Appearance
IntelliTrack® Consumable Inventory Guide
How to set up and run the IntelliTrack Consumable Inventory bundle: tenant settings, reports and dashboards, consumable items, inventory management, stock orders, receiving, picking and containers.
Chapter 1 - Consumable Inventory Bundle
Welcome to the Consumable Inventory bundle. This bundle contains the workflows that manage consumable inventory and orders.
Consumable Inventory Features
In the Consumable Inventory Bundle, you will find features to fully manage your consumable inventory tracking.
Inventory
Functionality around inventory includes the following:
- Inventory Add: Add an item quantity to inventory.
- Inventory Move: Move an item in inventory from one site-location to another.
- Inventory Adjust: Adjust the item quantity in inventory up or down.
- Inventory Unit of Measure Conversion: This feature applies when the item uses multiple units of measure. Let down inventory quantity from a higher unit of measure or roll up inventory quantity from a lower unit of measure.
Orders
Order functionality includes:
- Issues: perform stock issues to a customer.
- Receipts: perform stock receipts to a vendor.
- Return: perform stock return from a customer.
- Picking: perform item picks to a customer.
- Receiving: perform item receive from a vendor.
Consumable Inventory Terminology
The table below lists common IntelliTrack Consumable Inventory terms.
Common IntelliTrack Consumable Inventory Bundle Terms
| TERM | WORKFLOW | DEFINITION |
|---|---|---|
| Tenant | Bundle Setup | All data elements contained within a Tenant are segregated to that Tenant. In other words, data elements cannot be transferred or shared between Tenants. |
| Site | Location Setup | Site is the first tier of the organizational hierarchy. A Site belongs to a Tenant. Multiple sites can belong to one Tenant. Sites can be physical or logical units. |
| Location | Location Setup | Location is the second tier of the organizational hierarchy. A location belongs to a site and is stationary; it is often referred to as a "physical location" because it has a physical presence. Examples of a location could be a bin, rack, shelf, or closet. More than one location can belong to a Site. Locations cannot belong to more than one Site. |
| Sub-location | Location Setup | Each location can also have multiple sub-locations. To create a sub-location, enter the “Parent Location” field during the create location process. |
| Containers | Moveable Storage Setup | A container is a movable storage unit that resides in a physical location. Examples of a container include a toter or a shipping container. |
| Items | Item Setup | Items are physical goods or materials that the organization wishes to track. An item is unique to each Tenant. All item numbers and alternate item numbers must be unique within a Tenant. |
| Assignees | Site Contact Management | An Assignee is used with Consumable Inventory as a Site Contact. When a Site Contact is added, this "assignee" will receive inventory item recorder notification emails and inventory adjustment notification emails. |
| Consumable Inventory | Consumable Inventory Management | Consumable Inventory consists of physical items that are added to site-locations. Inventory may consist of items that are bought and resold, consumed in a production process (consumable), or used to create a new item or perform some other function in the organization. Inventory typically consists of items that exist in multiple quantities. |
Tenant Settings
To review the Settings for your Tenant, navigate to the Tenant Settings page. Select Management > Settings > Tenant Settings to reach this page. The Consumable Inventory bundle contains a number of settings for your Tenant. The settings govern:
- Inventory
- Orders
Inventory Settings
The tenant settings for inventory are managed from the Settings for Inventory page. Navigate to the Tenant Settings page and then select the Edit button for the Inventory option to reach the Settings for Inventory page.
Log Balance
When the Log Balance setting is enabled, the four-wall inventory count for an item will be calculated and logged in history as the quantity balance after an item transaction. The item transactions are:
- Add Item to Inventory
- Inventory Adjustment
- Physical Inventory (Mobile)
- Single Move
- Mass Move
- Let Down
- Roll Up
- Issue
- Receipt
- Return
- Pick
- Receive
Synopsis
Tracking the Log Balance quantity is a two-step process:
- Enabling the Log Balance setting.
- Adding the Balance column in the Item History page via the Manage Columns option, Balance
Enabling the Log Balance Setting
To enable history logging of the item quantity balance, refer to the steps below.
- From the Settings for Inventory page (Management > Settings > Tenant Settings > Inventory): enable the Log Balance setting.
- Going forward, for each applicable history record, the quantity balance for the item will be calculated and logged as the Balance Qty in history.
Viewing the Balance Quantity
Go to the Item History page (Insights > Item History).
Select the Manage Columns option.

The Manage Columns window appears. Mark the checkbox to the left of the Balance option.
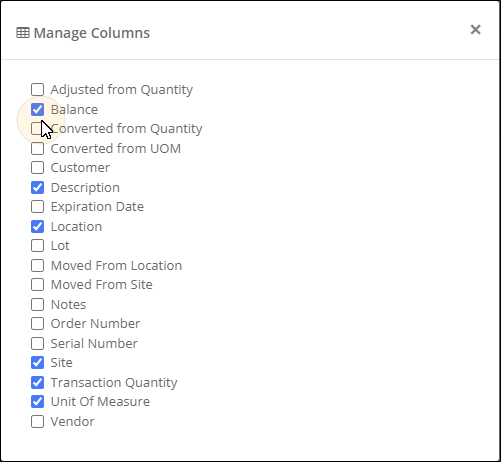
Close the Manage Columns window. You are returned to the Item History page. The Balance column is now included in the page.
If desired, "save a view" that includes the Balance column.
Select the View button.

The Save View popup appears.
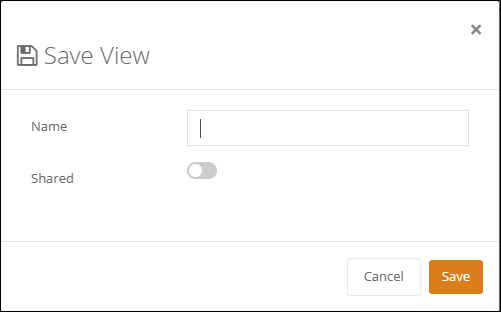
Name the View and save it.
The View is saved and available via the Select View drop-down list options.

A View may be configured to be the default page view via Select View > Configure. Fill in the Star to the left of the view by clicking on it to set the View as the default page view.
Unit Cost Tracking
Unit Cost Tracking for an item in IntelliTrack is determined by two settings:
- The Unit Cost Tracking Method for the Tenant, which is set in the Settings for Inventory page.
- The Track Unit Cost setting for the item, which is enabled at the item by way of the Track Unit Cost setting.
Using Unit Cost Tracking
Note
The item unit cost is tracked for the item by the item's unit of measure-each count.
When unit cost tracking is used for an item, the item unit cost will be required when the item is added to a Receipt Order, Return Order, and Receiving Order. The unit cost for an item is tracked for each item's unit of measure-each count.
Important
The Tenant must have a Unit Cost Method enabled AND the Item must have the Track Unit Cost setting enabled in order for the item's unit cost to be automatically tracked according during an item receipt, return, or receive.
Unit Cost Tracking Methods
IntelliTrack has four unit cost tracking methods. They are explained in the sections that follow.
Average
Select this method to enable average cost tracking for the Tenant. This means that when the Track Unit Cost setting is enabled for the item: the unit cost for this item unit of measure-each count will be averaged each time a unit cost for it is entered at item receipt, item return, and item receive. The item unit cost is updated with the average unit cost calculated for the item during item receipt/return/receive transactions in the current inventory using this formula:
Unit Cost Averaging Formula
(inventory quantity for the Tenant for the item unit of measure x the current unit cost) + (the incoming quantity for the item unit of measure x the incoming unit cost)
/ (current inventory quantity for the item unit of measure + incoming quantity for the item unit of measure)
Last
Select this method to enable last unit cost tracking for the Tenant. This means that when the Track Unit Cost setting is enabled for the item: the last unit cost entered at item receipt, item return, and item receive for the item unit of measure-each count will be recorded as the item unit cost.
Highest
Select this option to enable highest unit cost tracking for the Tenant. This means that when the Track Unit Cost setting is enabled for the item: the highest unit cost entered for the at item receipt, item return, and item receive is recorded as the item unit cost. When this unit cost tracking method is selected, the item unit cost is only updated when the most recently entered item unit cost for the item unit of measure-each count is higher than the recorded item unit cost.
Least
Select this option to enable the least unit cost tracking for the Tenant. This means that when the Track Unit Cost setting is enabled for the item: the least unit cost will be used as the item unit cost when Track Unit Cost is also enabled for the item. When this unit cost tracking method is selected, the item unit cost is only updated when the most recently entered item unit cost for the item unit of measure-each count is lower than the recorded item unit cost.
Enabling Item Unit Cost Tracking
To enable item unit cost tracking in the Tenant, please refer to the steps that follow.
Go to the Settings for Inventory page by selecting Management > Settings > Tenant Settings from the Blue Navigation / Menu Bar anchored along the left side of the IntelliTrack web page. The Settings for Inventory page appears.
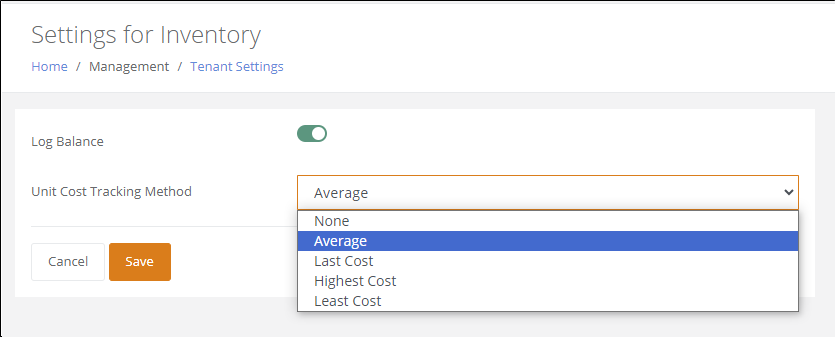
In the Unit Cost Tracking Method field, press the drop-down arrow and select the option that you want to use:
- Average
- Last
- Highest
- Least
Press the Save button to save this Unit Cost Tracking Method for the Tenant.
Going forward, the Tenant will use this cost tracking method WHEN the Track Cost setting is ENABLED for an item.
Important
When None is selected, Unit Cost Tracking is not enabled for this Tenant. This means that the Unit Cost will not be tracked for an item.
Enabling Unit Cost Tracking for an Item
When the Tenant has a Unit Cost Tracking Method set for Average, Last, Highest, or Least, IntelliTrack will track the item unit cost upon item receipt, return, or receive for each item unit of measure-each count WHEN the Track Unit Cost setting is enabled for the item. To enable the item for cost tracking, please refer to the steps that follow.
Select Management > Items > Items from the Blue Navigation / Menu Bar found along the left side of the page.
The Items page appears.
To add an item press the Add button above the grid to reach the Add Item page or to edit an item, locate the item in the list and press the Edit button in the Actions column to the right of this item to reach the Edit Item page for the item.
At the Add Item page or the Edit Item page, press the Details tab to bring this portion of the page to the front.
Enable the Track Unit Cost field so that Unit Cost Tracking is used for this item at Receipt, Return, or Receive.
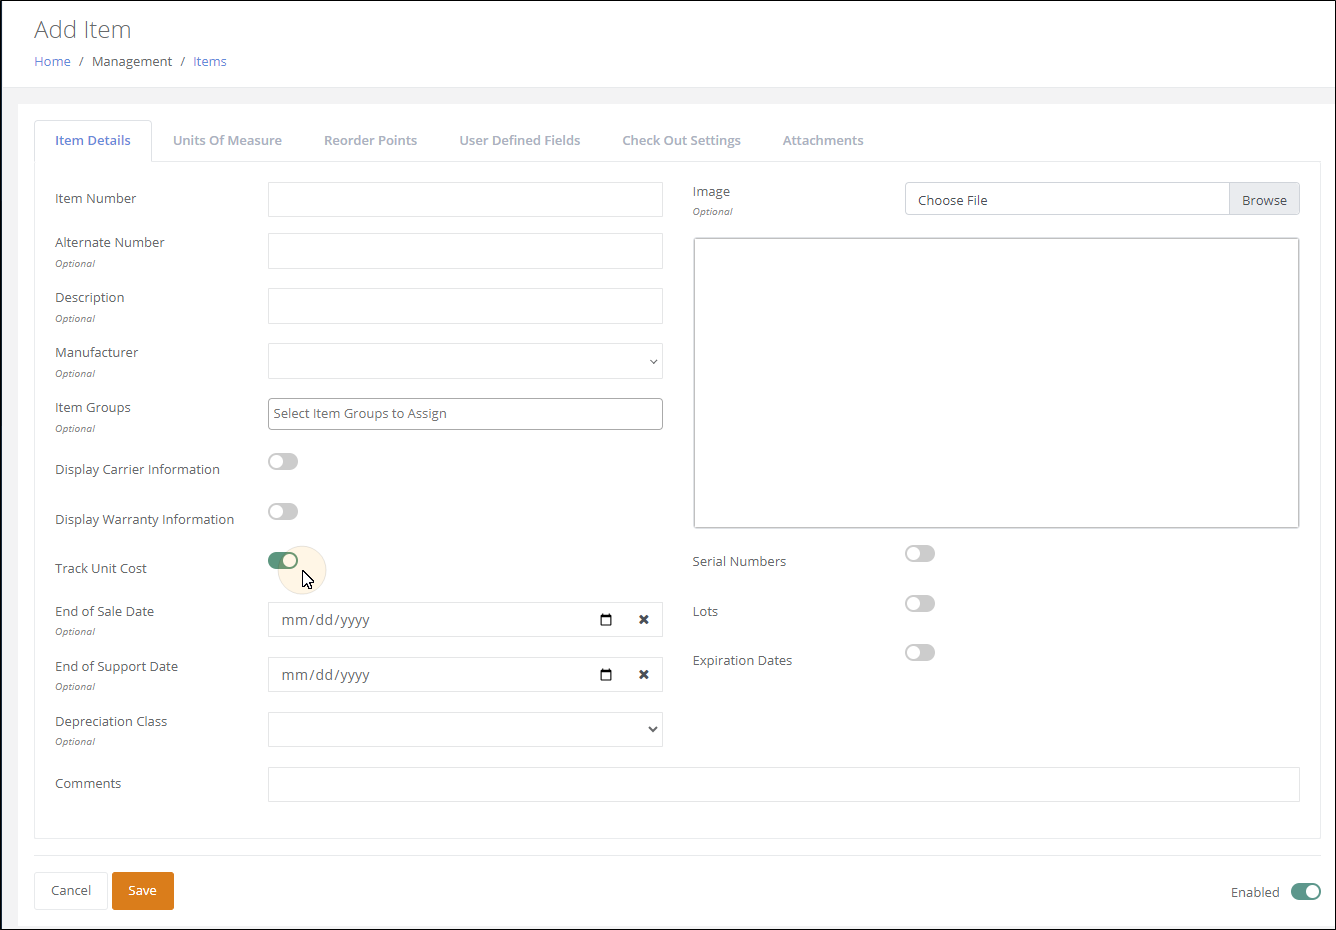
When this item is saved by pressing the Save button, this item will be enabled for unit cost tracking and will track the unit cost upon receipt, return or receive based upon the Unit Cost Tracking Method selected at the Settings for Inventory page.
- If you select the Average method, IntelliTrack will track and average the unit cost based upon the most recent unit cost entry.
- If you select the Last method, IntelliTrack will track and record the unit cost of the most recent order.
- If you select the Highest method, IntelliTrack will track and record the unit cost only if it is more than the current recorded unit cost.
- If you select Least method, IntelliTrack will track and record the unit cost only if it is less than the current recorded unit cost.
Checking the Item Unit Cost
When Unit Cost Tracking is used, the item's unit cost is updated and recorded for the item according to the unit cost method that Tenant uses. The unit cost for an item is tracked by each item's unit of measure-each count and it may be reviewed at the Edit Item page in the Unit of Measure tab.
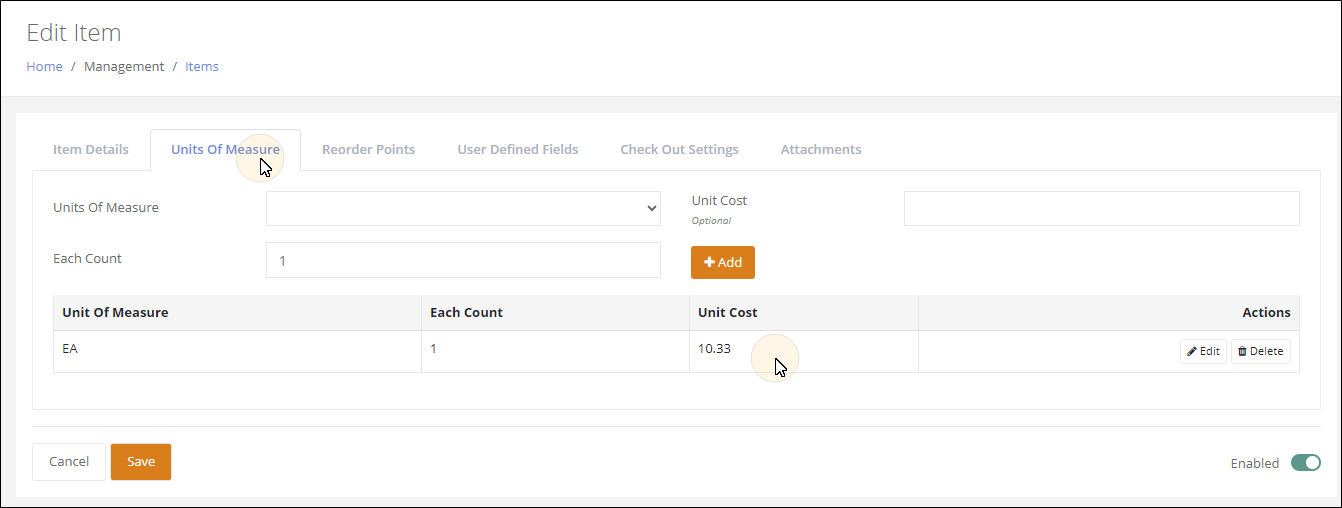
Entering the Item Unit Cost
When Unit Cost Tracking is used, the item's unit cost is required during an item stock receipt and stock return and an item receive during a receiving order in the Unit Cost field.

Disabling Unit Cost Tracking
Unit Cost Tracking for an item in IntelliTrack is disabled when the Unit Cost Tracking Method for the Tenant is set to None.
Note
When Unit Cost Tracking Method for the Tenant is disabled, the Item Unit Cost may be added for each item unit of measure-each count for the item. However, the Unit Cost will not be updated automatically during an item receipt, return, or receive. It will only be updated when manually updated at the Edit Item page \ Unit of Measure Tab for the item.
Receiving and Picking Order Settings
Select the Edit button for the Receiving and Picking Order option to reach the Settings for Receiving and Picking Order page.
Receiving and Picking Order Settings
The Settings for Receiving and Picking Order govern order auto-numbering and line auto-numbering.
- Order Auto-Numbering
- This setting is enabled in the Tenant by default. When it is enabled, the order number is automatically entered by the system.
- Next Order Number
- Used when Order Auto-Numbering is enabled. The Order Number is automatically incremented based upon this setting.
- The default entry for Receiving Orders is 40000.
- The default entry for Picking Orders is 50000.
- Order Number Prefix
- Used when Order Auto-Numbering is enabled.
- The default entry for Receiving Orders is RCV.
- The default entry for Picking Orders is PCK.
- Auto Line-Numbering
- This setting is enabled in the Tenant by default. When it is enabled, the line number is automatically entered by the system.
- Start At: Used when Auto Line-Numbering is enabled. The line number for an order will start with this value. The default entry is 10.
- Increment By: Used when Auto-Line Numbering is Enabled. The line number will increment by this value. The default entry is 10.
Stock Order Settings
Select the Edit button for the Stock Order option to reach the Settings for Stock Order page.
Stock Order Settings
The settings for stock orders govern order numbering.
- Order Auto-Numbering: Enabled by default.
- Next Order Number: When Order Auto-Numbering is enabled, the order numbers are automatically incremented based upon this setting.
- The default entry for Issue Orders is 10000.
- The default entry for Receipt Orders is 20000.
- The default entry for Return Orders is 30000.
- Order Number Prefix:
- The default entry for Issue orders is IS.
- The default entry for Receipt orders is RC.
- The default entry for Return order is RT.
Inventory Site Setting
When a Site does not use the Auto-Update Inventory Quantity setting, a separate Inventory Quantity for the item may be maintained at the Site. This typically occurs when a Physical Inventory is performed via the Mobile Client.
Setting Up a Site to Use Inventoried Quantity
A Site may be set to use the Inventoried Quantity feature by Disabling the Auto-Update Inventory Quantity setting. This setting may be disabled from the Add Site page or the Edit Site page.
- Select Management > Locations > Site from the menu bar.
- Select the Add button to add a new site, or the Edit button for a Site that already exists.
- From either the Add Site page or the Edit Site page, you will see a setting: Auto-Update Inventory Quantity. This setting is Enabled by default. Disable this setting if you want the Site to capture and maintain a separate Inventory quantity. When you Save the Site, with this setting Disabled, a separate Inventory Quantity will be maintained for this Site at the Inventory page when you add this item to inventory via a Physical Inventory transaction. You will also have the option to add a separate Inventory Quantity at this Site when you perform an Adjust transaction in the web application.
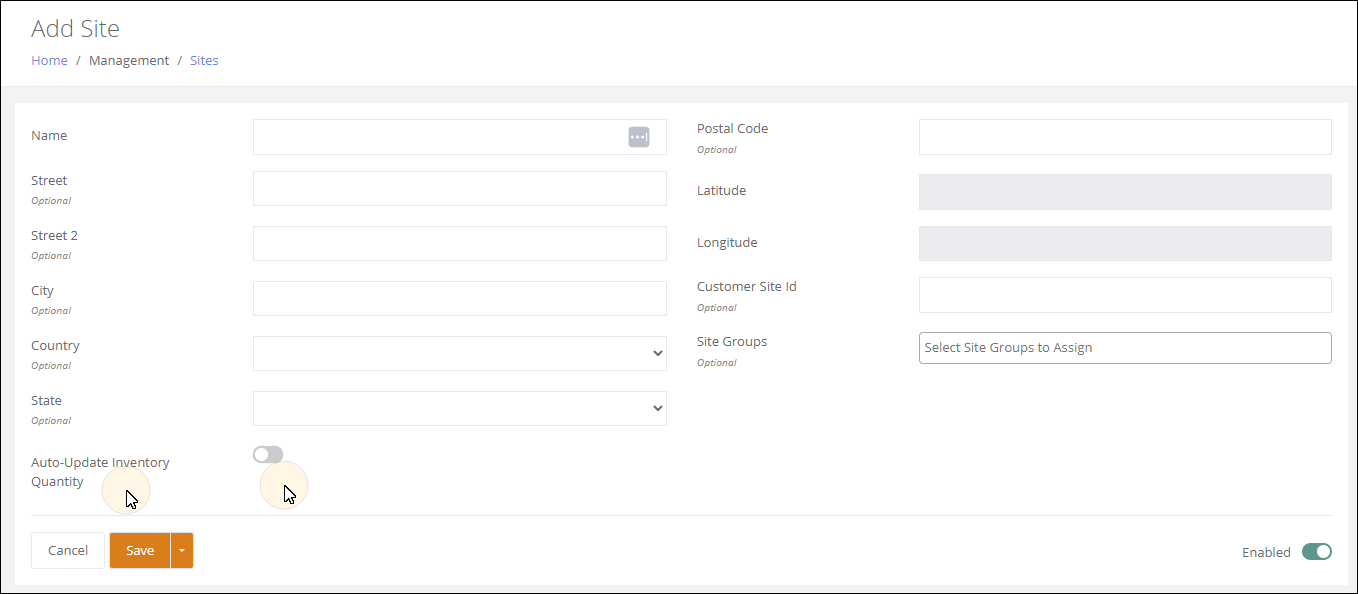
Site Contact
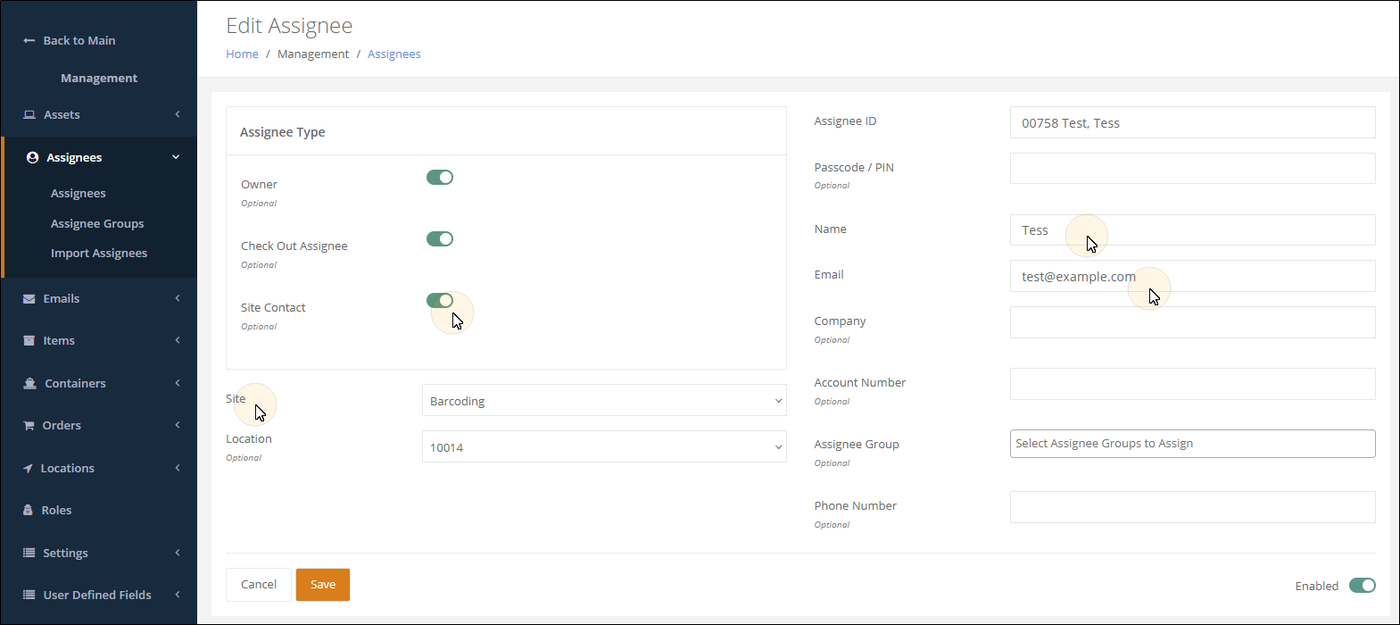
An Assignee is used with Consumable Inventory Management in IntelliTrack. It functions as a Site Contact. The assignees are displayed for the Tenant at the Assignees page.
Assignee Type
- Site Contact: the contact for a site; this assignee is associated with a Site and can be referenced at the Site level by name and email address. To be eligible to be a site contact, the Site Contact setting must be enabled for the Assignee.
Note
Enabling a Type for an Assignee is optional. However, if an Assignee does not have a type, the Assignee with be ineligible for use in IntelliTrack. Part of Assignee Management is enabling the Assignee Type.
Managing Assignees
Note
Admin access is required to create, edit, or delete an assignee.
Assignees are managed at the Assignees page
Select Management > from the Home menu bar.
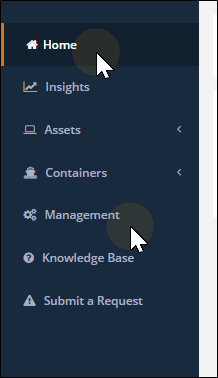
The Management menu options appear. Select Assignees > Assignees from the Management menu bar. The Assignees page appears.
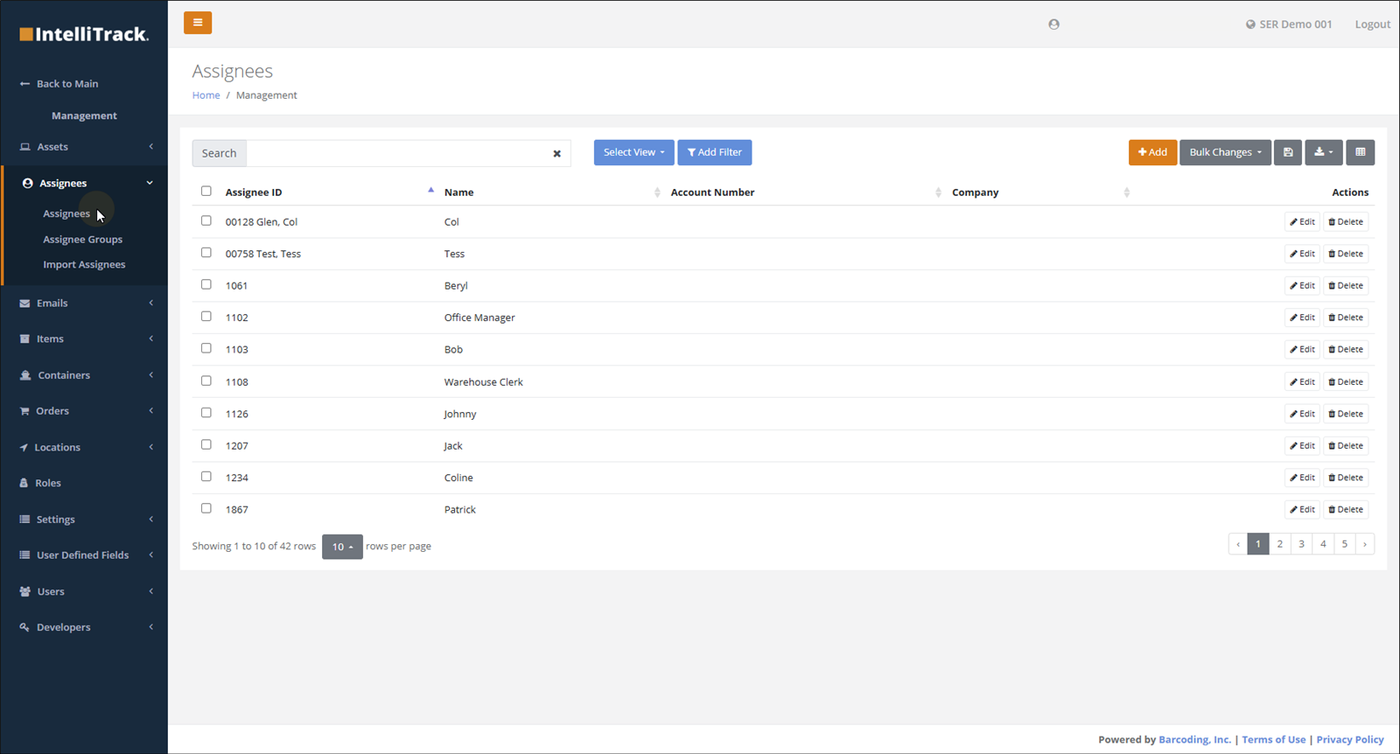
Note
To add, edit, or delete an Assignee, Administrator access is required.
Adding a Site Contact
When you add a Site Contact Assignee, the following fields are required for the Assignee:
- Assignee Name
- Site
- Name
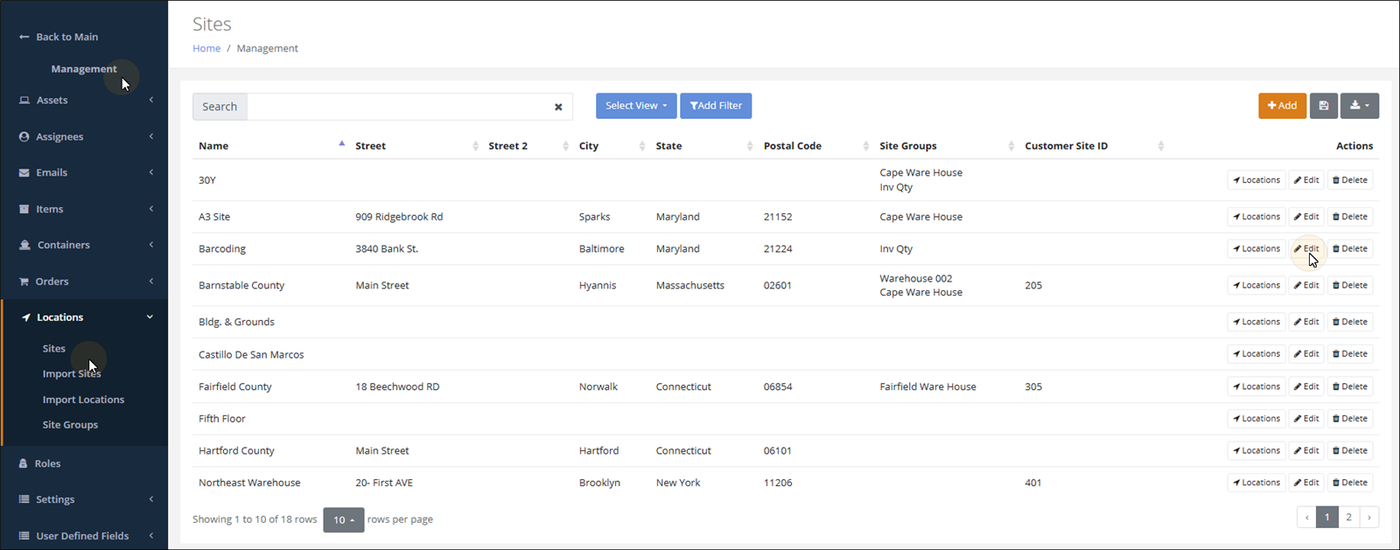
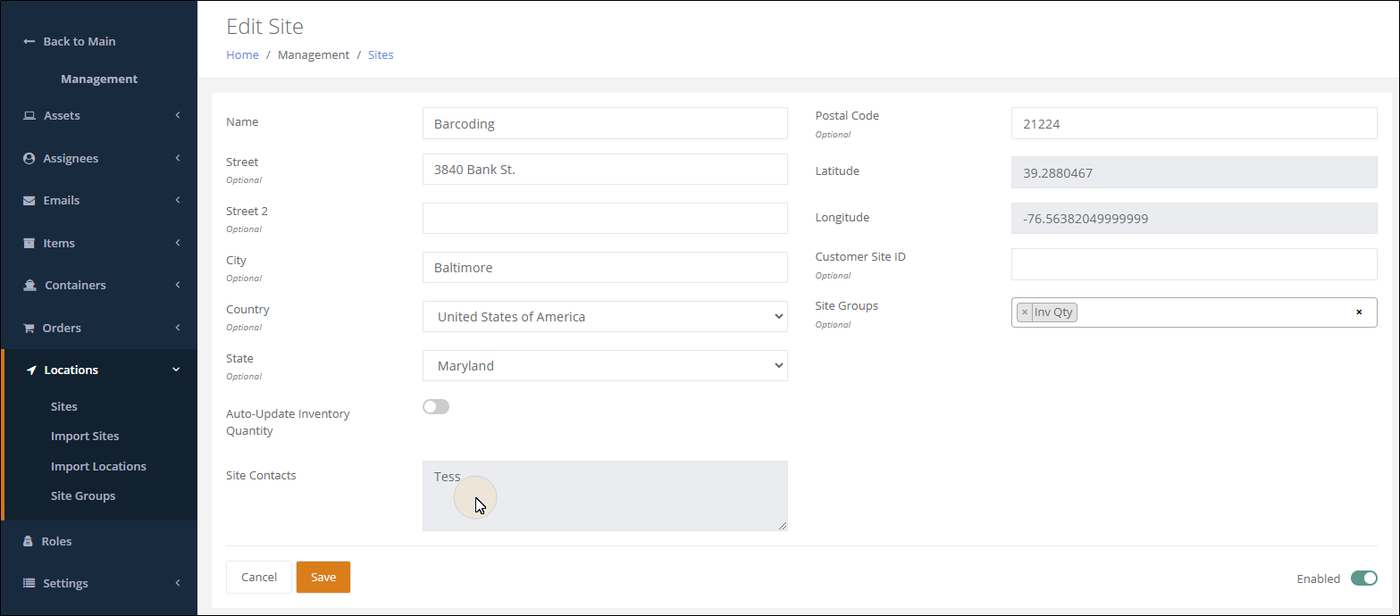
The Site Contact's information is displayed at the Edit Site page (Management > Locations > Site > Edit).
Subscriptions
A Create Subscription option is available at many pages. This option allows you to subscribe to a page view. When you subscribe to a page view, the data from the page view is exported into a CSV file and sent to you via an email attachment on a user-selectable day of the week and / or day of the month.
Setting Up a Subscription
To set up a Subscription to a page, refer to the steps that follow.
At the top right of the page, click the Download button.
Click the drop-down arrow and select the Create Subscription option.
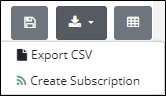
The Create Subscription popup appears.
Enter the Name for your subscription in the Name field.
Schedule when you want to receive the Subscription to this report. To schedule it weekly, select the Weekly tab to bring it to the front and mark the checkbox to the left of the Day of the week that you want to receive the email. To schedule a Monthly subscription, select the Monthly tab to bring this portion to the front and select a day of the month from 1-31.
Managing Subscriptions
Subscriptions are managed at the Subscriptions page. At the Subscriptions page, you may view your Subscription information. Each Subscription is listed along with its schedule summary. If you no longer want to receive a Subscription, you have the option to Delete it.
You have two ways to reach the Subscriptions page:
- User Profile page
- Insights page
Refer to the steps that follow to reach the Subscriptions page from your User Profile page.
- To reach your User Profile page, select your username found in the upper right corner of the page.
- The User Profile page appears.
- From the Subscriptions field, press the Manage button.
- The Subscriptions page appears.
Refer to the steps that follow to reach the Subscriptions page from the Insights page.
- Select Insights from the Main menu.
- Select the Subscriptions button found to the right, above the page's grid.
- The Subscriptions page appears.
Chapter 2 - Insights
The system provides you with data insights at the Insights page (Main > Insights).
Favorite Insights
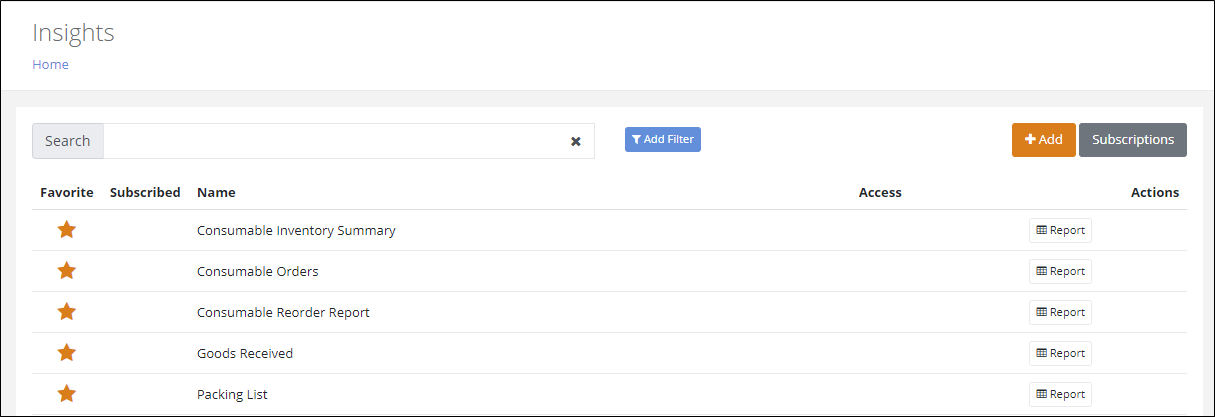
When a Report or Dashboard is marked as a “Favorite” at the Insights page, a link to this page is created at the Home page.
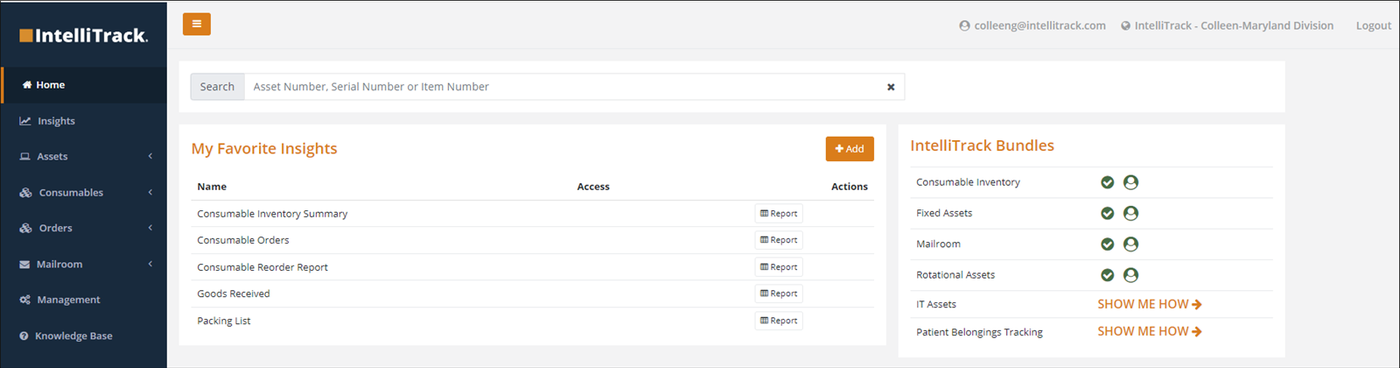
The Home page link is placed in the My Favorite Insights area of the page.
Page View
The Consumable Inventory bundle has system created views at the Consumable Orders page and the Inventory page. They are designed to give you specific information about specialized data insights. You may also use the Add Filter tool and the Manage Columns tool to create your own View or Views to glean specific information about your data.
System Page View
You will find system-created page views at the following pages:
System Created Views
| Page | System View Name |
|---|---|
| Consumable Orders | Issues |
| Consumable Orders | Receipts |
| Consumable Orders | Return |
| Inventory | Inventory by Item Groups |
| Inventory | Inventory by Location |
User Created Page View
You may create a specific Page View at a main list page in IntelliTrack by using the Add Filter dialog to query the page data and, when available at the page adding or removing optional columns via the Manage Columns window. This allows you to derive the data you need. A View may then be saved for future use or designated as the default view for the page.
Note
Ideal page candidates for a User Created View are any of the Insight pages and the Inventory page.
Adding Filters
Each main list page in the application has an Add Filter dialog. It provides the ability to query page data by a field value. Filtering page data allows you to display only the records that meet certain criteria.
Add Filter Dialog Query Options
| Query | Query Description | Example |
|---|---|---|
| Begins With | Only retrieves data for the field that begins with the exact criteria. | For example, to only retrieve data that begins with D1, select the Begins With query and enter D1 in the Value field. |
| Contains | Retrieves data for the field that is found in the criteria. | For example, to only retrieve data that contains 5, select the Contains query and enter 5 in the Value field. |
| Does Not Equal | Only retrieves data that doesn’t equal the criteria. | For example, To exclude data that contains a specific value, select the Does Not Equal query and then enter the criteria in the Value field. Data that does not match this criteria is excluded. |
| Ends With | Only retrieves data that ends with this exact criteria. | For example, enter 01 in the Value field. Only data that ends with 01 is displayed. |
| Equals | Only retrieves data that is equal to this criteria. | For example, to retrieve data that equals 1000, select the Equals query and enter the criteria value in the Value field. Only data for the selected field that equals 1000 is displayed in the column. |
To add a filter to the page:
Select the Add Filter button that is found above the page's list of data.
The Add Filter dialog appears.
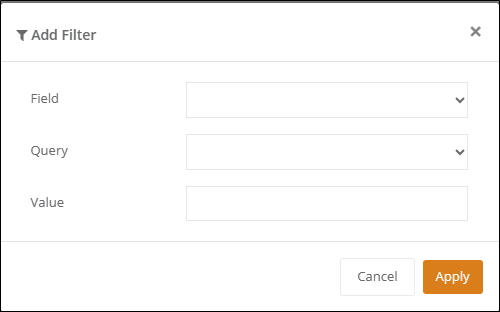
Field: Click the drop-down list to select the field for querying.
Query: Click the drop-down list to select the query to apply (see "Adding Filters").
Value: enter the Query value.
Press the Apply button to apply the query to the page.
Manage Columns
At some list pages, a Manage Columns window is also available. It allows you to add and remove optional columns to or from the page.
The Manage Columns icon, which is found above the Actions column, is available at a page when this feature is found there.
Click or press the Manage Columns icon to open the Manage Columns window.
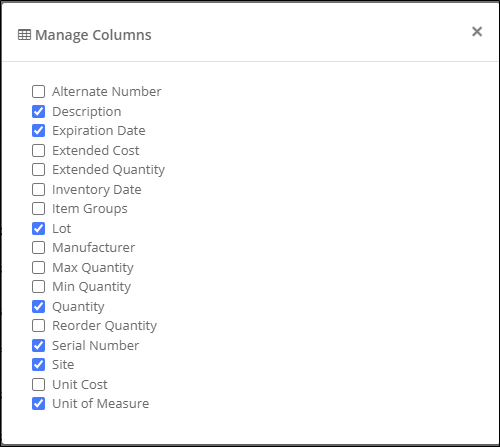
To remove an optional field from the page, unmark the checkbox to the left of the field.
Once removed, a field may be added back to the page by marking the checkbox to the left of the field.
Required Fields
The required fields may NOT be removed from the page and they are NOT part of the Manage Columns options.
Saving a View
When your view is configured on the page via filters and columns, it is ready to be saved as a View. To save a View, refer to the steps below.
To save a view, press the Save View button along the top of the page.
The Save View dialog appears.
Enter the name of the view in the Name field.
Mark the Shared button if you want this view to be available to all Users in the tenant.
Press the Save button. The Save View dialog closes.
You are returned to the page.
The View is saved. This means that you can select it again.
Selecting a View
To select a View, refer to the steps below.
To select a View that you have saved, press the dropdown arrow in the Select View button. A list of saved views appears.
Select the View that you want to load onto the page. A check mark appears to the left of the View.
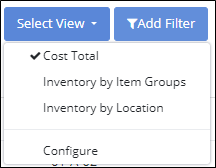
The list closes and the View loads onscreen.
Configure Options for the View
Configure options for the view include:
- Set a View as the Default.
- Delete a View that you have created.
Setting a View as the Page Default View
To set a saved view as the page default view, refer to the steps that follow.
From the Select View button, press the drop-down arrow.
Select the Configure option.
A Configure popup appears.
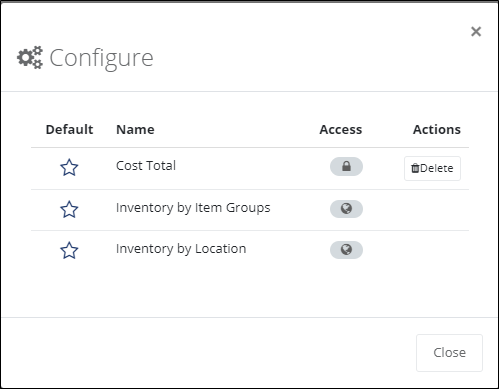
Mark the Star to the left of the view. The Star turns Gold.
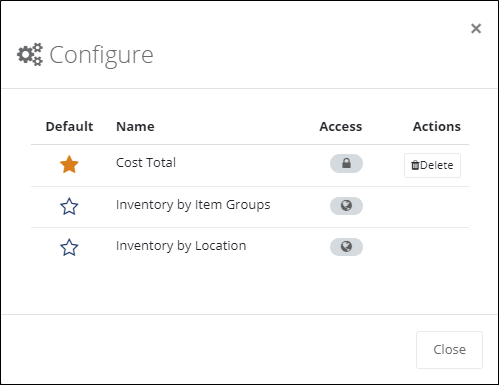
Close the Configure popup.
Refresh the page.
The selected View appears; it is now the default view. This means that each time you load this page, this View is loaded.
Note
To reset the page view: Select the Star to the left of the view. The Star's Gold fill color is removed. You may now select another view or revert back to the default view. The new View setting will be applied the next time you load the page.
Deleting a Page View
Note
A system-created page view may not be deleted.
Important
A view may be deleted by the creator of the view.
To delete a saved view, refer to the steps that follow:
From the Select View button, press the drop-down arrow.
Select the Configure option.
A Configure popup appears.
The Delete option is available for any view that the logged-in user has created.
Press the Delete button to delete a saved View.
Item History
The Item History page (Insights > Item History > Report) displays consumable item history transactions. The following transactions are tracked:
- Inventory Adjustment
- Issue
- Item Added to Inventory
- Item Created
- Item Deleted
- Item Edited
- Let Down
- Move
- Physical Inventory
- Pick
- Receipt
- Receive
- Return
- Roll Up
Page View
The following features are available for customizing the data at this page; see "Page View" for more information.
- Manage Columns: use to add / remove optional fields.
- Add Filter: use to filter the data in the report by specific fields.
- User Created Page View: create and save Views.
Data Export
You are able to export the page data to a CSV file; see "Exporting Page Data"
Consumable Inventory Summary
The Consumable Inventory Summary page (Insights > Consumable Inventory Summary > Report) shows the following information for all inventory in the Tenant:
- Site
- Item number
- Description
- Alternate number
- Total Unit of Measure Quantity
- Unit cost
- Total cost
- Extended Quantity (optional field, available via the Manage Columns option)
Page View
The following features are available for customizing the data at this page; see "Page View" for more information.
- Manage Columns: use to add / remove optional fields.
- Add Filter: use to filter the data in the report by specific fields.
- User Created Page View: create and save Views.
Data Export
You are able to export the page data to a CSV file; see "Exporting Page Data"
Consumable Inventory Variance
The Consumable Inventory Variance Report is used when a separate Inventory Quantity is captured for the site inventory. It displays any discrepancies between the quantity field and the inventory quantity field for items inventoried at the site.
Note
The Auto-Update Inventory Quantity setting must be disabled for the Site in order for a separate inventory quantity to be captured for the item in inventory. Please see "Inventory Site Setting" for more information.
This report displays the information by:
- Site
- Location
- Item Number
- Description
- Unit of Measure
- Quantity
- Inventory Quantity
- Inventory Date
- Variance
- Unit Cost
- Cost Variance
Page View
The following features are available for customizing the data at this page; see "Page View" for more information.
- Manage Columns: use to add / remove optional fields.
- Add Filter: use to filter the data in the report by specific fields.
- User Created Page View: create and save Views.
Data Export
You are able to export the page data to a CSV file; see "Exporting Page Data"
Consumable Orders
The Consumable Orders report shows consumable order history by order transaction:
- Issue
- Receipt
- Return
- Receive
- Pick
The Consumable Orders Report shows these fields by default:
- Order Number
- Customer
- Item Number
- Site
- Location
- Unit of Measure
- Serial Number
- Lot
- Expiration Date
- Transaction Quantity
- Transaction Date
Manage Columns Options
The Manage Columns feature allows you to add or remove optional fields to this page. The fields included in the Manage Columns are:
| Option | Description |
|---|---|
| Actual Quantity | Associated with Receiving and Picking Orders; it is quantity of the transaction that has been already received or picked. |
| Carrier | Carrier associated with the Picking Order. |
| Customer | Customer associated with the Issue, Return, and Picking Order. |
| Customer Address | Main customer address associated with the Issue, Return, and Picking Order customer. |
| Description | Description of the item. |
| Due Date | Receiving Order and Picking Order Due Date. |
| Expiration Date | Expiration Date for an item that uses expiration dates. |
| Item Groups | Item Group or Item Groups associated with the item. |
| Location | Location of the item for the Issue, Receipt, Return, Receive, and Pick transaction. |
| Lot | Lot for an item that uses lots. |
| Notes | Note entered for the Order Line Item. |
| Order Date | Order Creation Date. |
| Order Status | The Order Status is associated with a Receiving Order or a Picking Order. It is either Open or Closed. |
| Order Type | Type of the Order: Issue, Receipt, Return, Receiving, Picking. |
| Order UDF 1 | User defined field 1 associated with the order. |
| Order UDF 2 | User defined field 2 associated with the order. |
| Order UDF 3 | User defined field 3 associated with the order. |
| Order UDF 4 | User defined field 4 associated with the order. |
| Order UDF 5 | User defined field 5 associated with the order. |
| Order UDF 6 | User defined field 6 associated with the order. |
| Ordered Quantity | Order quantity for the item in a Receiving Order and in a Picking Order. |
| Serial Number | Serial Number for the item that uses serial numbers. |
| Shipping Address | Customer Shipping address or addresses associated with Issue Order, Return Order, and Picking Order. |
| Shipping Method | Carrier's Shipping Method associated with a Picking Order. |
| Site | Site of the Item Transaction for the item Issue, Receipt, Return, Receive, and Pick transaction. |
| Total Cost | Extended cost of the item that has been issued / picked (Issue and Pick transaction), and received (Receipt and Receive, Return transactions). |
| Transaction Date | Date the item was issued / pick (Issue and Pick transactions) and received (Receipt, Return, and Receive transactions). |
| Transaction Quantity | Amount of the in the Issue, Receipt, Return, Receive, or Pick transaction. |
| Unit Cost | Item unit cost per unit of measure. |
| Unit of Measure | The name of the counting unit of the item. |
| Vendor | The Vendor associated with the Receipt Order or the Receiving Order. |
| Vendor Address | The address for the Receipt Order Vendor or the Receiving Order Vendor. |
Print Option
The Print option will print this report with item barcodes.
Select the Print button.

The Print window appears. Each order line is listed. A barcode is generated for the item.
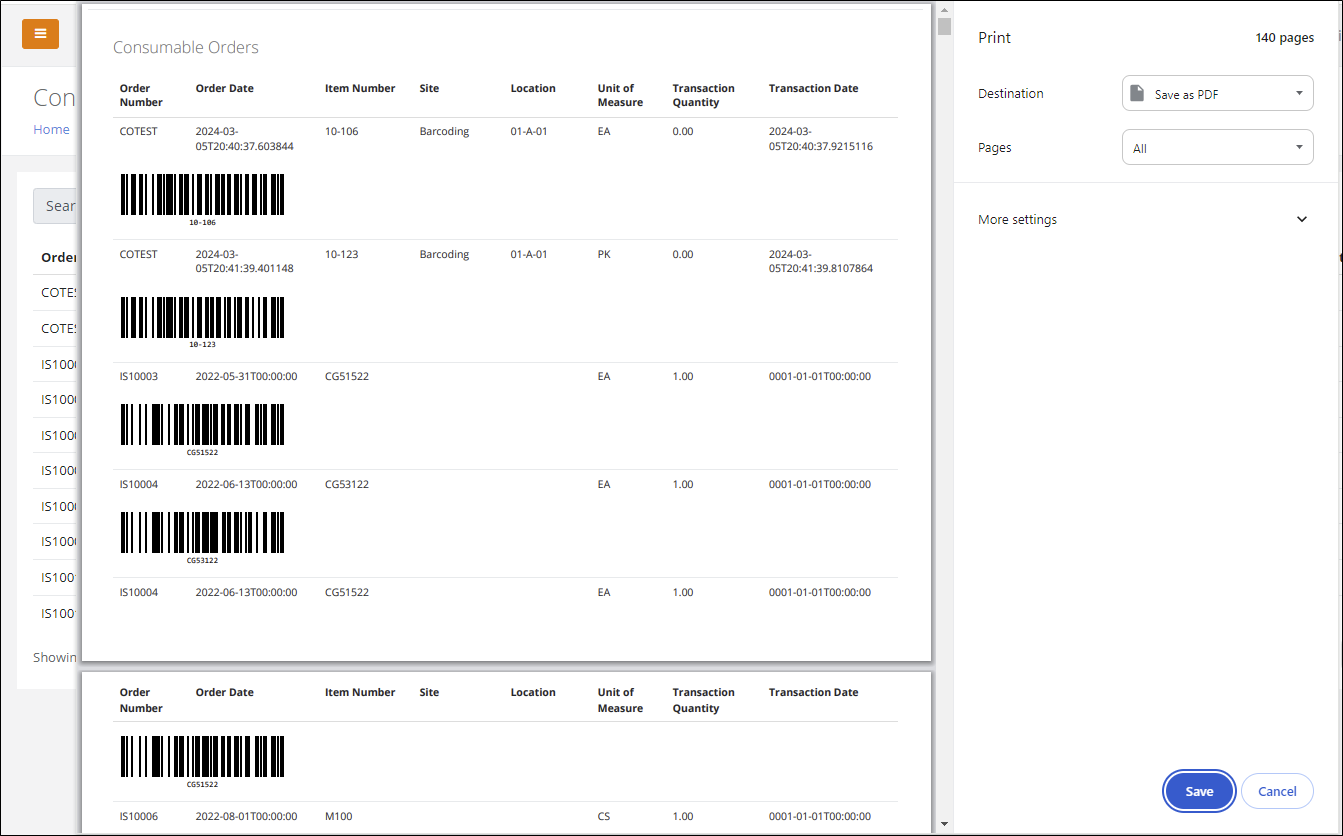
The report may be saved to a PDF or sent to a printer.
Page View
The following features are available for creating a View at this page; see "Page View" for more information.
- Manage Columns: use to add / remove optional fields.
- Add Filter: use to filter the data in the report by specific fields.
- User Created Page View: create and save Views.
System Views / Consumable Orders Page
The following system views are at the Consumable Orders page: Issues, Receipts, and Returns. These View options filter out the other order types to give you a View for each specific order type, as selected.
Data Export
You are able to export the page data to a CSV file; see "Exporting Page Data"
Consumable Reorder Report
The Consumable Reorder Report is a valuable tool in establishing site inventory that needs to be replenished.
Important
It is necessary to set Item-Site Reorder Points for item reorder data to populate the Consumable Reorder Report. Please see "Item Reorder Points" for more information.
Item Reorder Points for the Site
In order for the Consumable Reorder Report to track reorder information, an item must use Site-Item Reorder Points. They are set for the item at the Add Item or Edit Item page in the Reorder Points tab. To add Reorder Points to an item, see "Item Reorder Points" for more information.
Consumable Reorder Report
When a site-item-quantity in inventory falls below the minimum quantity set for the site-item, the item is added to the Consumable Reorder Report page (Insights > Consumable Reorder Report > Report).
The following information is displayed for an item that needs to be reordered:
- Site
- Item Number
- Description
- Alternate Number
- Total Quantity
- Min Quantity
- Max Quantity
- Reorder Quantity
- Unit Cost
- Total Cost
Page View
The following features are available for customizing the data at this page; see "Page View" for more information.
- Manage Columns: use to add / remove optional fields.
- Add Filter: use to filter the data in the report by specific fields.
- User Created Page View: create and save Views.
Data Export
You are able to export the page data to a CSV file; see "Exporting Page Data"
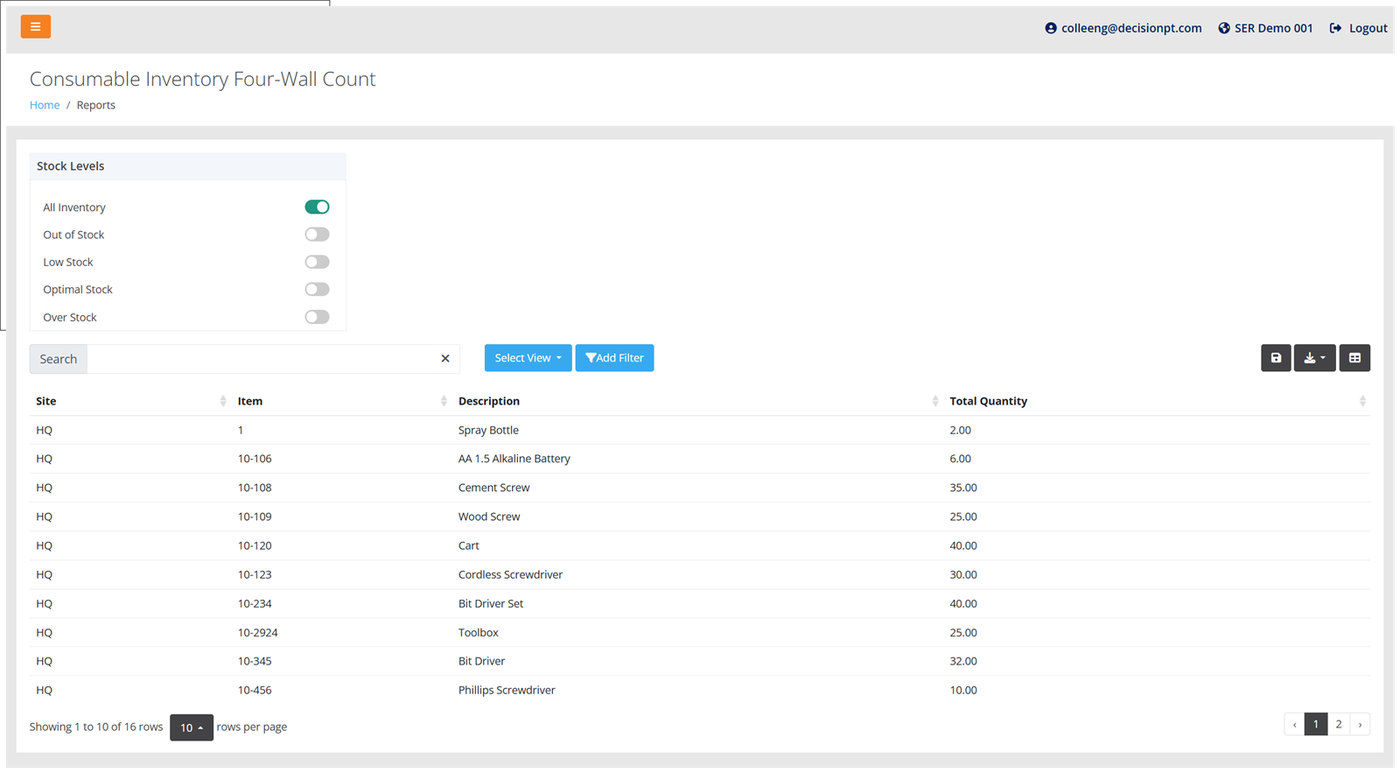
Consumable Four-Wall Count
This report enables Users to view the Total Sum Quantity for Inventory across all Units of Measure by Site and by Item.
Page View
The following features are available for customizing the data at this page; see "Page View" for more information.
- Manage Columns: use to add / remove optional fields.
- Add Filter: use to filter the data in the report by specific fields.
- User Created Page View: create and save Views.
Data Export
You are able to export the page data to a CSV file; see "Exporting Page Data"
Goods Received
The Goods Received Report will produce a printed good received list for a vendor order:
- Receipt Order
- Receiving Order
The printed Goods Received report shows the Receipt and Receive transactions for an item. The Report may be sorted Order Number so that all transactions for an order are grouped together.
Printing a Goods Received List for a Specific Order
To print a Goods Received list for a full Receipt order or Receiving order, use the Add Filter dialog to filter the Goods Received list by a specific Order Number.
To add a filter to the page:
Select the Add Filter button that is found above the page's list of data.
The Add Filter dialog appears.
Field: Click the drop-down list to select the Order Number field for querying.
Query: Click the drop-down list to select the query to apply (see "Adding Filters").
Value: enter the Query value.
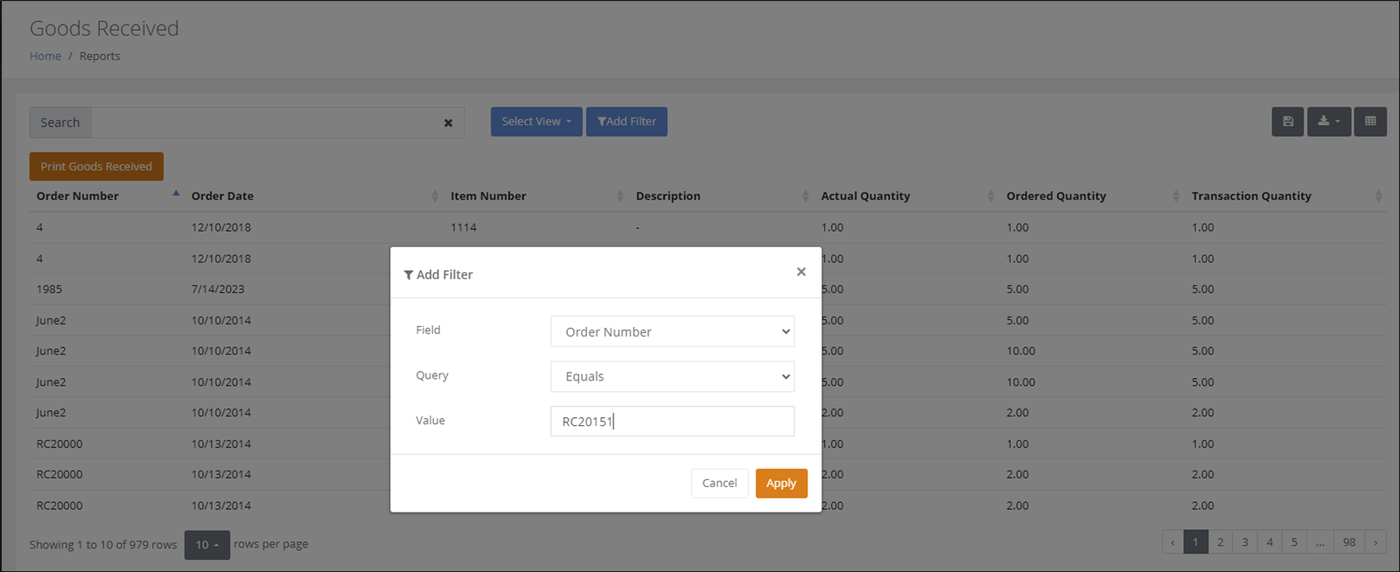
Press the Apply button to apply the query to the page.
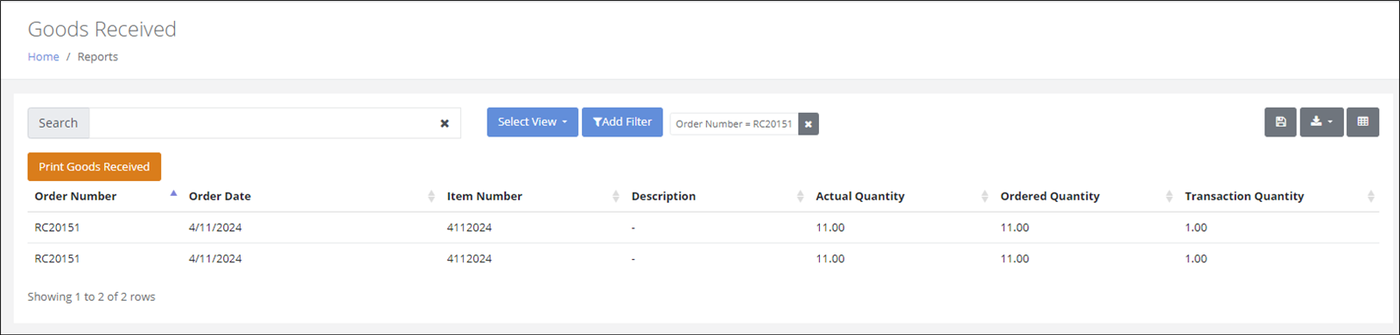
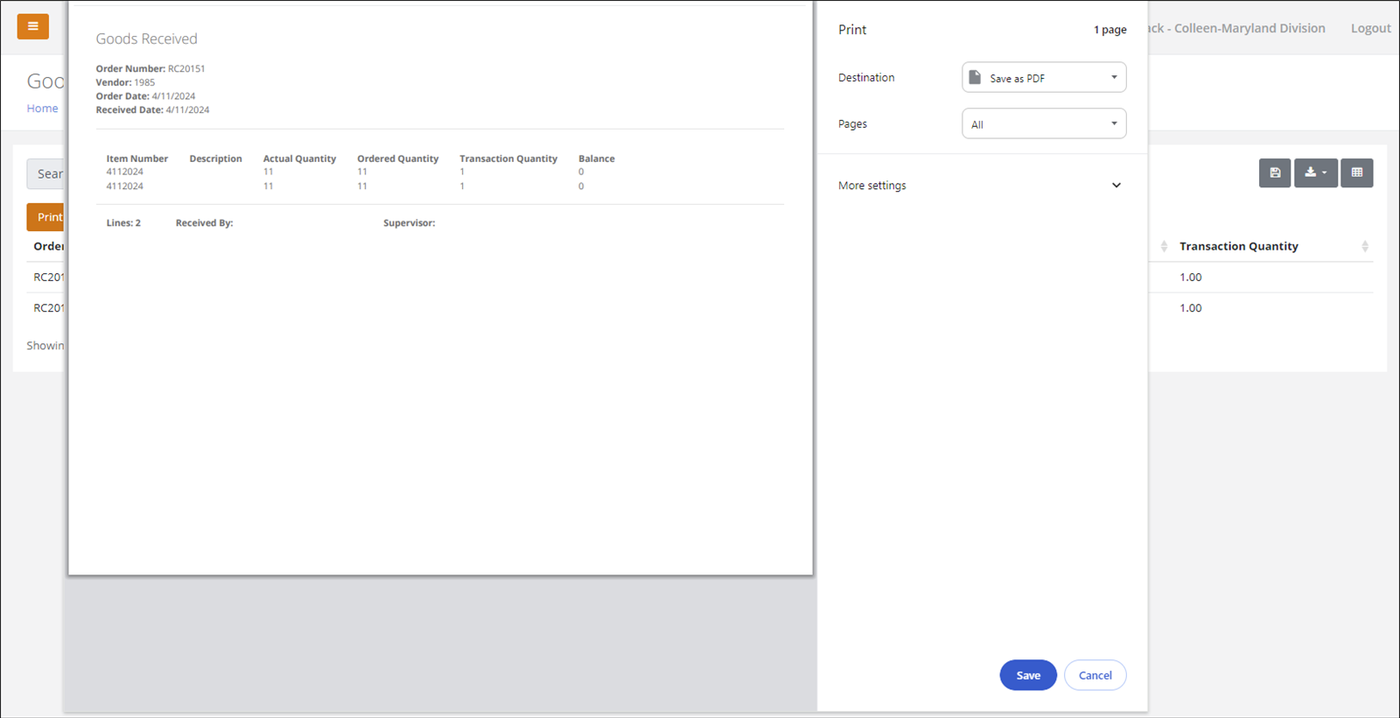
Press the Print Goods Received button.
A Print window loads onscreen. The Goods Received list is ready to be sent to the desired printer.
Note
The Goods Received report may also be exported to a CSV file. The Manage Columns feature is also available for customizing the report details.
Page View
The following features are available for customizing the data at this page; see "Page View" for more information.
- Manage Columns: use to add / remove optional fields.
- Add Filter: use to filter the data in the report by specific fields.
- User Created Page View: create and save Views.
Data Export
You are able to export the page data to a CSV file; see "Exporting Page Data"
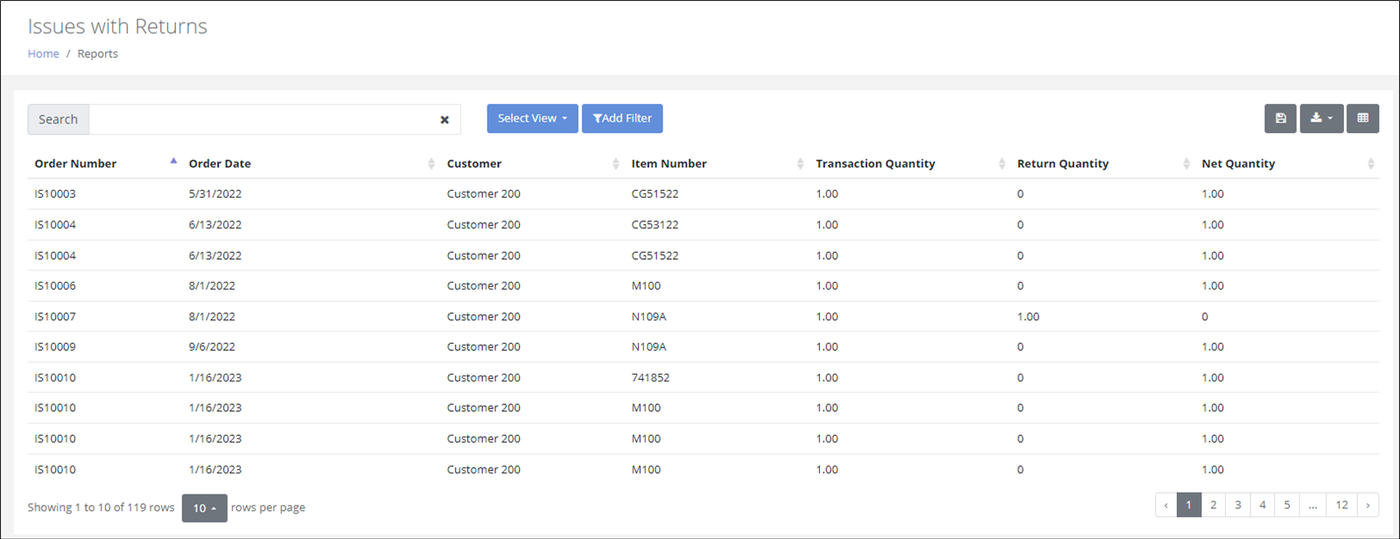
Issues with Returns
The Issues with Returns Report shows the amount of items issued, the amount of items returned, and the net of items issued-returned when a return order referenced to an issue order has been submitted.
Note
The report is most helpful for a Return order that has been referenced to an Issue order. Please see "Return / Issue Reference" for more information.
Page View
The following features are available for customizing the data at this page; see "Page View" for more information.
- Manage Columns: use to add / remove optional fields.
- Add Filter: use to filter the data in the report by specific fields.
- User Created Page View: create and save Views.
Data Export
You are able to export the page data to a CSV file; see "Exporting Page Data"
Packing List
The Packing List Report will produce a printed packing list for an outbound customer order:
- Issue Order
- Picking Order
The printed Packing List report shows the Issue and Pick transactions for an item. The Report may be sorted by Order Number so that all transactions for an order are grouped together.
Printing a Packing List for a Specific Order
To print a Packing List list for a full Issue order or Picking order, use the Add Filter dialog to filter the Packing List list by a specific Order Number.
To add a filter to the page:
Select the Add Filter button that is found above the page's list of data.
The Add Filter dialog appears.
Field: Click the drop-down list to select the Order Number field for querying.
Query: Click the drop-down list to select the query to apply (see "Adding Filters").
Value: enter the Query value.
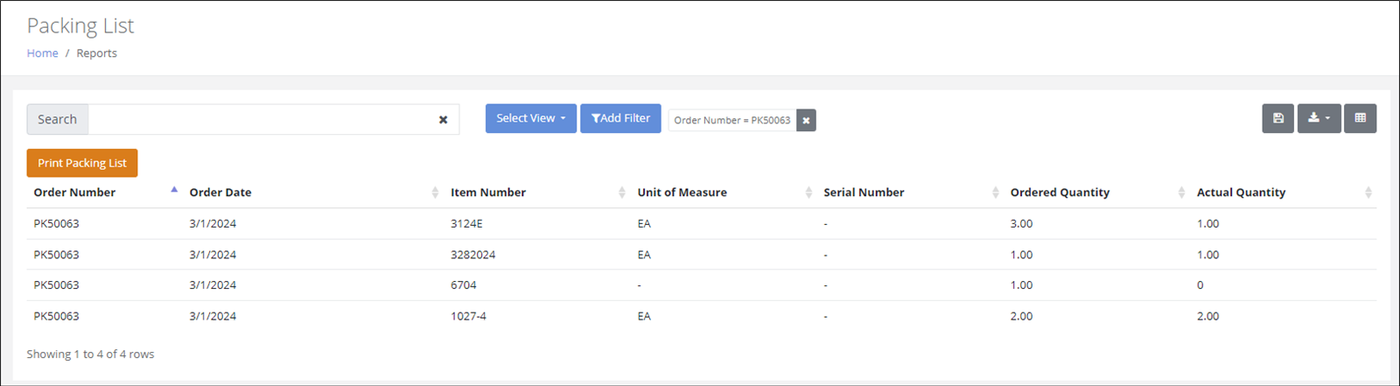
Press the Apply button to apply the query.
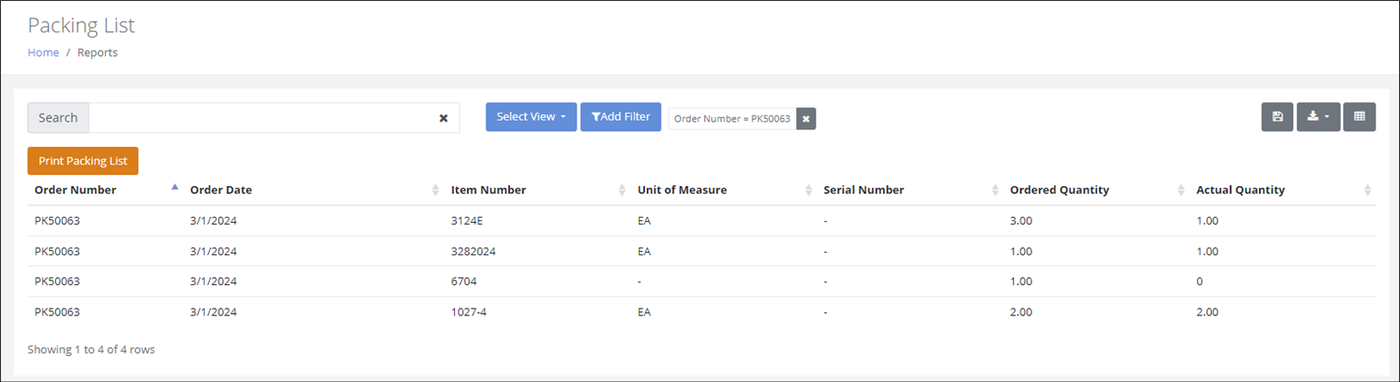
Press the Print Packing List button.
A Print window loads onscreen. The Packing List is ready to be sent to the desired printer.
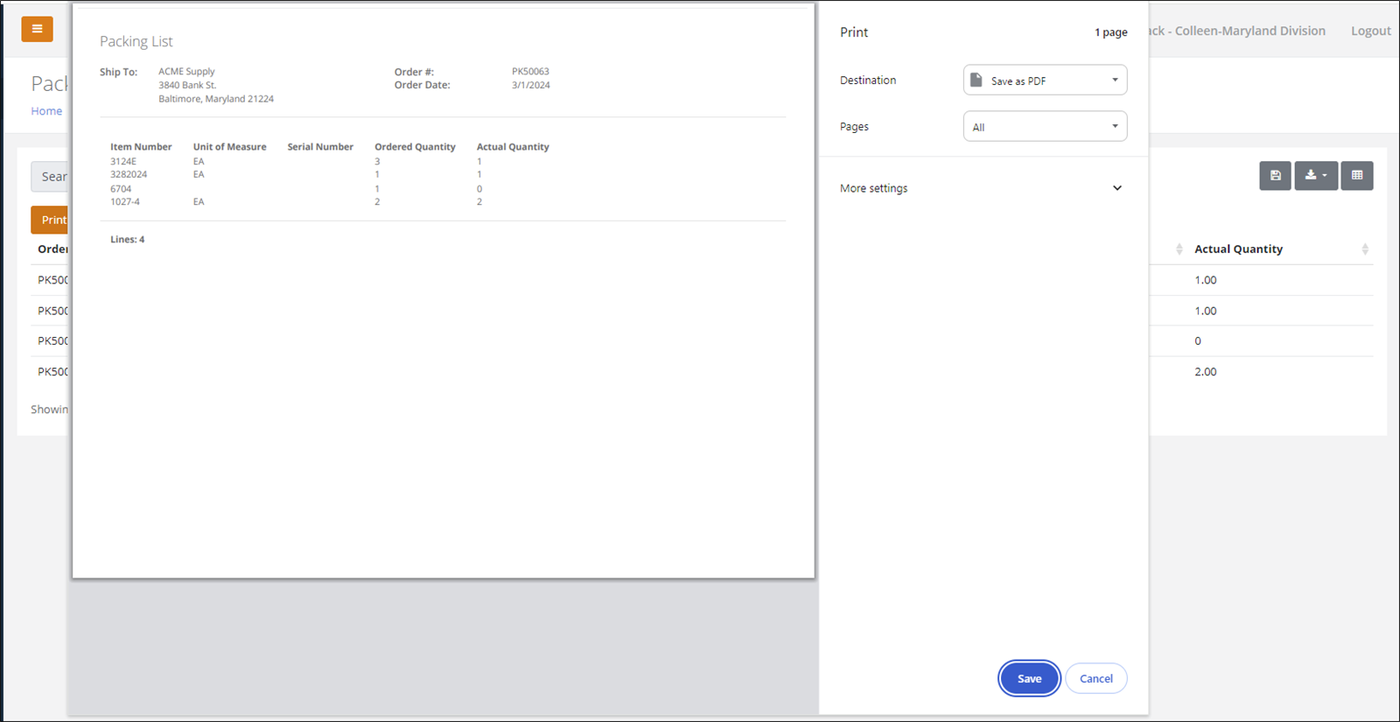
Note
The Packing List report may also be exported to a CSV file. The Manage Columns feature is also available for customizing the report details.
Page View
The following features are available for customizing the data at this page; see "Page View" for more information.
- Manage Columns: use to add / remove optional fields.
- Add Filter: use to filter the data in the report by specific fields.
- User Created Page View: create and save Views.
Data Export
You are able to export the page data to a CSV file; see "Exporting Page Data"
Exporting Page Data
The data that you are viewing on a list page can be exported out of the system into a CSV file. To export the page data from IntelliTrack, refer to the steps that follow.
At the top right of the page, click the Download button.
Click the drop-down arrow and select the Export CSV option.
The data on the page is exported to a CSV file, it is usually found in the Downloads folder.
Dashboard Options
IntelliTrack’s Dashboard offerings, available from the Insights page, include additional Key Performance Indicators (KPIs) within the Consumable Inventory Bundle. These dynamic Inventory KPIs provide Users with real-time visibility into Stock Levels, Inventory, and Orders that are available when adding a Dashboard.
- Stock Level
- Inventory By Location
- Open Picking Orders
- Picking Orders Due
- Open Receiving Orders
- Receiving Orders Due
Adding a Dashboard
A Dashboard is added from the Insights page. The new KPI options are available in the Inventory section of the Data Source dropdown list when the User adds a new Widget.
To add a Dashboard and reach the new Inventory KPIs, please refer to the steps that follow.
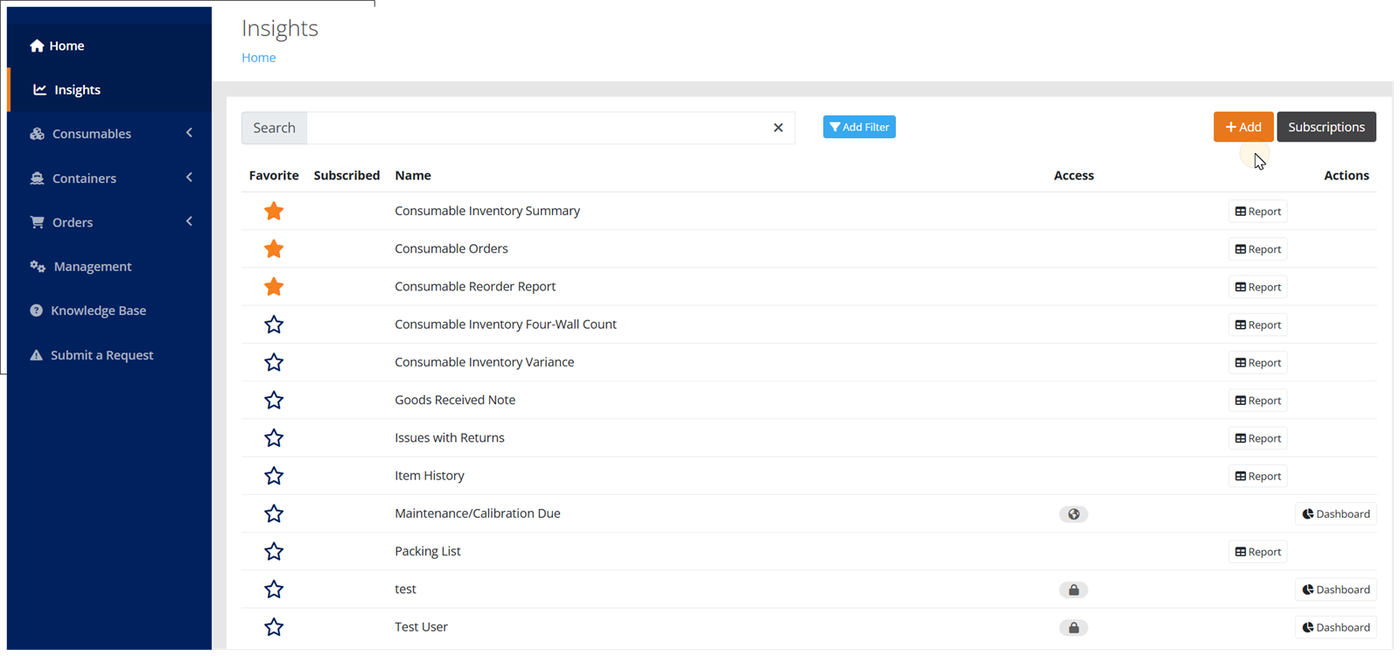
Select Home > Insights. The Insights page appears.
At the Insights page, select the Add button.
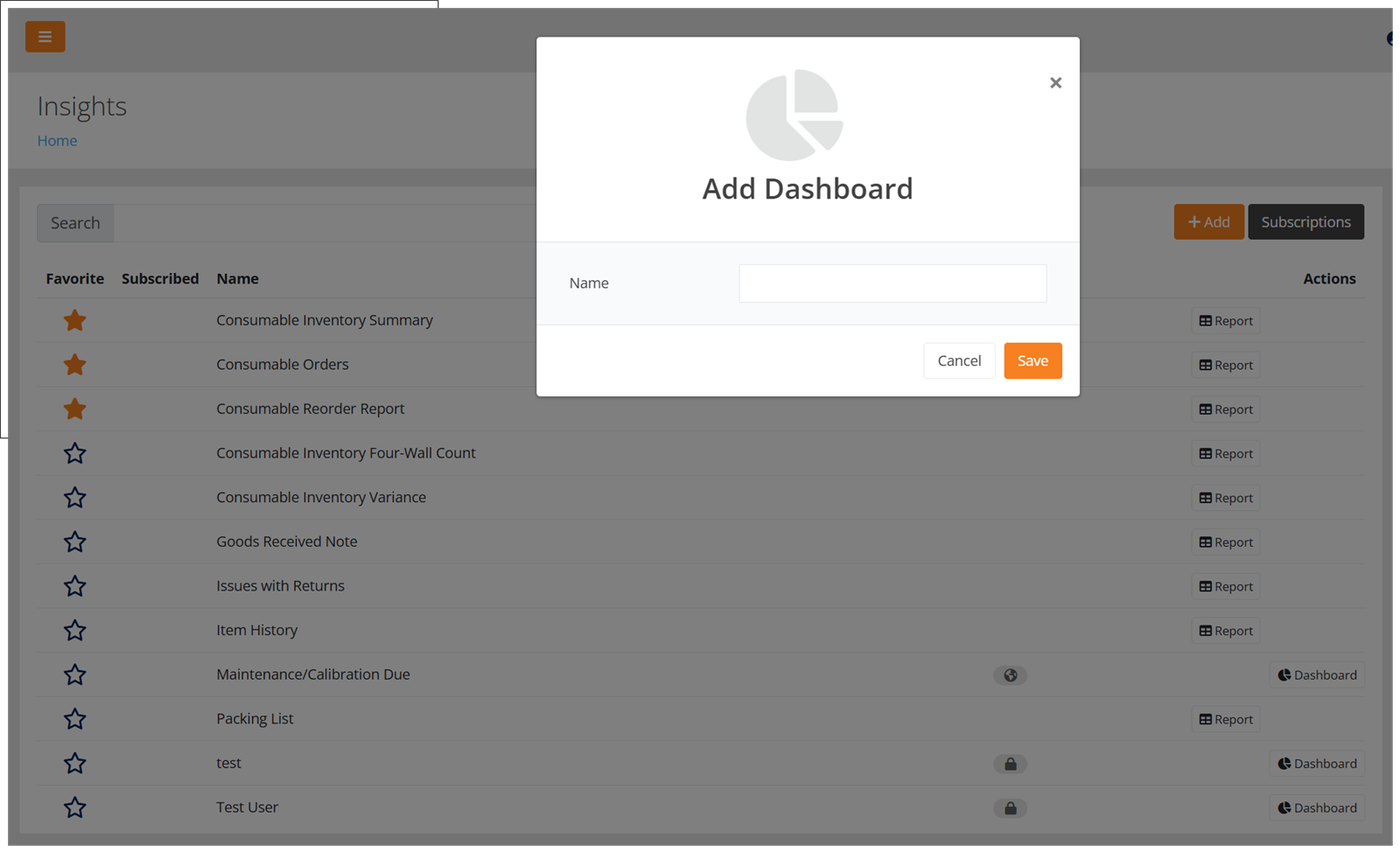
The Add Dashboard popup appears.
Name: name the Dashboard and press the Save button to close the Add Dashboard popup.
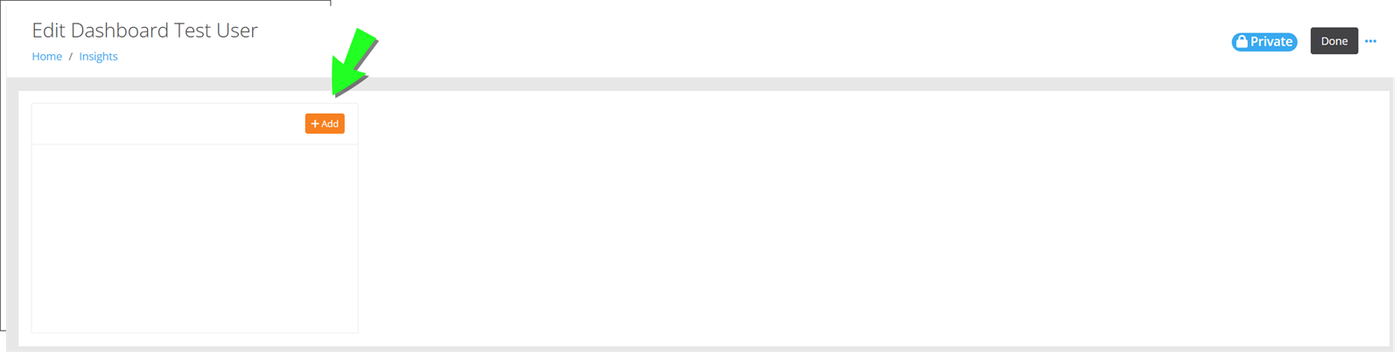
The Edit Dashboard page appears, for this Dashboard.
Adding a Widget
A Widget in the Dashboard displays data information according to its Configuration, Input, and Output. The Widget is added to the Dashboard via the Add Widget Wizard. To add a Widget to a Dashboard, refer to the steps that follow.
Widget Configuration
At the Configuration tab, select the Data Source and Visualization for the Widget.
At the Edit Dashboard page: select the Add button inside the empty square.
The Add Widget Wizard appears. The Configuration tab is to the front.
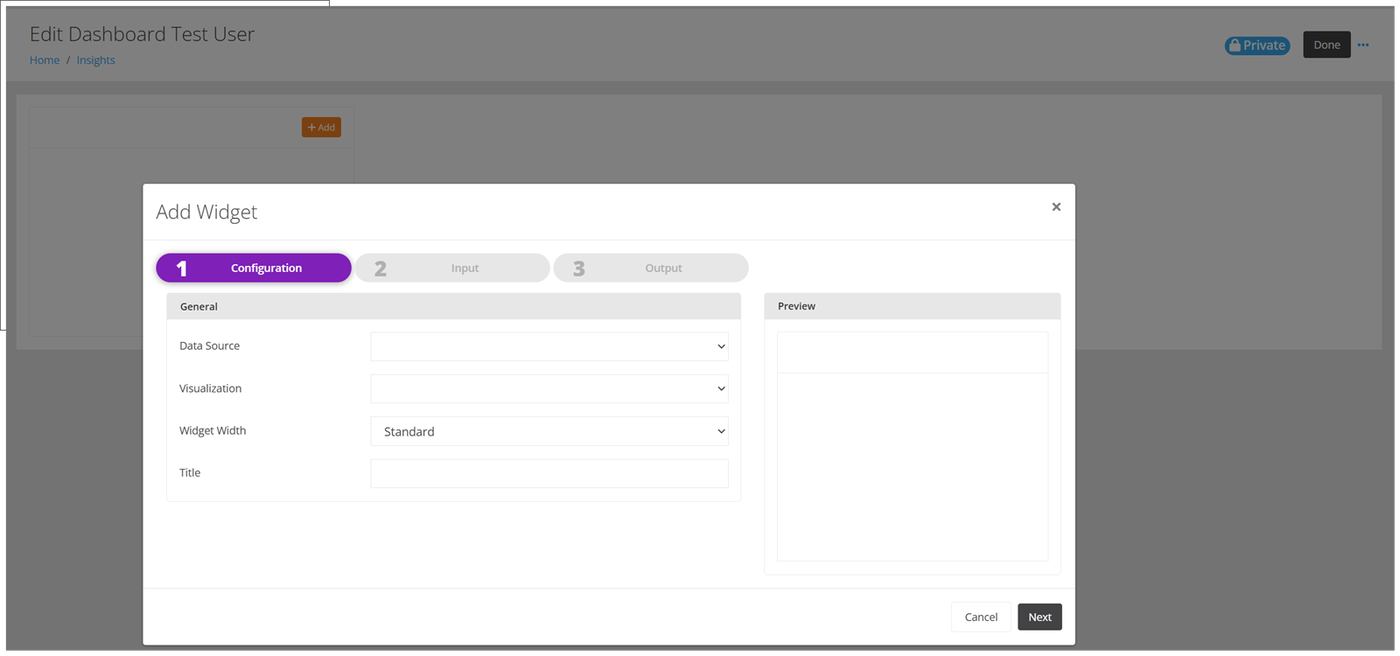
Data Source: click the drop-down arrow in this field to view the list of options in the Inventory category.
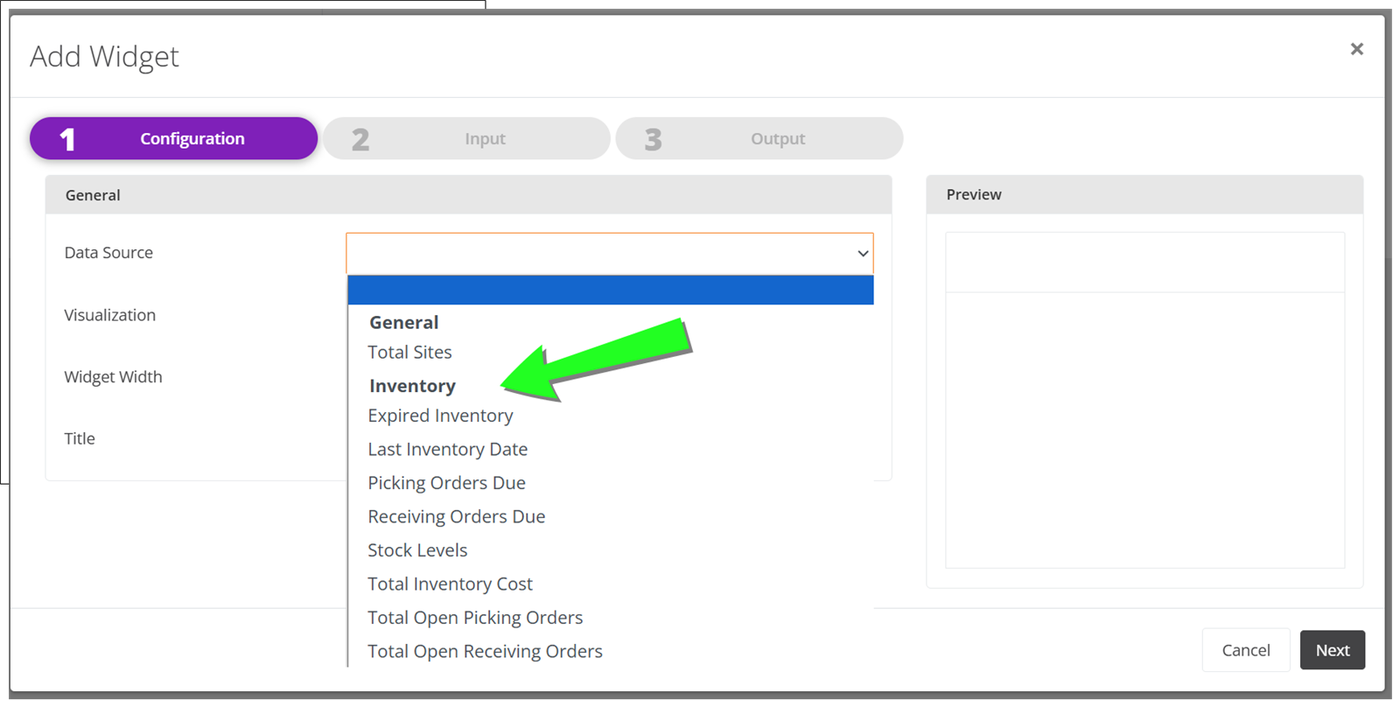
The Inventory options for the data source of the widget are:
- Expired Inventory
- Last Inventory Date
- Picking Orders Due
- Receiving Orders Due
- Stock Levels
- Total Inventory Cost
- Total Open Picking Orders
- Total Open Receiving Orders
Visualization: Next, select the visual depiction for the Widget. Click the drop-down arrow in the Visualization field and select from the options that are available.
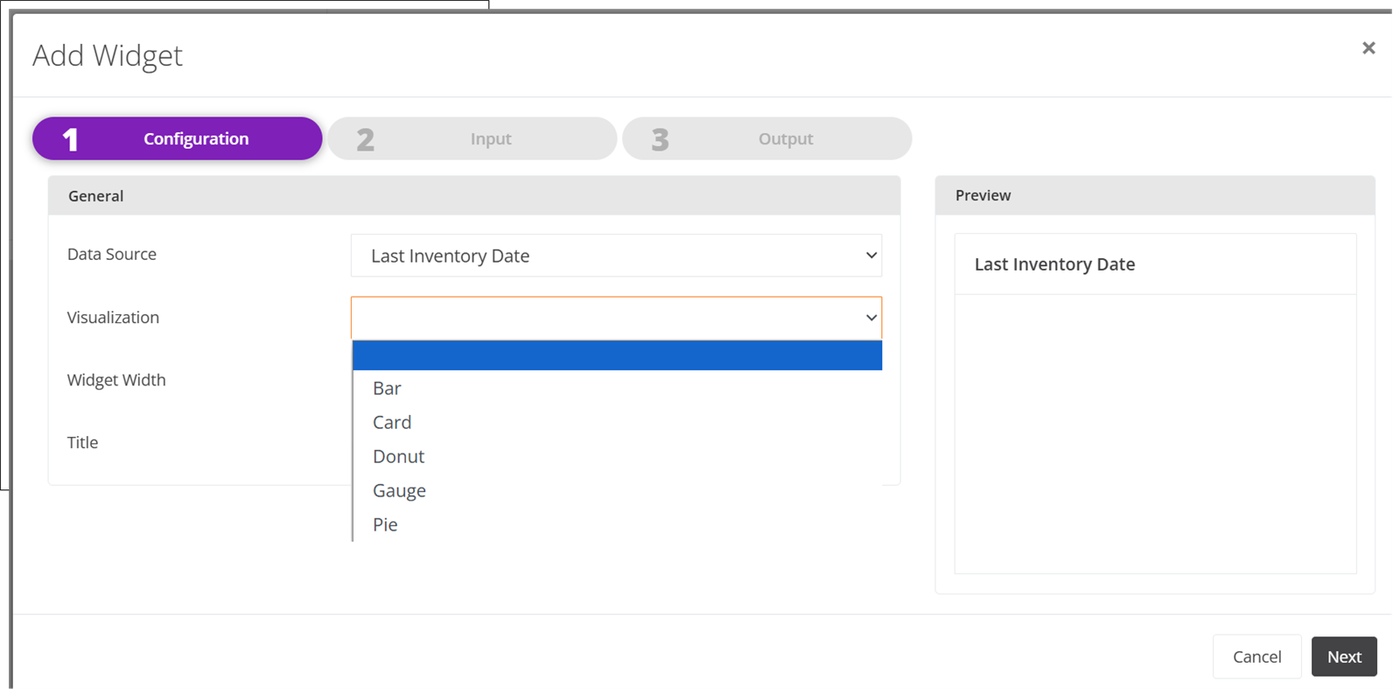
Typically, the Visualization options are: Bar, Card, Donut, Gauge, Pie.
When the Data Source and the Visualization options are selected, a preview appears in the Preview pane to the right.
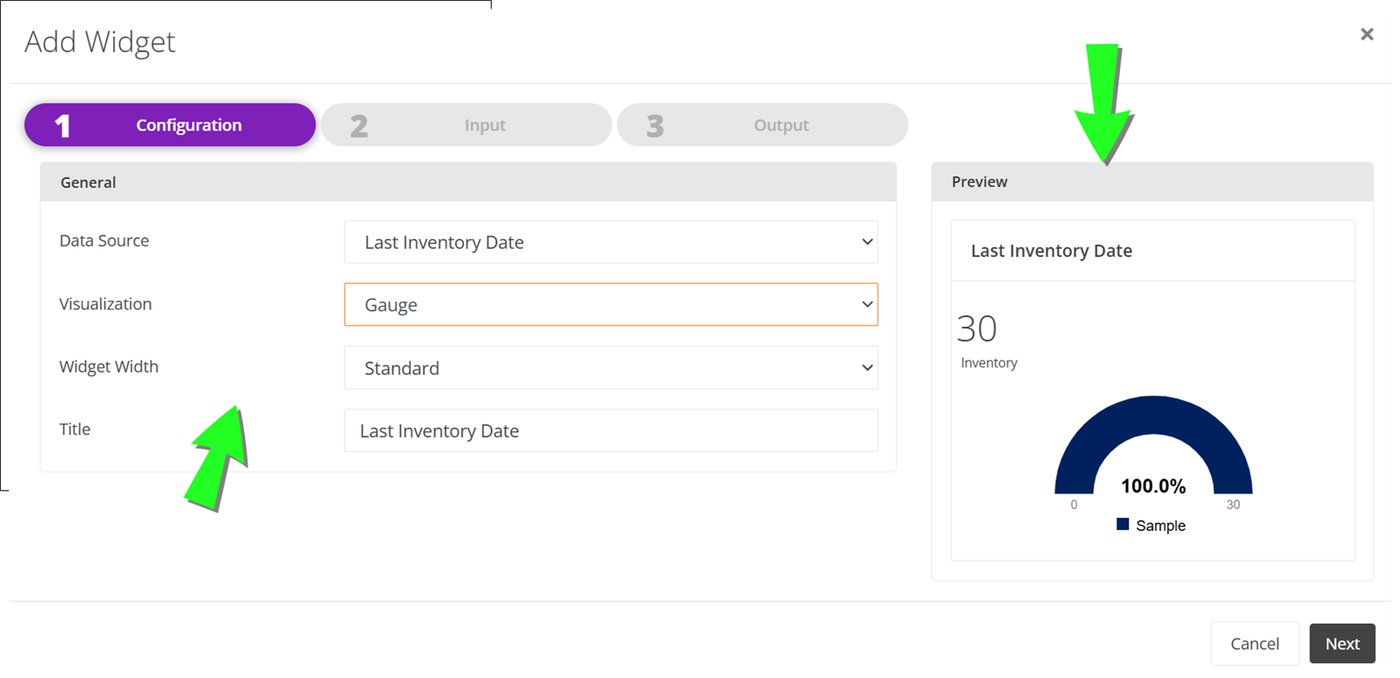
Widget Width: the Widget Width defaults to Standard, but you may change it to another option, as available (the other options typically are: Wide, Extra Wide, Full Screen). Note that the Widget Width options depend upon the Visualization that is selected.
Title: the name of the Data Source that is selected is the default title for the Widget, but you may change this to something else, if desired.
Press Next to continue to the Input Tab.
Input Tab
Note
This is an optional step when adding a Widget.
At the Input tab, you are able to set Query Parameters and a Value to Filter.
Using the Input tab is an optional step when adding a Widget.
Important
If you do not set any Input values, the Output will contain all Items and Sites in the Tenant.
Query Parameters and Value to Filter
- Click the drop-down in the Query Parameters field and select from the options available: Item Number, Item Group, Site, Site Group.
- Next, a Value to Filter is required. Select a specific value based upon the Query Parameter from the Value to Filter drop-down list.
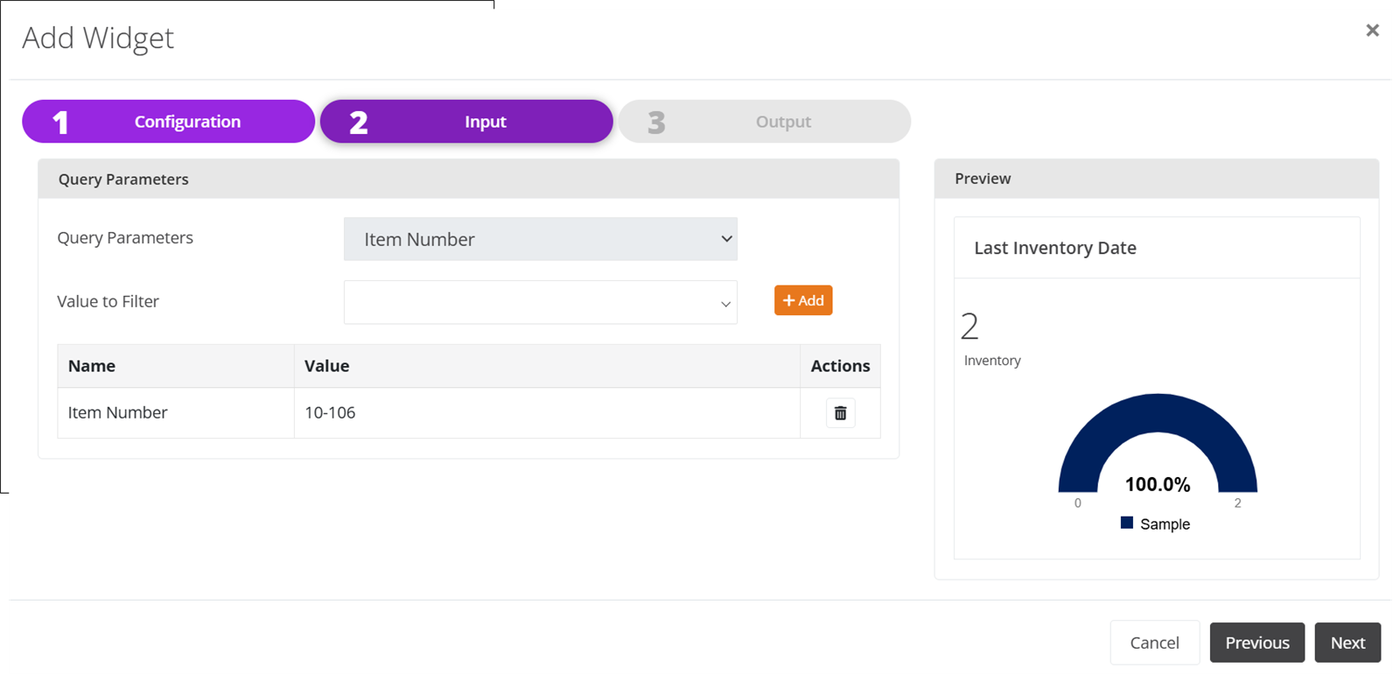
When you are finished at the Input tab, press the Next button to advance to the Output tab in the Add Widget Wizard.
Output Tab
At the Output tab, customize various aspects of the Widget.
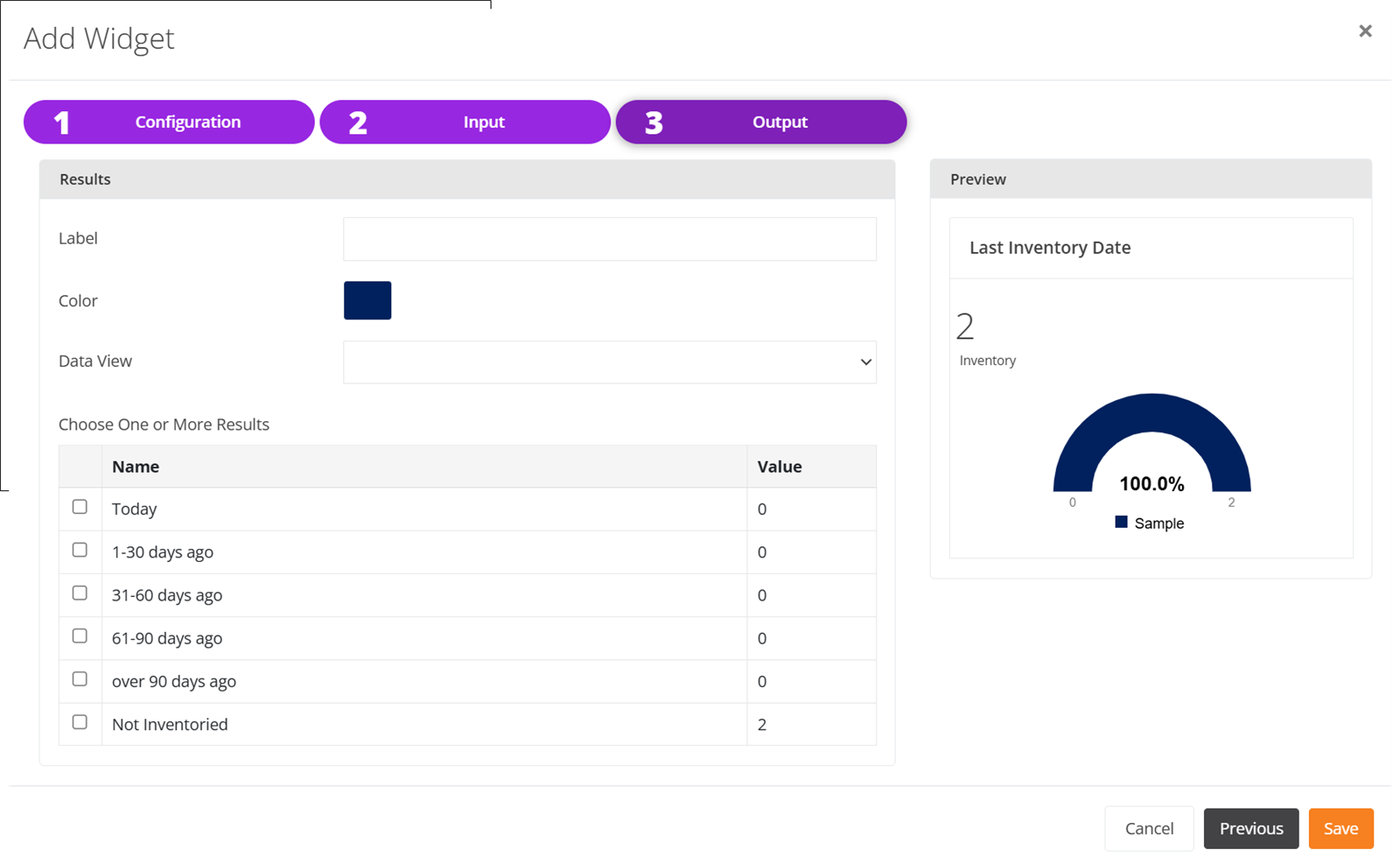
Label: Add a Label to the Widget, if desired.
Color: Customize the Color of the Widget, if desired.
Data View: Select a Data View to apply when viewing the Widget's output, if desired.
Results: Choose the Results for the Widget from the options available (required).
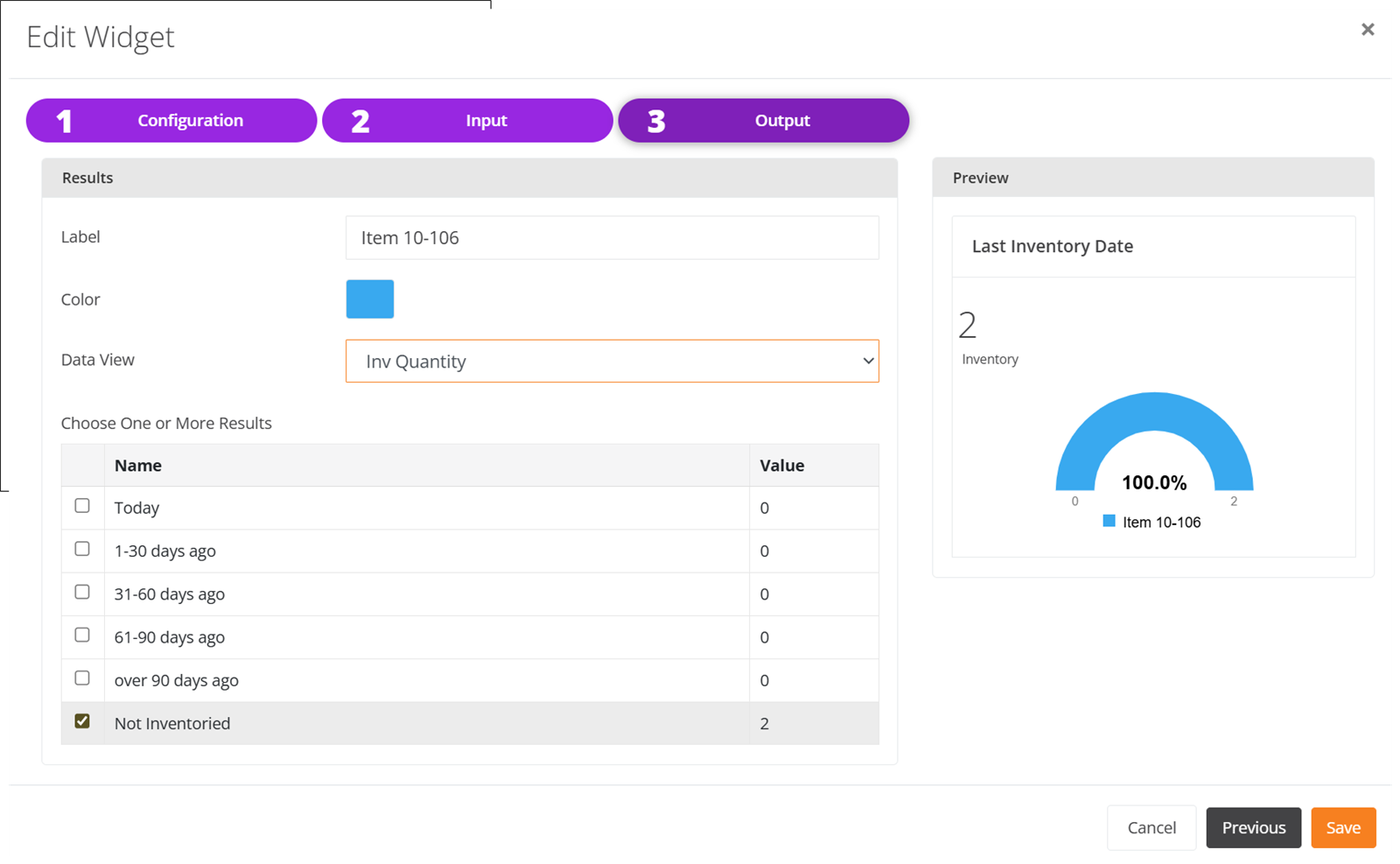
Press the Save button to save the Widget.
The Add Widget Wizard closes and you are returned to the Edit Dashboard page. The Widget is included on the page.
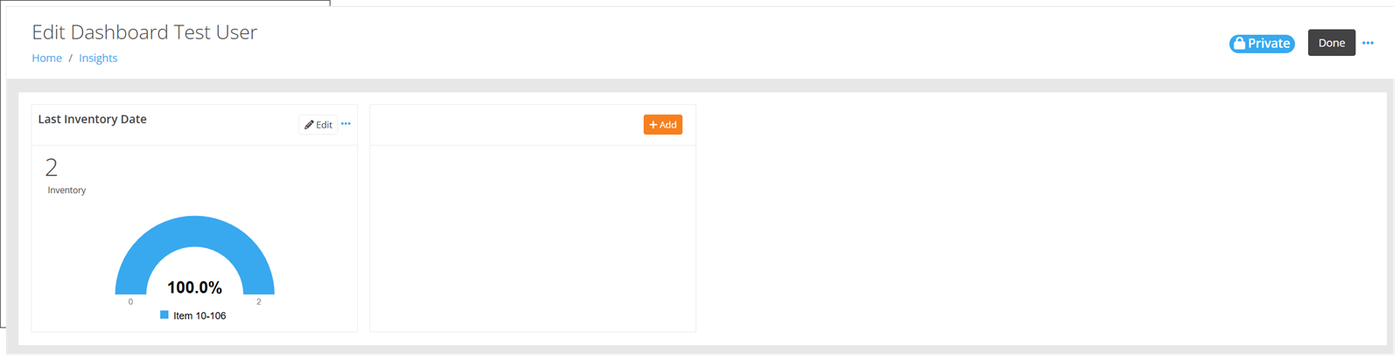
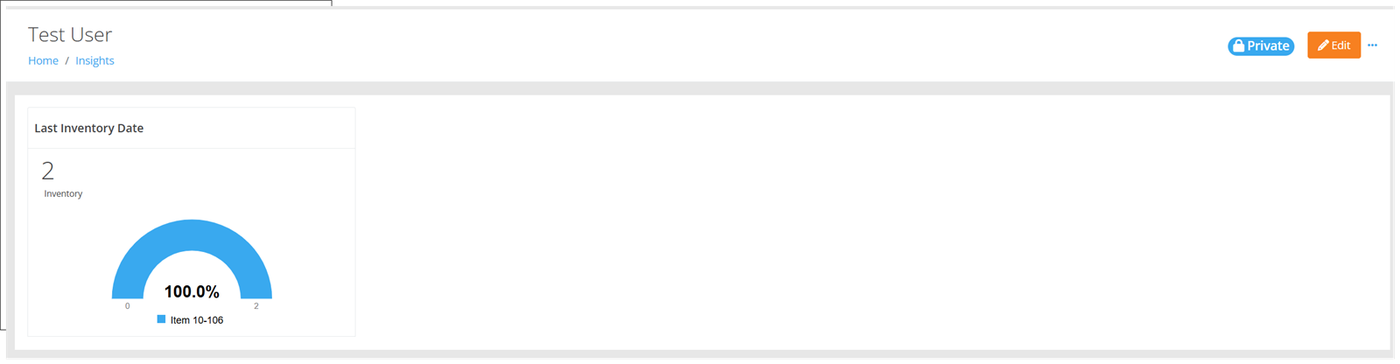
You may continue to add another Widget or Widgets. When you are finished adding Widgets, press the Done button in the top right area of the page to Save the Dashboard. The Widget in the Dashboard will take you to the relevant page when you click on the Visualization.
Managing Your Dashboard
The Dashboard is saved as a Private Dashboard by default and the Creator of the Dashboard is its Owner.
Note
The creator of the Dashboard is the "Owner" of it. The Dashboard Creator may change its access, edit it, delete it, or transfer ownership of it.
To reach the "Admin" options for this Dashboard, press the Edit button in the top right area of the Dashboard. The Dashboard will be placed in Edit Mode.
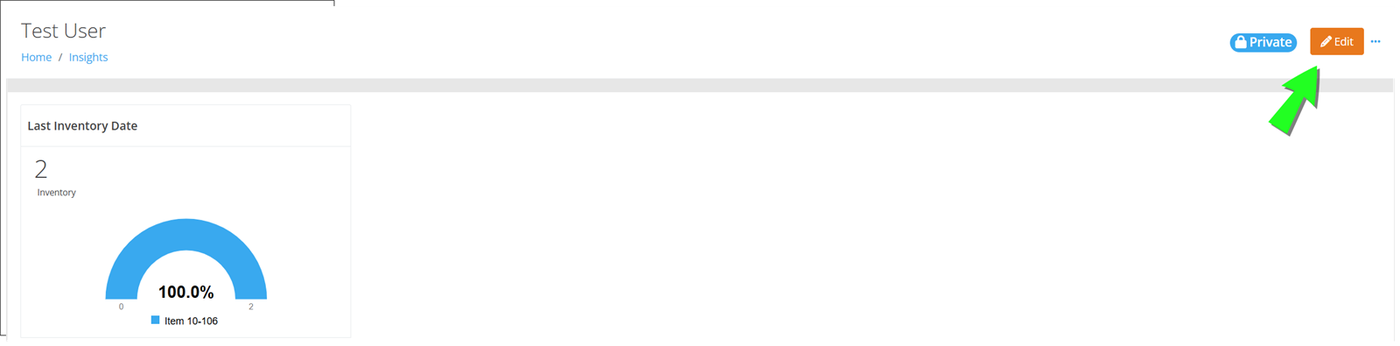
The Page is ready for editing.
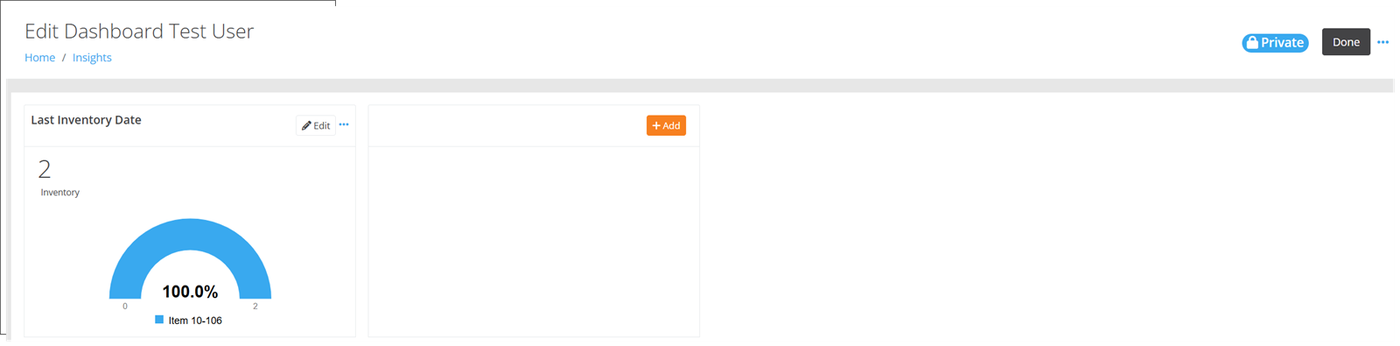
Widgets
You can edit an existing Widget, or another Widget or Widgets.
You can also reach the edit options by pressing the Edit button in the top right area of the page.
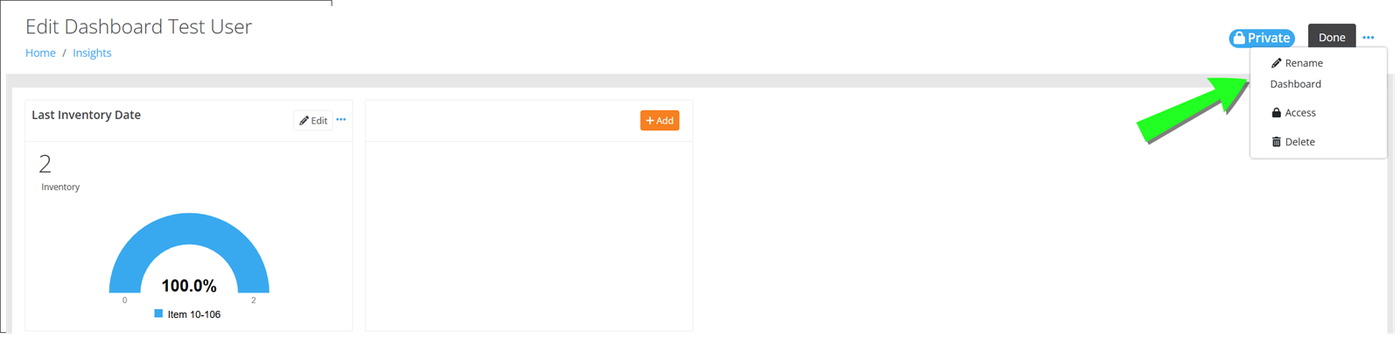
More Options
- Rename the Dashboard
- Edit the Access
- Delete the Dashboard
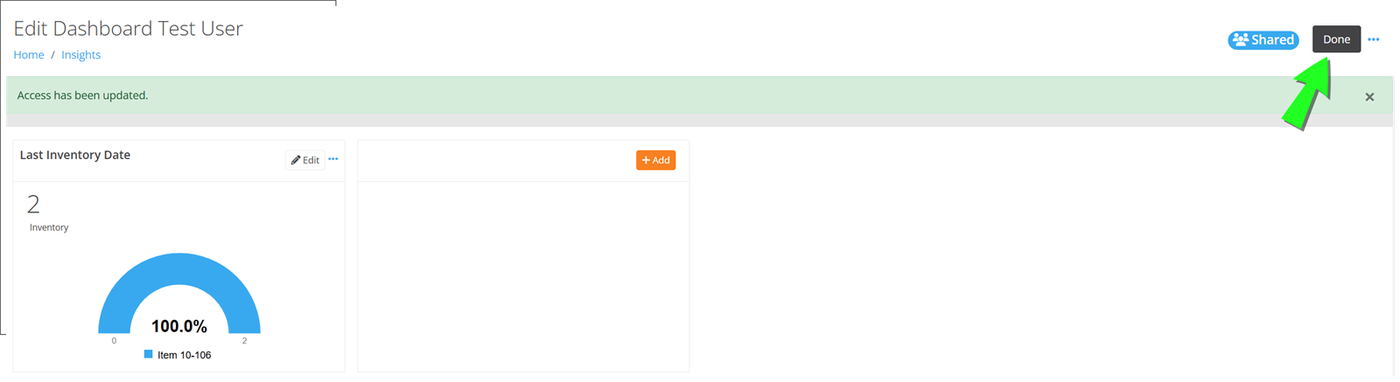
Press Done to save changes to the Dashboard.
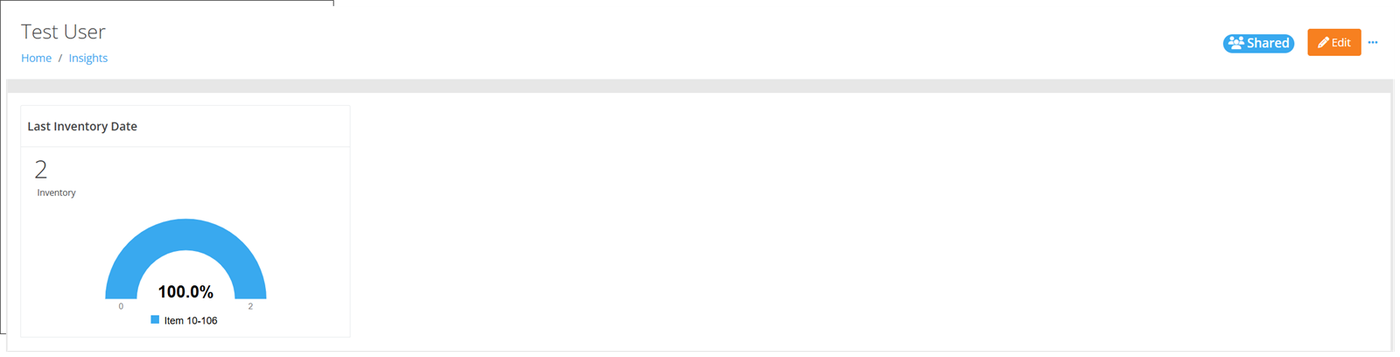
Other Admin Functions
You can Transfer Ownership of a Dashboard to another User in the Tenant and you can Clone a Dashboard. The Options are found in the More Options for the Dashboard when it is NOT in Edit Mode.
Chapter 3 - Consumable Items
The items are the goods and materials in your organization. In the Consumable Inventory bundle, the item will be consumed or sold once it becomes part of your inventory.
Consumable Item Workflows
Unlimited quantities of a consumable item may be added to site-locations when the following transactions are submitted:
- Item Added to Inventory
- Adjust quantity higher
- Physical Inventory
- Receipt
- Return
- Receive
A consumable item may be removed from inventory when the following transactions are submitted:
- Issue from the site-location in full
- Pick from the site-location in full
- Adjust from the site-location to zero
A consumable item quantity may be adjusted up or down when an Adjust transaction is submitted. The quantity is also adjusted during an order transaction. A consumable item may be moved from one site-location to another when a Move transaction is submitted. The following sections discuss adding a consumable item and performing the workflows for it.
Items Page
The collection of items in the Tenant is found at the Items page. Select Management > Items > Items to reach this page.
Important
An item must be added to the application before it can become part of the inventory.
Note
To add, edit, or delete an Item, Administrator access is required.
Adding an Item
In IntelliTrack, an item is added at the Add Item page. The item may have many details; however, to save an item the required fields are:
- Item Number
- Unit of Measure
- Each Count for the Unit of Measure
To add a new item to the Tenant, please follow these steps:
- Select Management from the Main menu options in the Navigation pane.
- The Management menu appears in the Navigation pane.
- Select Items > Items from the Management menu.
- The Items page appears.
- Select the Add button in the top right area of the page. The Add Item page appears. The Item Details tab is to the front.
- Item Number: The item number is required.
- Click the Units of Measure tab to bring this tab to the front. Add at least one unit of measure-each count to the grid.
- Press the Save button.
You may add more details to the Item. To view a detailed explanation of all the optional fields for an item, continue with the following sections.
Items Details
The main item information is added from the Item Details tab. When the Add Item page appears, the Item Details tab is automatically brought to the front. Add the item number and relevant item associations and attributes at this tab.
- Item Number field (required): enter the item number (must be unique).
- Alternate Number: enter the alternate number.
- Description field: enter an item description.
- Comments field: enter any item comment or comments in this field.
- Manufacturer field: click the dropdown arrow to select a manufacturer from the manufacturer list that appears.
- Item Groups field: An item group is often a model or category. Click the dropdown arrow and select the item group or groups from the item group dropdown list. This field accepts multiple item groups.
- Track Cost: Enable this setting to track the item unit cost during an item receipt, return, or receive transaction.
- Comments: enter any relevant or necessary comments about the item in this field.
- Image: to add an image to this item, click the Browse button to open the Open dialog. From the Open dialog, browse to the image file and select it for the item. The image will be displayed in the image area.
- Serial Numbers: enable this setting to require a serial number for this item-unit of measure when it is added to inventory.
- Lots: enable this setting to require a lot for this item-unit of measure when it is added to inventory.
- Expiration Dates: enable this setting to require an expiration date for this item-unit of measure when it is added to inventory.
Item Units of Measure
At least one unit of measure-each count must be added to the item. It is added from the Units of Measure tab. Optionally, the Unit Cost may also be added to the unit of measure-each count.
- Click the Units of Measure tab to bring this tab to the front.
- Units of Measure field: click the dropdown arrow to view the Units of Measure drop-down list. Select the Unit of Measure for this item from the list.
- Each Count field: enter the each count in this field. The each count is the base unit for this unit of measure.
- For example, when a Unit of Measure of {Each} has an each c count of one, the base counting unit of {Each} is one (1 {Each} equals 1 item). When a Unit of Measure of {Box} has an each count of ten, the base counting unit of {Box} is ten (1 Box equals 10 items).
- The unit of measure-each count must be unique. This means that a single item cannot have two duplicate units of measure or duplicate each counts.
- Unit Cost field (optional): enter the unit cost for this unit of measure in this field. When the unit cost is entered, the system is able to calculate extended item cost based upon the on hand quantity for this item unit of measure-each count.
- When Track Cost is enabled for the item, the unit cost will automatically change upon item receipt, return, or receive. For more information about automatic cost tracking, see "Unit Cost Tracking" for more information.
- Click the Add button to the right of the Units of Measure field. The unit of measure-each count-unit cost is added to the item.
- If you are only using one unit of measure for this item, you are finished.
- Repeat steps 1-5 to add another unit of measure for this item. Continue until all units of measure are added for this item.
Note
Each item unit of measure-each count must be unique to this item.
Editing the Unit Cost
The Unit Cost for an Item can be edited at the Edit Item page. To edit the unit cost, follow the steps below.
Important
Editing an Item is an Administrator level privilege.
Select Management > Items > Items. The Items page appears.
To edit the Unit Cost for an Item, use the page's Search bar or Add Filter popup to search for the Item.
In the Actions column for the Item entry, press Edit. The Edit Item page for this Item appears.
Press the Units of Measure tab to bring this portion to the front.
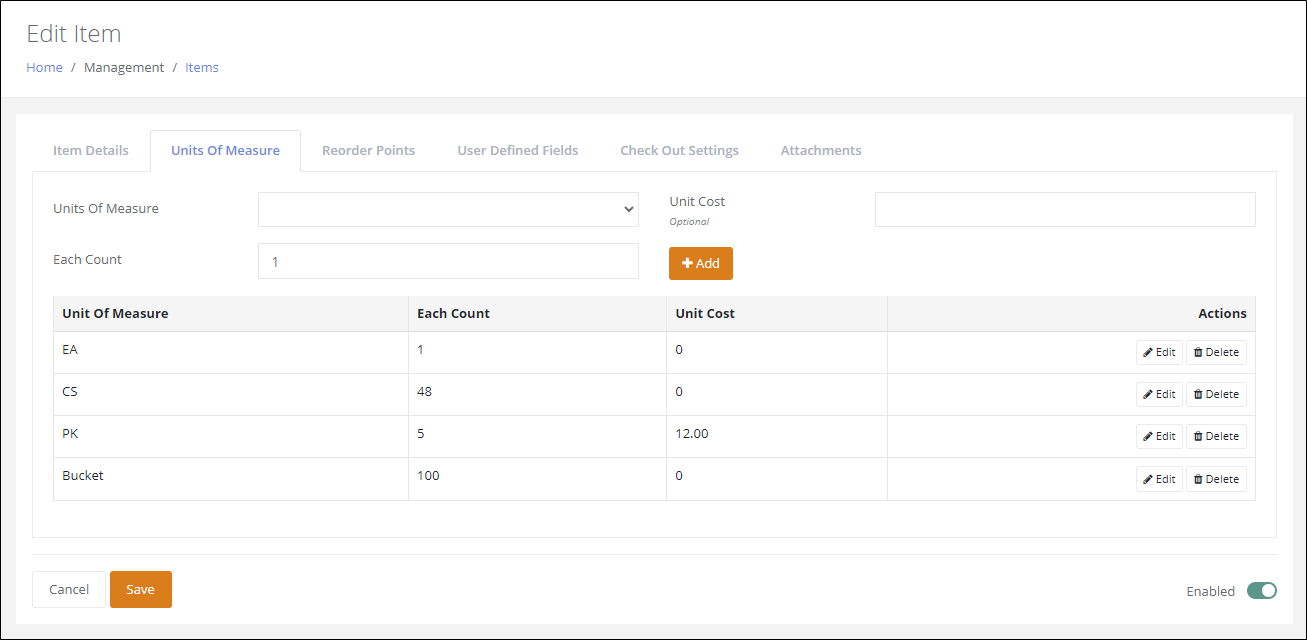
Each Unit of Measure-Each Count is found in the unit of measure area.
To change the Unit Cost for a Unit of Measure-Each Count, press Edit in the Actions column. The Change Unit Cost popup appears.
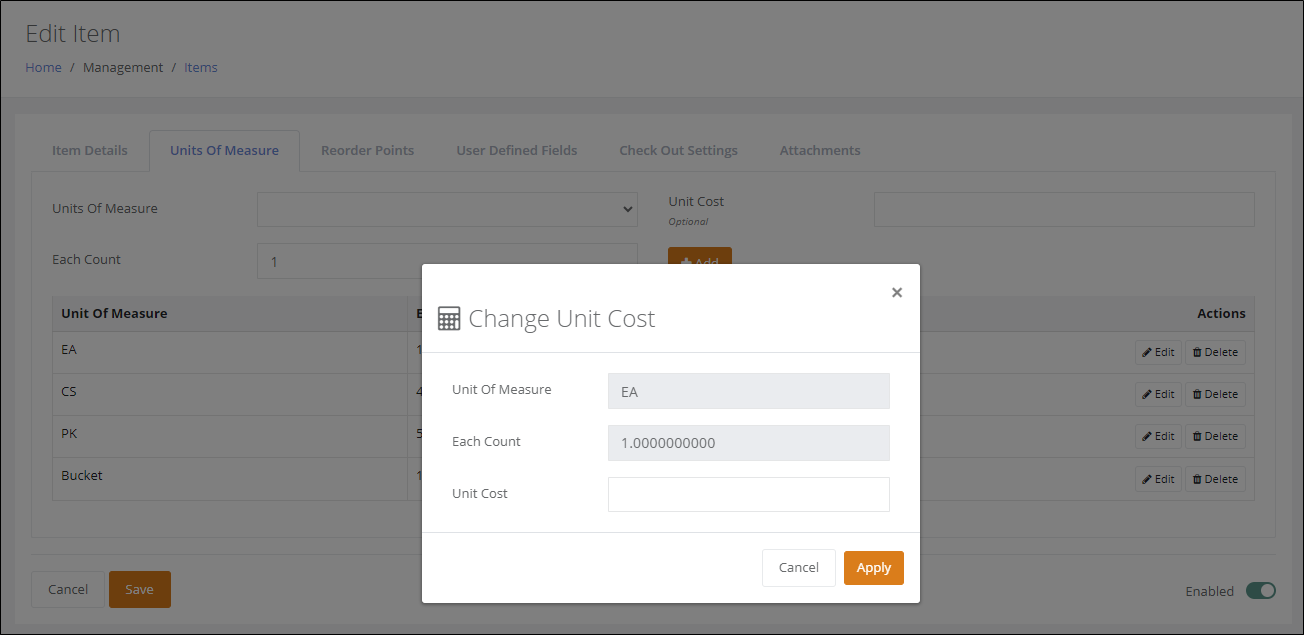
Note
When the Tenant uses automatic Unit Cost Tracking and the Item has the Track Cost setting enabled, the Unit Cost that is manually entered will be overwritten when the item is added to inventory via a Receipt, Return, or Receive transaction.
Item Reorder Points
Important
Item Reorder Points are tracked by Site.
The adequate amount of stock on hand and when stock needs to be reordered at the Site is dependent on three quantity values added to the Site: Min (minimum quantity), Max (maximum quantity), and Reorder (reorder quantity). Enter the Reorder Point values at the Reorder Points tab.
Click the Reorder Points tab to bring this portion of the Add Item or Edit Item page to the front. You may set min-max-reorder quantity levels for the item by site.
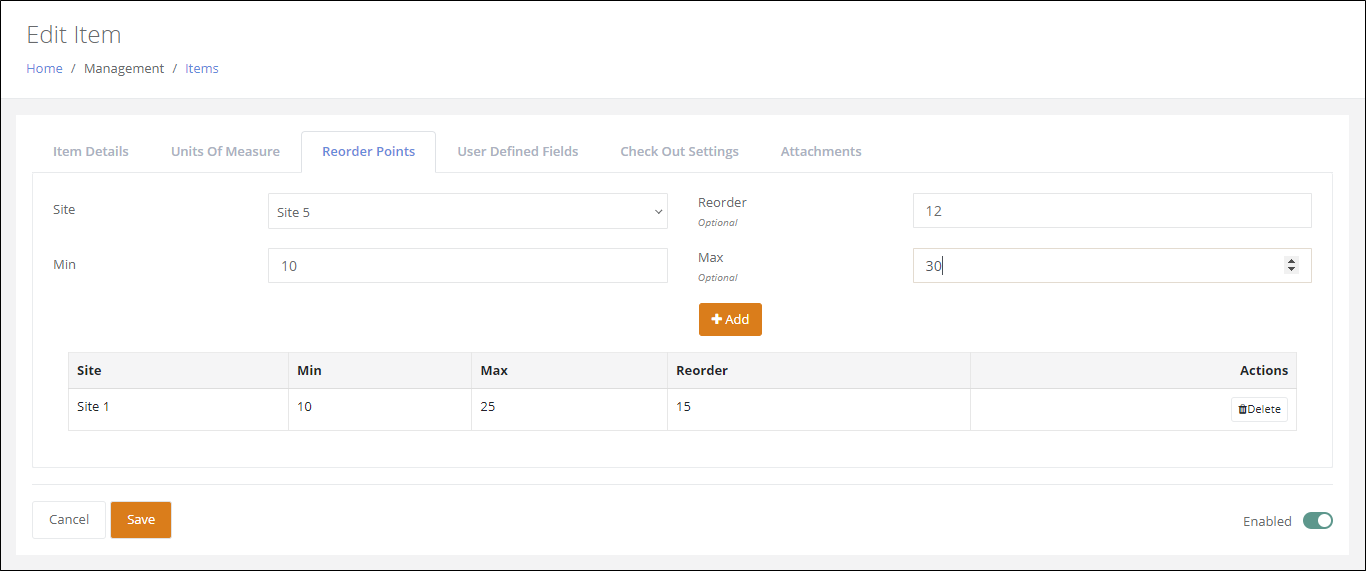
Site: The Site is the Site that the Reorder Point Quantity values will be applied to for this item in inventory.
Minimum Quantity: The item's Minimum Quantity is a reorder threshold setting, which means that when the On hand Quantity for this item in inventory, at the designated Site, falls BELOW the Minimum Quantity, this item needs to be reordered. The Minimum Quantity is required when adding a Site-Item Reorder Point. The Minimum Quantity must be greater than zero.
Reorder Quantity: The item's Reorder Quantity is the quantity to be reordered for the item when it falls below the Minimum Quantity at this Site. It must be greater than zero.
Maximum Quantity: The item's Maximum Quantity is the quantity that should not be exceeded for this item at this Site. It must be greater than zero.
How to Add Reorder Points to an Item
To add reorder points to an item, refer to the steps below:
- Site (required): Click the drop-down arrow in the Site field and select a site from the list that appears.
- Min (required): Enter the item's minimum allowed quantity in the Min field. It must be greater than zero.
- Max (optional): Enter the item's maximum allowed quantity in the Max field. It must be greater than zero.
- Reorder (optional): Enter the item's restock quantity in the Reorder field. It must be greater than zero.
- Click the Add icon to add this site reorder point to the item.
- To add another reorder point for another site, click the drop-down arrow in the Site field and select this site. Repeat steps 2 through 5 until you are finished adding reorder points by site.
Consumable Reorder Report
The Consumable Reorder report tracks items that need to be reordered. The items found in this report have quantity levels that have fallen below the minimum quantity at the designated Site. For more information about this report, see "Consumable Reorder Report".
Inventory Item Reorder Notification Email
An email notification will be sent to the designated recipients and / or the Site Contact when an item needs to be reordered at a Site.
Site Contact
A Site Contact automatically receives an inventory item reorder notification email when an item falls below the Minimum Quantity at their Site; see "Site Contact"for more information.
Designated Receipients
Recipients that are added for the Inventory Item Reorder Notification Email at the Email Template page will receive an inventory item reorder notification email when an item in the Tenant falls below the Minimum Quantity.
Note
Administrator level access is required to edit the email template.
To set the recipient or recipients for this email, please follow these steps:
Select Management > Emails > Email Templates to reach the Email Templates page.
Find the Inventory Item Reorder Notification email in the Name column.
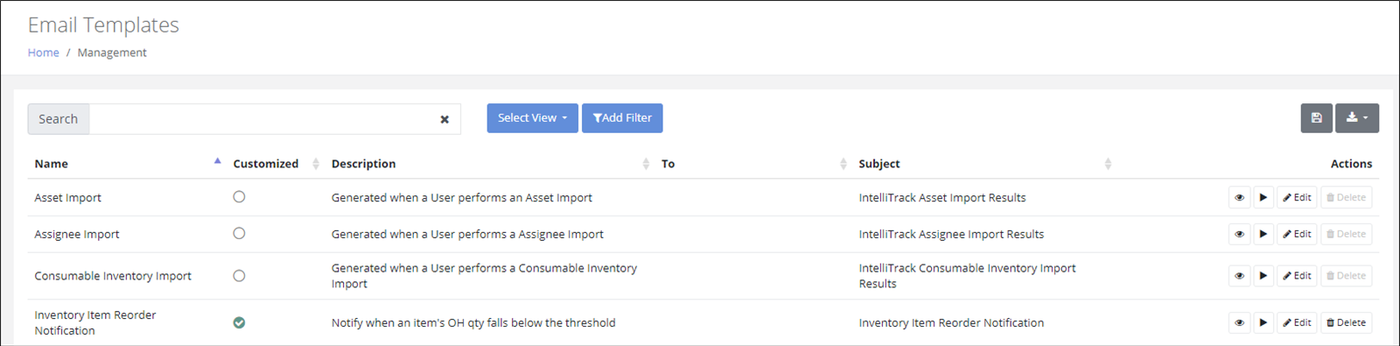
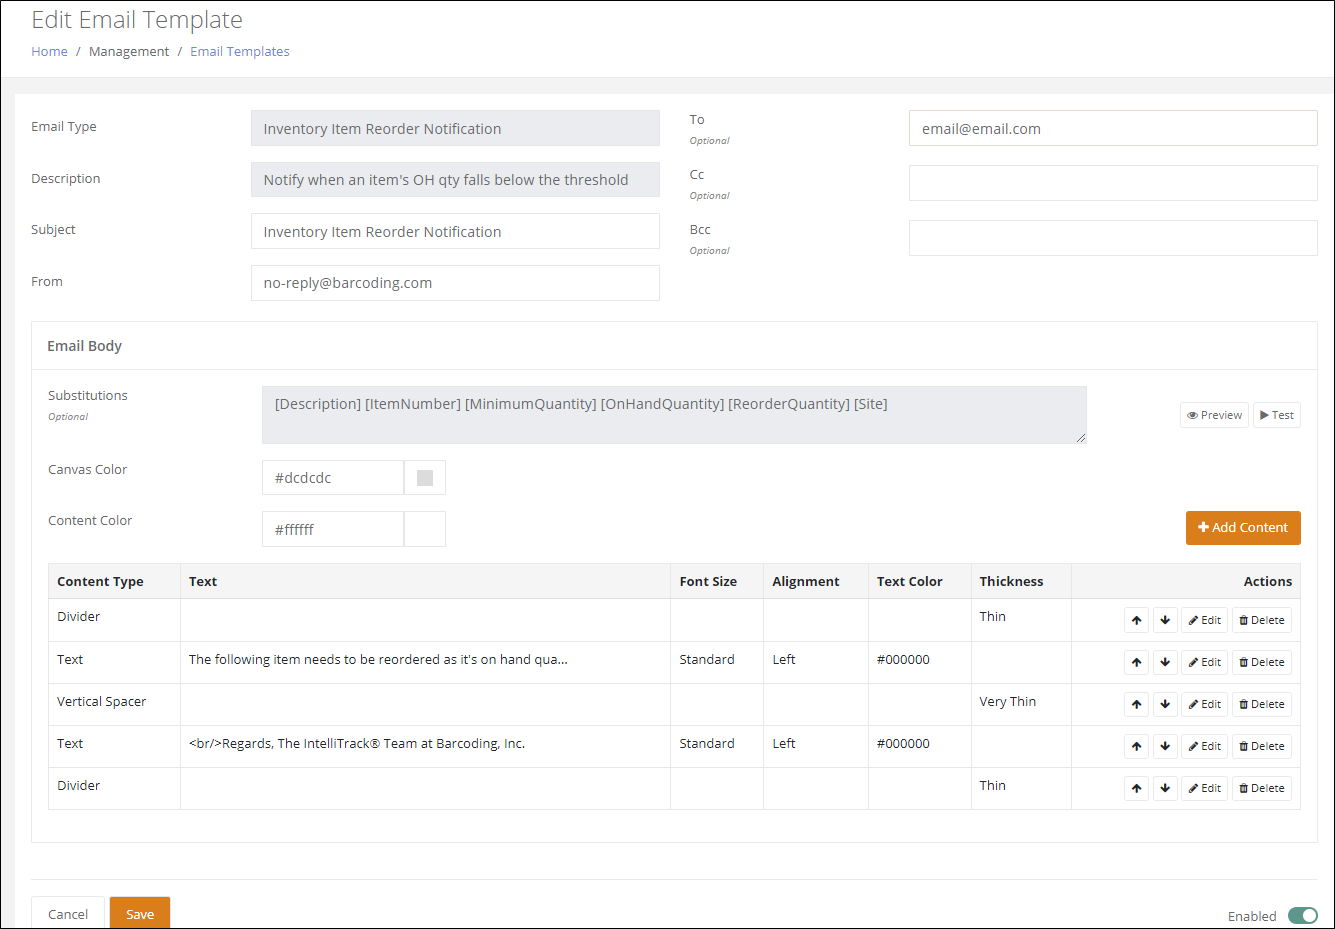
For this email, in the Actions column, press the Edit button to view the Email Template and add the recipients for this notification email.
Press the Save button to save the recipients for this email.
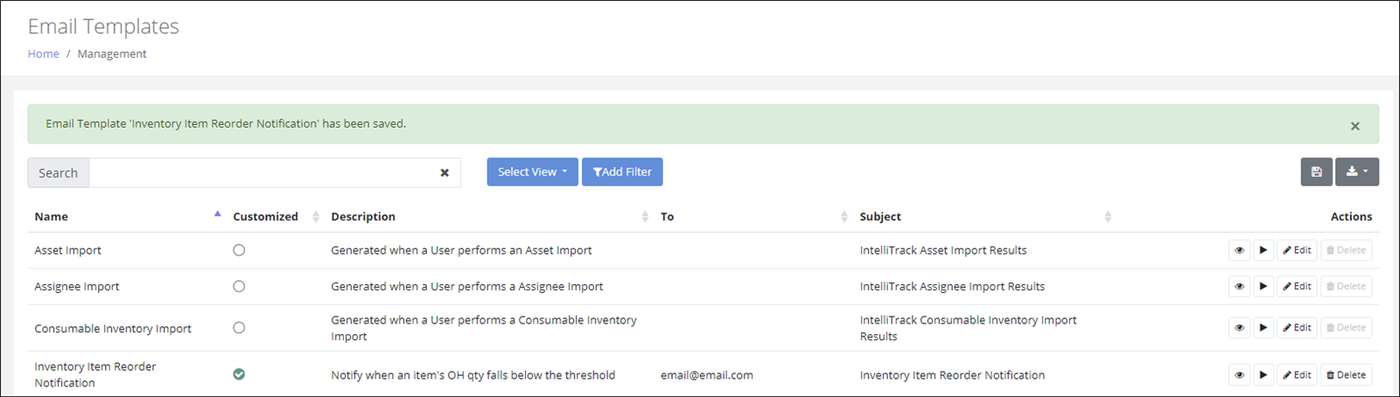
You are returned to the Email Templates page. The recipient(s) that you added to this email are now displayed.
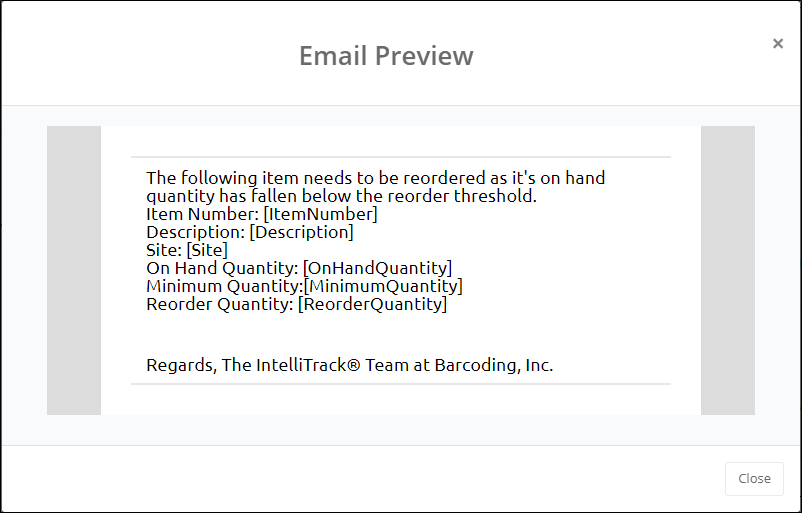
When an item falls below the minimum quantity at a Site, an email will be automatically sent to the recipient(s) added to the template in the To field.
Item User Defined Fields
User defined fields (optional) for the item are added to the item at the User Defined Fields tab. A user defined field is useful if you want to add distinct information for this item.
Important
Up to 25 User Defined Fields may be added for an item. The Item User Defined Fields are added separately, in Management > User Defined Fields. Once added, they are available for any item; see "Item User Defined Fields" for more information about adding User Defined Fields.
Refer to the steps below to add user defined fields to the item:
Click the User Defined Fields tab to bring it to the front.
User Defined Field Groups field: Click the drop-down arrow to view the list of user defined field groups added to the system.
Click the Add button.
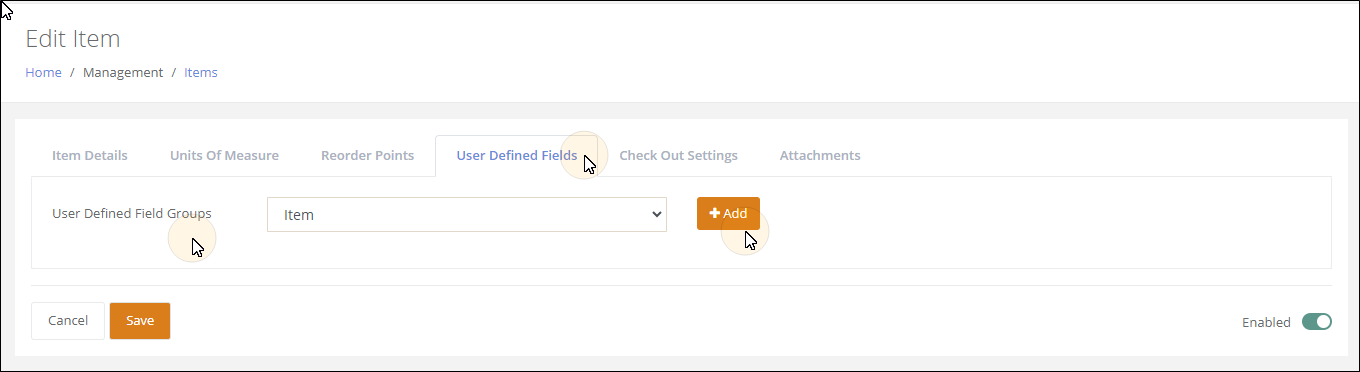
The User Defined Field Group is added to the tab. This means that all the user defined fields in this group are added.
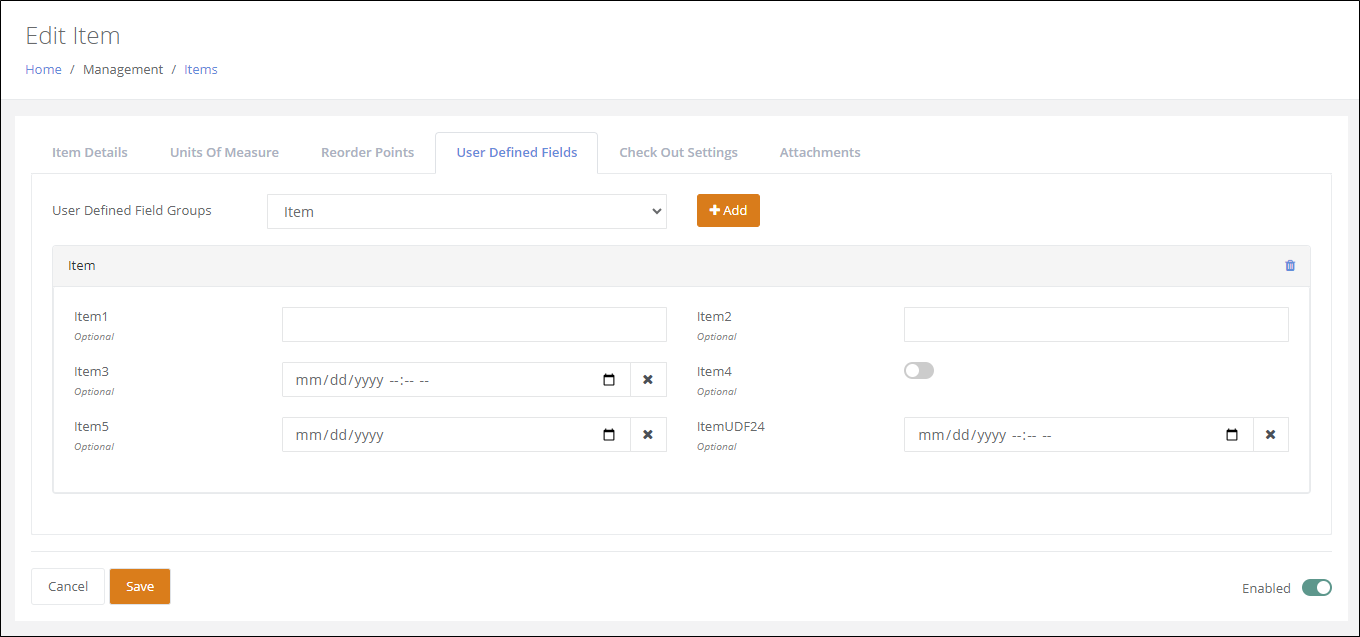
Press the Save button to save the User Defined Field Group to this item. The user defined fields in this group are not available for this item.
Item Attachments
A maximum of five files may be attached to an item from the Attachments tab, which is available from the Add Item page and the Edit Item page. The maximum file size is 50 MB.
Browse to the file via the Browse button in the Attachment field.
Select the file so that it appears in the Attachment field.
Upload it via the Add button.
The file is placed in the file attachment grid.
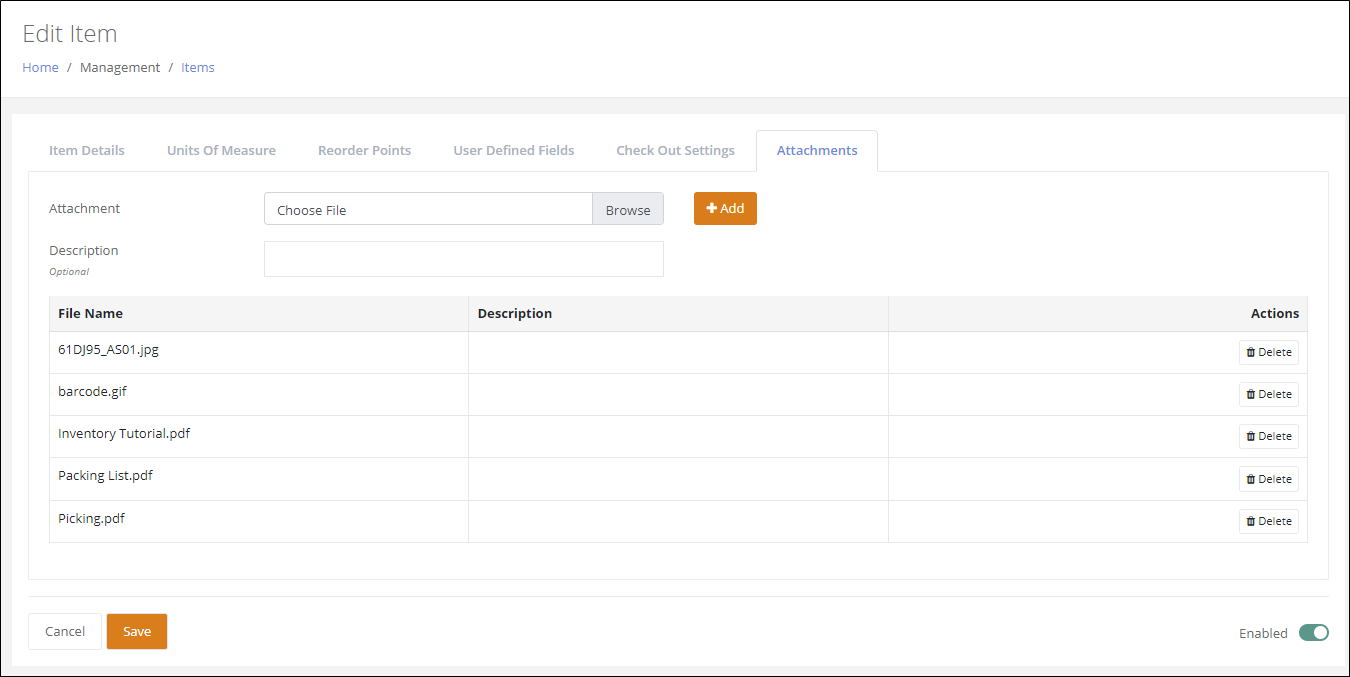
Press the Save button to save the file attachment(s) to the item. They are available for Download at any time.
Item Clone
The Clone feature gives you an accelerated way to add an item to the system. This feature is useful when you are adding an item that is similar to one that already exists. Many relevant fields automatically carry over to the new record, including:
- Description
- Manufacturer
- Item Groups
- Comments
- Picture
- Serial Number Setting
- Lots Setting
- Expiration Dates Setting
- Track Cost Setting
- Units of Measure
- User Defined Fields
- Reorder Points
Cloning an Item
An item is added via the clone feature at the Items page.
Select Management > Items. The Items page appears.
Find the item that you want to clone.
In the Actions column, click the ... More Options icon. The Clone option appears.

Select the Clone button. The Add Item page appears.
All fields that carry over and contain a value are set for this new item. Enter the Item Number in the Item Number field.
If you do not want to make any more adjustments to this item, press the Save button to save it.
Item Edit
All fields in the item may be edited from the Edit Item page. The Edit Item page is reached from the Items page.
Editing an Item
Refer to the steps below to edit an item.
- Click Management > Items > Items from the navigation pane.
- The Items page appears.
- In the Actions column, select the Edit button for the item that you want to edit.
- The Edit Item page appears for this item.
- Perform the changes that you want to make to the item.
- Press the Save button to save the updates to the item.
Item Delete
An item is deleted from the Items page. To delete an item, refer to the steps below.
Note
An item in use cannot be deleted.
- Select Management > Items > Items from the menu.
- The Items page appears.
- Select the Delete button for the item that you want to delete.
- A Confirmation prompt appears, asking you to confirm this action.
- To continue, press Yes.
- The prompt closes.
- If the item is not currently being used, it is deleted.
- If the item is currently being used, it will not be deleted: a message appears to notify you that the item is currently being used and cannot be deleted.
Add to Inventory Action
An item may be added to inventory from the Add to Inventory option at the Items page. This option is available from the Actions column.
Important
To work with item at your facility in a quantity capacity for inventory and orders, it must exist in inventory. Please see "Item Add to Inventory" for more information.
Administrator Level: Select the ... More Options button in the Actions column to view additional options. Select the Add to Inventory button from the More Options that appear.

User Level: select the Add to Inventory button from the Actions column.

The Add to Inventory popup for this item appears.
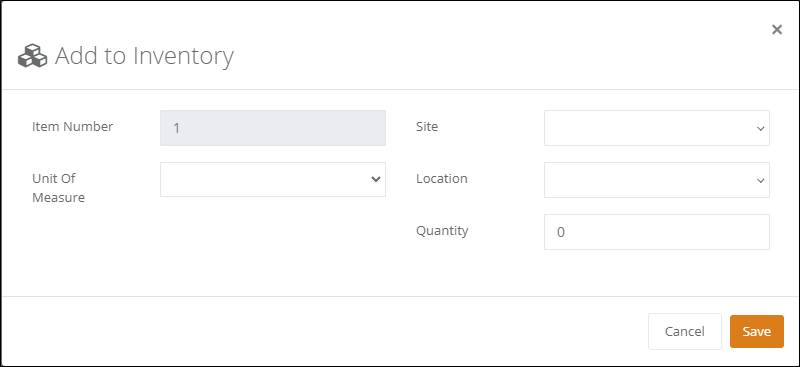
Inventory Tracking Options
An item may be enabled to use the following inventory tracking options:
- Serial Numbers
- Lots
- Expiration Dates
- Cost Tracking
These options are found for the item at the Add Item page or the Edit Item page in the Details tab. To enable the option, Enable the setting for the item.
Note
When an item is found in inventory, the item setting for Serial Numbers, Lots, and Expiration Dates cannot be changed.
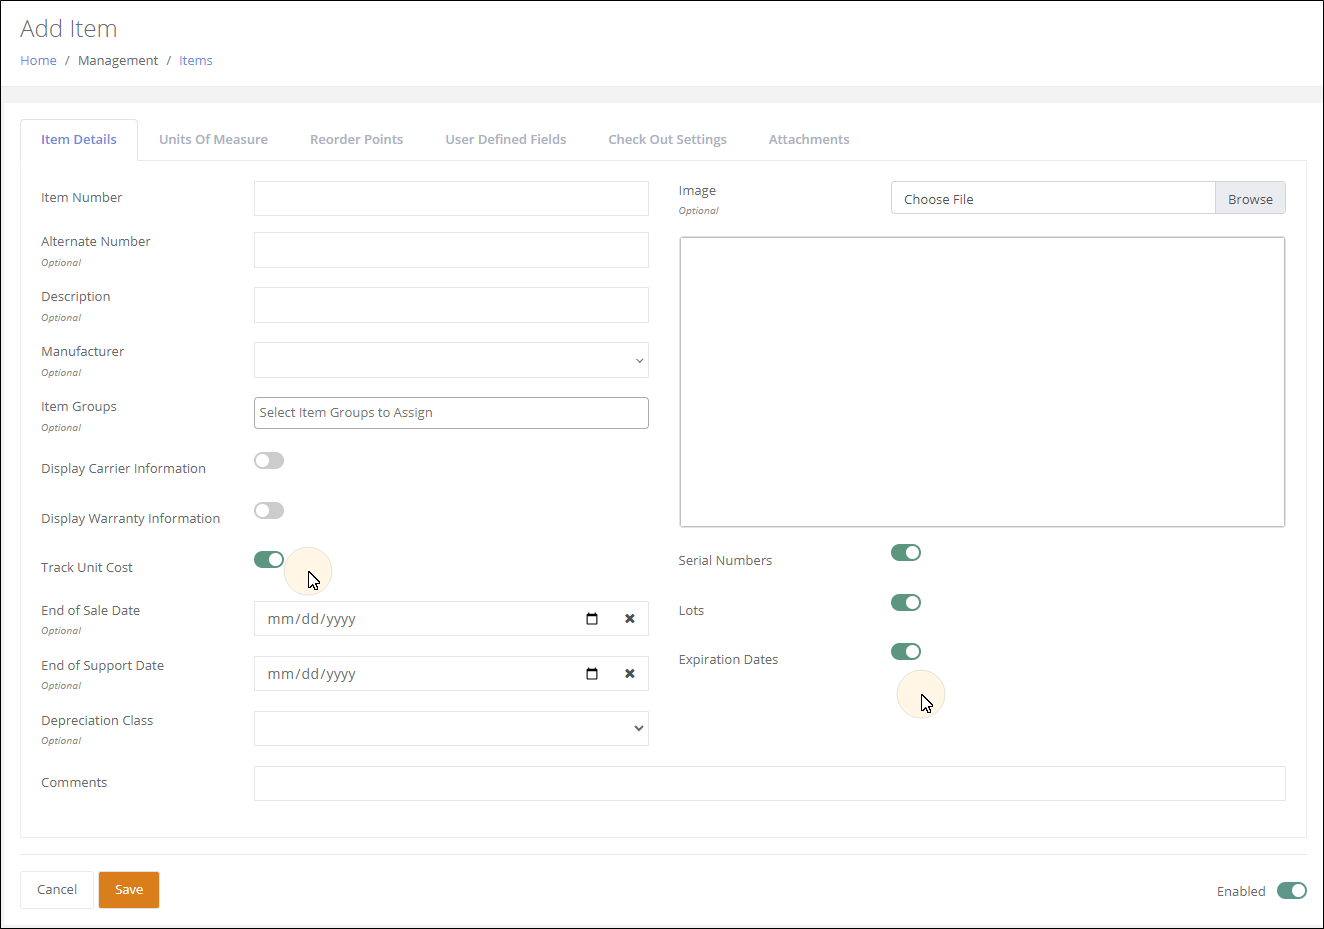
Tracking Serial Numbers
When a transaction involves an item that has Serial Numbers enabled, the UOM qty of the item is always 1 and you must add a unique serial number for each item in the transaction. The serial number may be entered in the Serial Number field during the following transactions:
- Item Added to Inventory
- Return
- Receipt
- Receive
Tracking Item Lot
When the Lot setting is enabled for the item, you must add a Lot for each item in the transaction. The lot may be entered in the Lot field during the following transactions.
- Item Added to Inventory
- Return
- Receipt
- Receive
Tracking Item Expiration Date
When the Expiration Dates setting is enabled for the item, you must enter an expiration date for the item to complete the following transactions. The expiration date may be entered in the Expiration Date field.
- Item Added to Inventory
- Return
- Receipt
- Receive
Tracking Item Unit Cost
When the Track Unit Cost setting is enabled for the item, the Unit Cost for the item is required to be added to the Unit Cost field to complete the following transactions:
- Return
- Receipt
- Receive
For more information about using item cost tracking, see "Unit Cost Tracking".
Importing Items
The item import capability provides for importing new item data or updating existing item data. The Item Import feature uses a CSV file, created from a downloadable template to import the data. Refer to the steps that follow to import item data:
- Select Management > Items > Import Items from the navigation pane.
- The Item Import page appears.
- Press the Download Template button to download the Item Import Template file. This file is a CSV file.
- Be sure to include the required fields for each item that you are importing.
- When preparing your import file, be sure to follow these guidelines:
- Maintain the Header row and the Header row name, as it is entered in the template. This is the database name of the field and it is what the import process uses to add the data in the template into the appropriate fields.
- Note the required fields. The required fields must be part of the template for the item to be imported.
- The optional fields may be removed from the template.
- For fields that require a On/Off, True/False, or Yes/No value, the import file will recognize: True/False, T/F, or 1/0.
- Save the import file that you create.
- From the Item Import page, select the Choose File button. Navigate to the file and select it.
- Press the Upload File button.
- A message will appear to notify you that the import is being processed.
- When the import is finished, a results message is sent to your email. The message contains details about the results of the import.
Item Lookups
IntelliTrack has the following item lookups:
- Item Groups
- Manufacturer
- Unit of Measure
The Item Group, Manufacturer, and Unit of Measure values are added to the system at separate pages. After the value is added to the system, it is available for use at the item. For more information about the item lookups, refer to the sections that follow.
Item Groups
An Item Group is used to categorize items. For example, an item group could be related to a product model number or an in-stock inventory type such as raw materials or finished goods. The Item Group list is maintained at the Items Groups page. Once added, the Item Group is available as an option in the Item Groups down-down list when adding or editing an item. Select Management > Items > Item Groups to reach the Item Groups page.
Note
To add, edit, or delete an Item Group, Administrator access is required.
Adding an Item Group
From the Item Groups page, select the Add button to add a new item group from the Add Item Group page. The Item Group Name is required and must be unique. The Item Group description is optional.
Editing an Item Group
From the Items Groups page, select the Edit button for an item group that you want to edit. The Edit Item Group page appears for this item group. The Name and Description may be edited.
Deleting an Item Group
Note
An Item Group that is associated with an item is "in use" and may not be deleted.
From the Item Groups page, select the Delete button for the Item Group that you want to delete. A Confirmation prompt appears asking you if you are sure that you want to delete this Item Group. If the Item Group is being used for an item, you are also notified that this item group is in use and cannot be deleted.
Manufacturers
A Manufacturer is an organization that manufactures goods. After a manufacturer is added, you are able to associate it with an item. A manufacturer is added at the Manufacturers page. Select Management > Items > Manufacturers to reach this page.
Note
To add, edit, or delete a Manufacturer, Administrator level access is required.
Adding a Manufacturer
From the Manufacturers page, select the Add button to reach the Add Manufacturers page. A name is required and must be unique. The description is optional.
Editing a Manufacturer
From the Manufacturers page, select the Edit button to the right of the manufacturer that you want to edit. The Edit Manufacturer page appears for this manufacturer. The name and description may be edited.
Deleting a Manufacturer
Note
A Manufacturer that is associated with an item is "in use" and may not be deleted.
From the Manufacturers page, select the Delete button to the right of the manufacturer that you want to delete. A Confirmation prompt appears to ask you to confirm this action. If the manufacturer is being used, a message appears along the top of the page to notify you that the manufacturer is currently being used and cannot be deleted.
Units of Measure
The Unit of Measure list is maintained from the Units of Measure page. Select Management > Items > Units of Measure to reach this page.
Note
To add, edit, or delete a Unit of Measure, Administrator level access is required.
Adding a Unit of Measure
From the Units of Measure page, select the Add button to reach the Add Unit of Measure page. A name is required and must be unique. The description is optional.
Editing a Unit of Measure
From the Units of Measure page, select the Edit button to the right of the Unit of Measure that you want to edit. The Edit Unit of Measure page appears for this Unit of Measure. The name and description may be edited.
Deleting a Unit of Measure
Note
A Unit of Measure that is being used for an item is "in use" and may not be deleted.
From the Units of Measure page, select the Delete button to the right of the Unit of Measure that you want to delete. A Confirmation prompt appears to ask you to confirm this action. If the manufacturer is being used, a message appears along the top of the page to notify you that the manufacturer is currently being used and cannot be deleted.
Item User Defined Fields
Note
To work with Item User Defined fields, Administrator level access is required.
IntelliTrack supports up to twenty five user defined fields for an item. The fields are fully customizable. Using them requires three basic steps:
- Adding an Item User Defined Field Group to the Tenant.
- Adding an Item User Defined Field to a User Defined Field Group.
- Adding the Item User Defined Field Group to the Item.
They are outlined below.
Step One: Add a User Defined Field Group for Items
An Item User Defined Field Group is used to group like item user defined fields together. Before you add an Item User Defined Field, you must add a group for it. To add an Item User Defined Field Group, refer to the steps that follow.
Important
An Item User Defined Field Group is required to add an Item User Defined Field.
- Select Management > User Defined Fields > User Defined Field Groups.
- The User Defined Field Groups page appears.
- Press the Add button.
- The Add User Defined Field Group page appears.
- Name field: enter a name for the User Defined Field group in this field.
- Entity: press the drop-down arrow and select Item since we are adding a User Defined Field Group for use with Items.
- Display Order: the Display Order matters when you have more than one User Defined Field Group for Items because it dictates the order that the field group appears in the Add/Edit Item User Defined Fields tab. if this is the first User Defined Field Group that you are adding, enter 1.
- Press Save. You are returned to the User Defined Fields Group page. The new Item User Defined Field Group has been added.
Step Two: Add an Item User Defined Field
An Item User Defined Field is managed from the Item User Defined Fields page. It must be part of an Item User Defined Field Group.
Important
An Item User Defined Field Group is required to add an Item User Defined Field. For more information about adding an Item User Defined Field Group, see "Step One: Add a User Defined Field Group for Items".
Please refer to the steps that follow to add an Item User Defined Field.
- Select Management > User Defined Fields > Item User Defined Fields. The Item User Defined Fields page appears.
- Press the Add button. The Add User Defined Field for Item page appears.
- Name: enter a Name for the User Defined Field in this field.
- User Defined Field: a total of 25 Item User Defined Fields are available. Select from the available user defined fields.
- Group: click the drop-down arrow in this field and select the Item User Defined Group that this Item User Defined Field belongs to from the list that appears.
- Display Order: dictates where this User Defined Field appears in the User Defined Field Group. It matters when you add more than one User Defined Field to this User Defined Field Group because the Display Order Number determines the placement of the User Defined Field inside this User Defined Field Group.
- Type: select the field type for this field from the following options:
- String: the field will accept alphanumeric characters.
- Numeric: the field will accept numeric characters.
- DateTime: the field will accept a calendar date-time stamp.
- Boolean: the field may be toggled on or off.
- Date: the field will accept a calendar date.
- Press Save to save the Item User Defined Field to the Item User Defined Field Group.
- Repeat steps 1-8 until you have added all the Item User Defined Fields to this group.
Adding a User Defined Field to an Item
Once the Item User Defined Field is saved to an Item User Defined Field Group, the User Defined Field Group is ready to be added to the item at the Add/Edit Item page\User Defined Fields Tab. All User Defined Fields added to the User Defined Field Group are also added to the item.
Important
The User Defined Fields must be added to each item that will use them.
To add the Item User Defined Fields to an Item, please refer to the steps that follow.
- Select Management > Items > Items from the navigation pane. The Items page appears. The User Defined Fields may be added to an item at the Add Item page or the Edit Item page.
- Add Item page: select the Add button to reach this page. The Add Item page appears.
- Edit Item page: locate the item for editing and select the Edit button in the Actions column. The Edit Item page appears for this item.
- Press the User Defined Fields tab to bring this tab to the front.
- Click the drop-down arrow in the User Defined Fields Group field. The Item User Defined Fields Group or Groups that have been added to the Tenant appear. Select the User Defined Field Group that you want to add to this item.
- Press the Add button.
- The User Defined Field Group and the Item User Defined Field or Fields that are part of it are added to the item.
- Press the Save button to save the User Defined Fields in the User Defined Field Group are saved to the item. They are available now to be used for the item.
Importing Items
The item import capability provides for importing new item data or updating existing item data. The Item Import feature uses a CSV file, created from a downloadable template to import the data. Refer to the steps that follow to import item data:
- Select Management > Items > Import Items from the navigation pane.
- The Item Import page appears.
- Press the Download Template button to download the Item Import Template file. This file is a CSV file.
- Be sure to include the required fields for each item that you are importing.
- When preparing your import file, be sure to follow these guidelines:
- Maintain the Header row and the Header row name, as it is entered in the template. This is the database name of the field and it is what the import process uses to add the data in the template into the appropriate fields.
- Note the required fields. The required fields must be part of the template for the item to be imported.
- The optional fields may be removed from the template.
- For fields that require a On/Off, True/False, or Yes/No value, the import file will recognize: True/False, T/F, or 1/0.
- Save the import file that you create.
- From the Item Import page, select the Choose File button. Navigate to the file and select it.
- Press the Upload File button.
- A message will appear to notify you that the import is being processed.
- When the import is finished, a results message is sent to your email. The message contains details about the results of the import.
Item Labels
The capability to print Item labels is found at the Items page (Management > Items > Items). It is a Bulk operation, which is completed from the Bulk Changes button, found along the top of the page.
The label sizes that IntelliTrack supports are:
- 2 x 1,
- 3 x 1,
- 3 x 2,
- 3 x 5,
- 4 x 2.
To print Item labels:
Select the records to be printed as labels by marking the checkbox to the left of the Item.
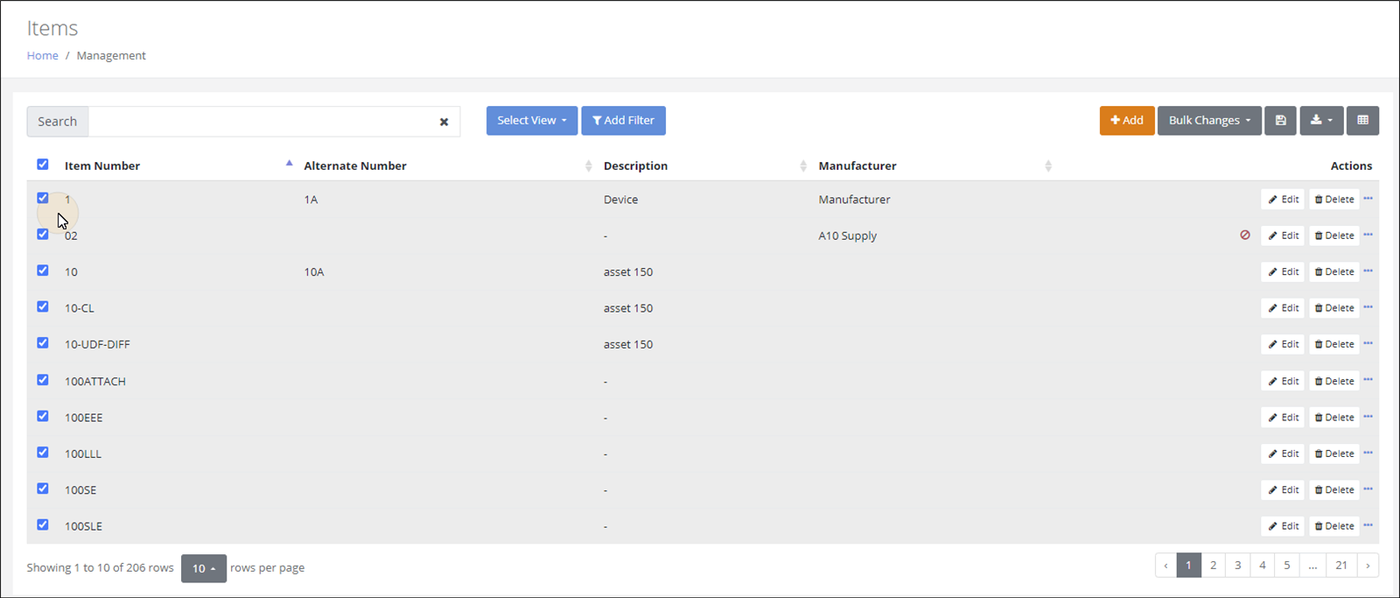
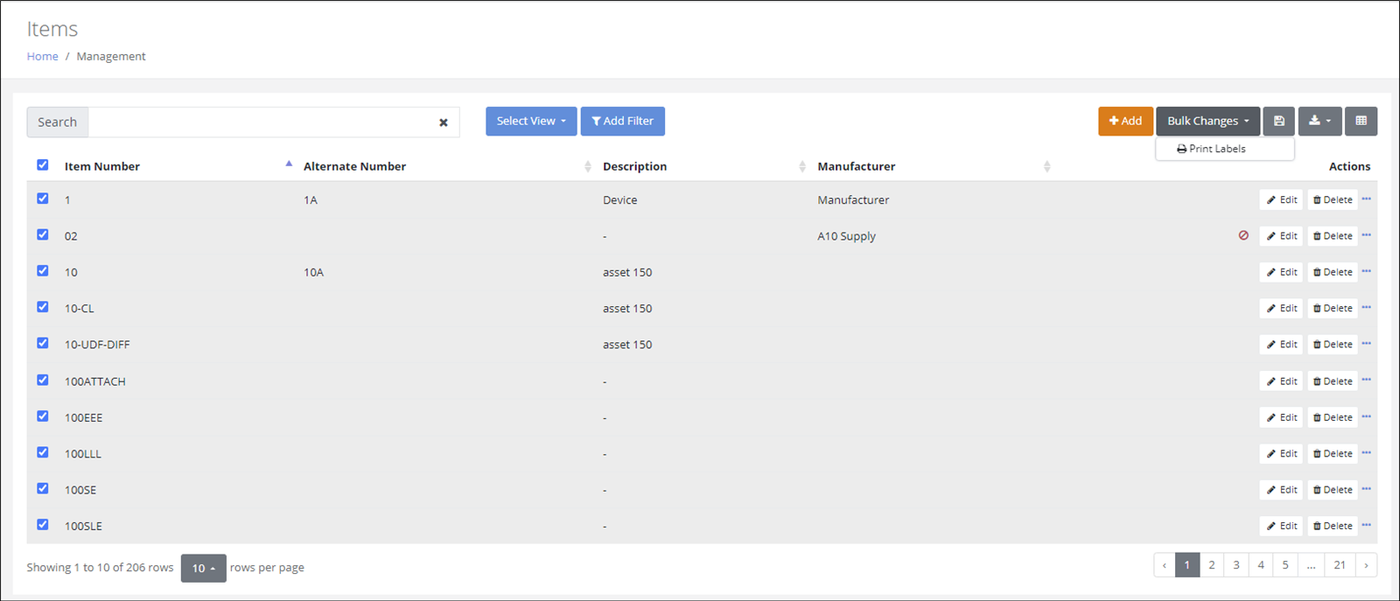
Select Bulk Changes > Print Labels.
The Print Labels popup appears.
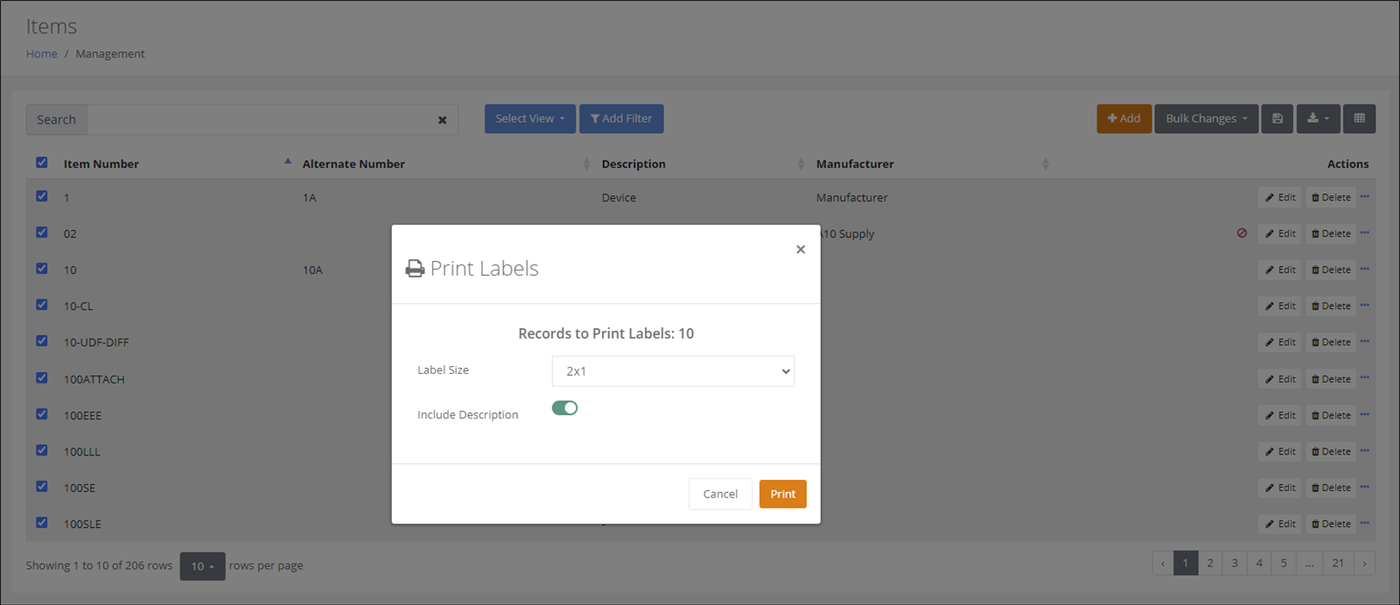
Records to Print Labels shows the amount of records selected for label printing.
Label Size: select the desired label size from the list of options.
Include Description Setting: Enable this setting to print an item description on the item label.
Press the Print button. The popup closes. The Print window appears onscreen.
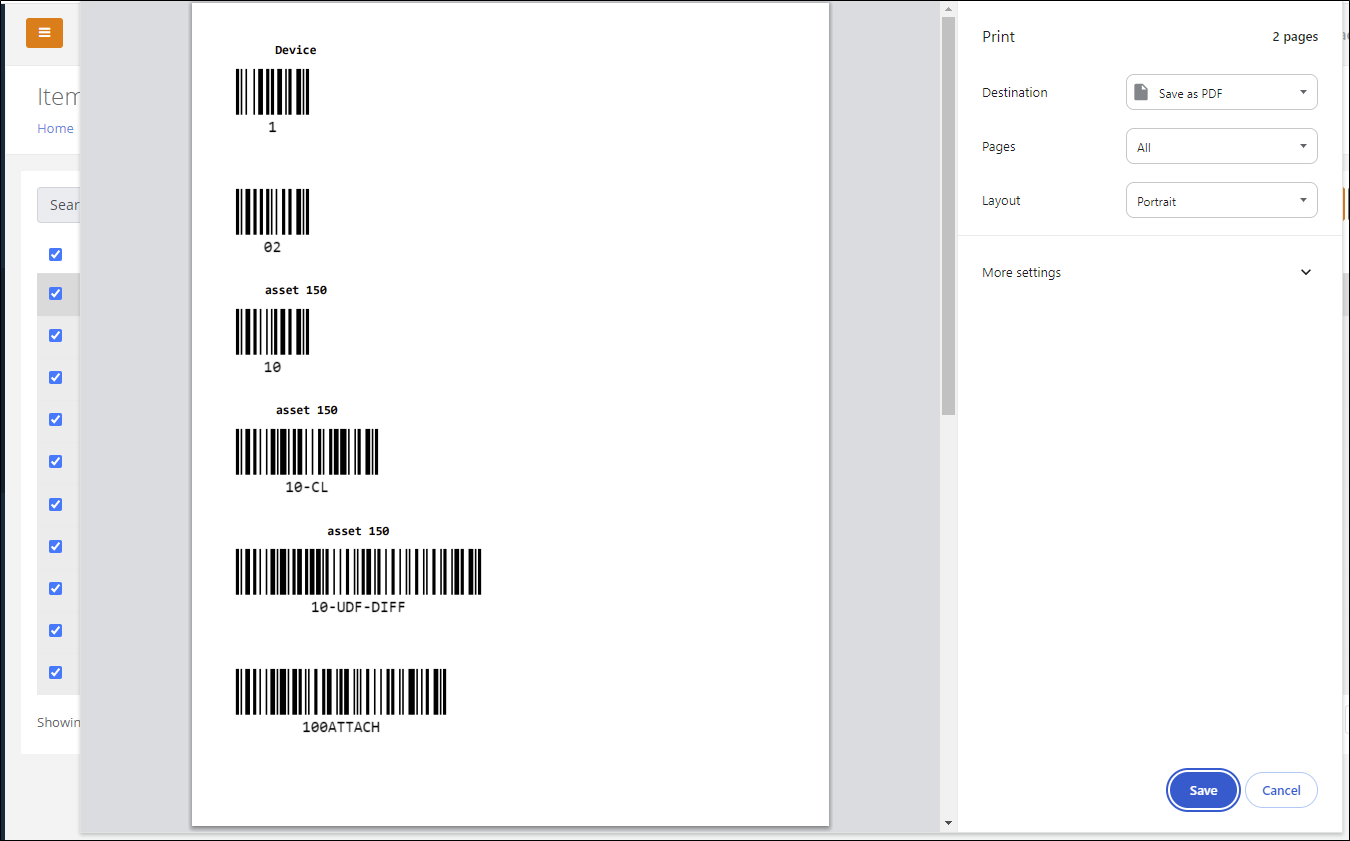
Select the Printer from the list of installed printers.
The Labels are sent to this printer and then printed.
Chapter 4 - Inventory Management
The inventory found in the Tenant is retrieved and displayed at the Inventory page.
Note
To manage inventory, Administrator or User level access is required.
- Manage Inventory
- Adjust Inventory
- Move Inventory
- Perform Inventory Unit of Measure Conversion
Item Add to Inventory
An item may be added to inventory from the Add to Inventory option at the Items page or via a Physical Inventory from the Mobile Client. The amount of inventory added to a site-location is the quantity. IntelliTrack supports on hand quantity and inventory quantity.
On hand Quantity
The amount of an item that is available is the on hand quantity. It is displayed in the Quantity field for the item at the Inventory page. By default, the system automatically updates the on hand quantity during a physical inventory by way of the Site setting, Auto-Update Inventory Quantity, which is Enabled by default.
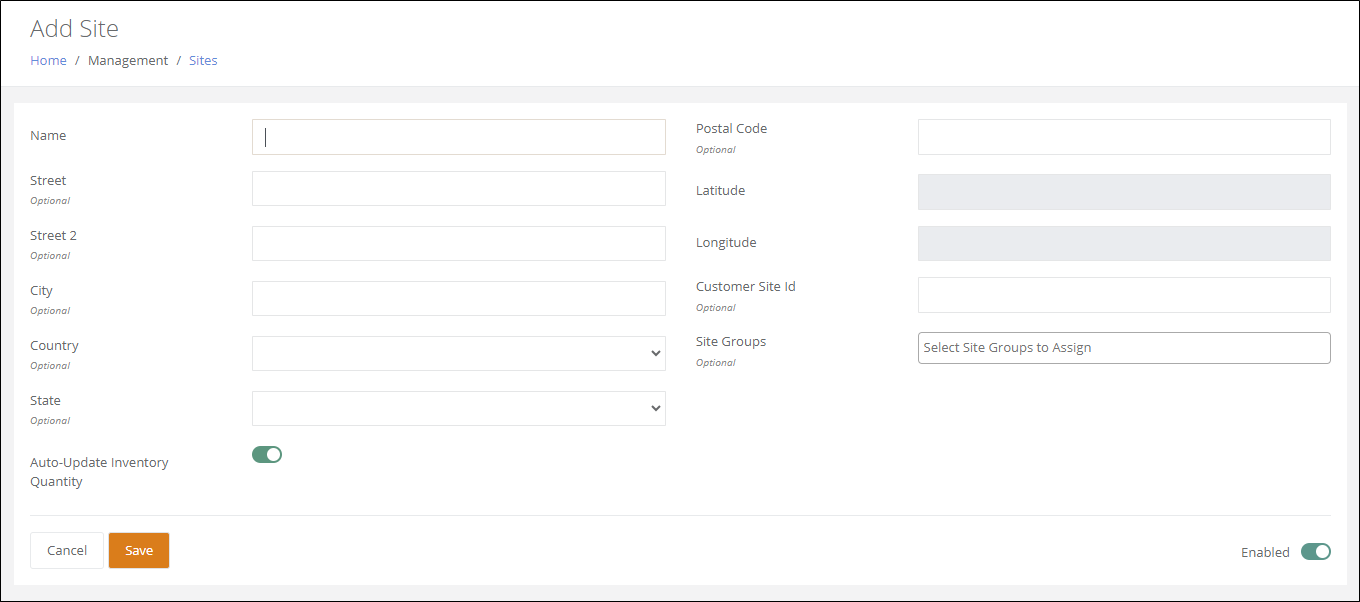
Inventory Quantity
If you would like to maintain a separate inventory quantity, IntelliTrack will maintain a separate Inventory Quantity during a Physical Inventory when the Site setting, Auto-Update Inventory Quantity is disabled.
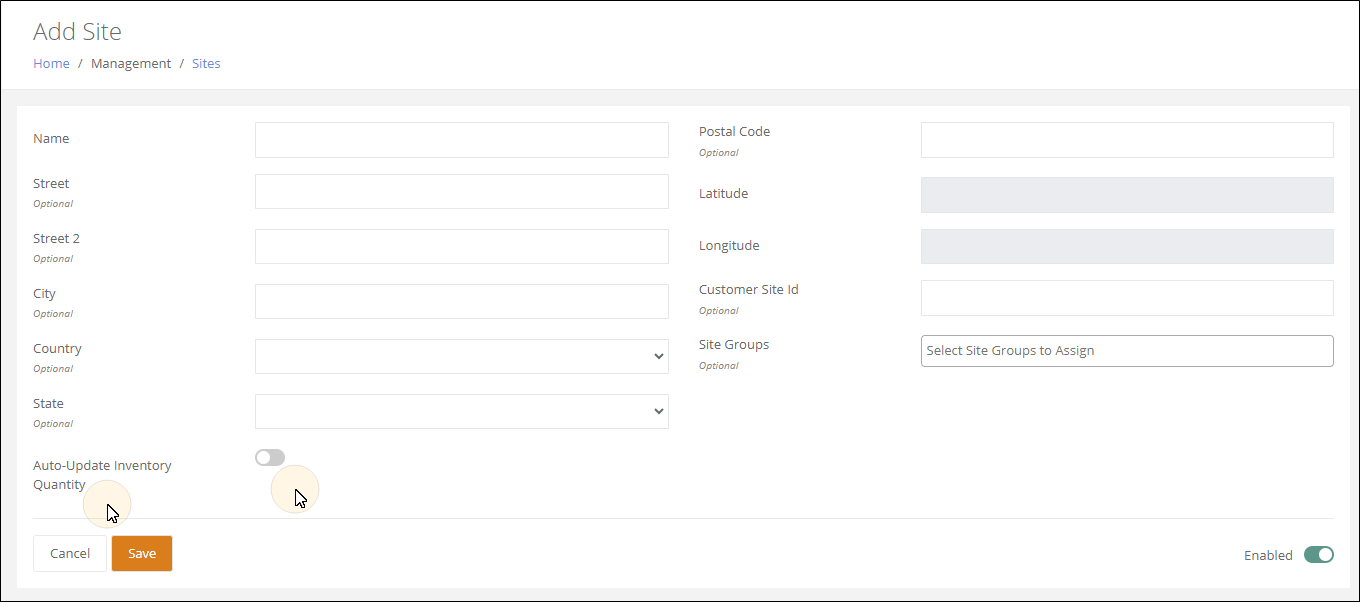
Note
The Inventory Quantity is the amount of an item that has been counted during a Physical Inventory. It is not part of the on hand quantity; but is a separate amount from the on hand amount. It is found in the Inventory Quantity field at the Inventory page.
Item Inventory Attributes
An item may use serial numbers, lots, and expiration dates. This will allow serial number, lot, or expiration date tracking for the item. These settings are enabled at the Add/Edit Item page\Item Details tab; see "Inventory Tracking Options" for more information.
Multiple Units of Measure
When an item has more than one unit of measure, you may add this item to inventory in varying units of measure.
Adding an Item to Inventory via the Web Application
Please refer to the steps below to add an item to inventory via the web application.
Select Management > Items > Items. The Items page appears.
For the item that you want to add to inventory:
Administrator Level: select the ... More Options button in the Actions column to view additional options. Select the Add to Inventory button from the More Options that appear.
User Level: select the Add to Inventory button from the Actions column.
The Add to Inventory popup appears.
- If the item is disabled the Add to Inventory dialog will not appear.
Enter the required information:
- Unit of Measure: required for all inventory records.
- Site: required for all inventory records.
- Location: required for all inventory records.
- Quantity: note that the quantity for a serial item defaults to 1 an cannot be changed.
- Serial Number: required for an item that uses serial numbers.
- Lots: required for an item that uses lots.
- Expiration Date: required for an item that uses expiration dates.
Press Save. The popup closes and a message appears to notify you that the item has been added to inventory.
Inventory Item Adjustment
The quantity for an item may be adjusted up or down, unless it is a serialized item. The quantity for a serialized item is locked at 1. To adjust inventory quantity in a site-location, follow the steps below.
Select Consumables > Inventory from the navigation pane.
The Inventory page appears. It lists the inventory records.
Locate the inventory record to adjust. Select the Adjust icon to the far right of this record.
The Adjust form appears. It contains inventory information for this item. You may adjust the quantity.
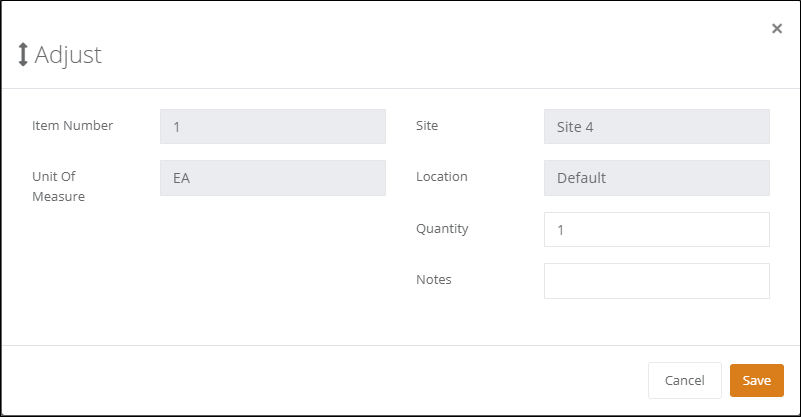
Quantity field: Enter the quantity adjustment in the Quantity field.
The quantity for an item with a serial number cannot be more than one.
Negative quantity is not allowed.
When the quantity is adjusted to zero, via an Adjust, Issue, or Pick transaction, the item is removed from the inventory.
Important
If you would like to track reorder quantity for a Site, we recommend that you set up Reorder Points for the item at the Site, see "Item Reorder Points" for more information.
Inventory Quantity field: Available when the Site does not use the Auto-Update Inventory Quantity feature. Enter the inventory quantity in this field, when applicable.
Select Save to process the inventory adjustment and close the form.
- You are returned to the Inventory page. The on hand quantity has been adjusted.
Inventory Quantity Feature
When a Site does not use the Auto-Update Inventory Quantity setting, a separate Inventory Quantity for the item may be maintained at the Site. This typically occurs when a Physical Inventory is performed via the Mobile Client.
Bulk Change Options for Inventory Quantity
The Bulk Change options of Update Quantity and Delete Inventory Quantity are available to aid you in managing the separate inventory quantity: you may either update the Quantity with the Inventoried Quantity or delete the Inventoried Quantity and maintain the current Quantity.
Update Quantity
- Select Home > Consumables > Inventory from the navigation pane. The Inventory page appears.
- For each item that you would like to move, mark the checkbox to the left of the Item Number field.
- The Bulk Changes button is found above the grid. Press the drop-down arrow in the Bulk Changes button.
- Select the Update Quantity option.
- The Update Quantity popup appears. It has the message: The Quantity will be updated to the Inventory Quantity. Update inventory for selected inventory records?
- Click Update to update the quantity to the inventory quantity for the selected records.
Delete Inventory Quantity
- Select Home > Consumables > Inventory from the navigation pane. The Inventory page appears.
- For each item that you would like to move, mark the checkbox to the left of the Item Number field.
- The Bulk Changes button is found above the grid. Press the drop-down arrow in the Bulk Changes button.
- Select the Delete Inventoried Quantity option.
- The Delete Inventory Quantity popup appears. It has the following message: Deleting inventory quantity removes physical counts without applying them. Continue?. Select Delete to continue with deleting the physical counts.
Convert Unit of Measure
Inventory Unit of Measure Conversion History Transactions are:
- Inventory Let Down
- Inventory Roll Up
This action is performed at the Inventory page for an item via the Convert Unit of Measure dialog (reached from the Convert button in the Actions column).
- Item must have multiple units of measure to perform either a quantity let down or a quantity roll up.
- When an inventory let down is performed, a larger item unit of measure quantity is let down to a smaller unit of measure quantity.
- Inventory Let Down To: the item UOM quantity which results from the quantity let down of the greater unit of measure.
- Inventory Let Down From: the item UOM quantity which is being let down to a smaller unit of measure.
- When an inventory roll up is performed, a smaller item unit of measure quantity is rolled up into a larger unit of measure quantity.
- Roll up Inventory To: the item UOM quantity which results from the quantity rollup to the greater unit of measure.
- Roll up Inventory From: the item UOM quantity which is being rolled up into a larger unit of measure.
Inventory Bulk Move
A bulk inventory move may be performed from the Inventory page.
Note
The bulk move operation moves all items from one location to another location.
- Select Home > Consumables > Inventory from the navigation pane. The Inventory page appears.
- For each item that you would like to move, mark the checkbox to the left of the Item Number field.
- The Bulk Changes button is found above the grid. Press the drop-down arrow in the Bulk Changes button.
- The Change Location option appears.
- Select the Change Location option. The Bulk Changes - Change Location popup appears.
- The Amount of Records to Move appears above the Site field.
- Site field: click the drop-down arrow in this field. The list of Sites appears. Select the Site to which you are moving the selected items.
- Location field: click the drop-down arrow in this field. The list of Locations for this site appears. Select the Location to which you are moving the selected items.
- Click Apply. The Bulk Changes - Change Location popup closes.
- A jobs page appears that shows the progress of the bulk move.
- When the bulk move is finished, you are notified that it succeeded. The selected records have been moved.
Inventory Single Move
You are able to change the location for a single item from the Inventory page.
Note
The Single Item Move allows you to move a partial quantity from one location to another location.
- From the navigation pane, Main menu, select Consumables > Inventory.
- For the item that you want to move, select the Location button in the Actions column.
- The Change Location popup appears.
- To Site field: click the drop-down arrow and select from the list of sites that appears.
- To Location field: click the drop-down arrow and select from the list of locations that appears.
- Quantity field: enter the quantity to move.
- Save: press Save to move the item-qty to the site and location.
System Views / Inventory Page
The following system views are found in the Select View drop-down options at the Inventory page:
- Inventory by Location: this System View is designed to provide insight on your inventory by location.
- Inventory by Item Groups: this System View is designed to provide insight on your inventory by item groups.

Importing Inventory
The inventory import capability provides for importing new inventory or updating existing inventory. The Inventory Import feature uses a CSV file, created from a downloadable template to import the data.
Important
The inventory import will not create a new item. If you want to import NEW ITEM inventory, first IMPORT the NEW ITEM data via the item import, see "Importing Items" for more information.
Refer to the steps that follow to import item data:
- Select Consumables> Inventory Import from the navigation pane.
- The Import Consumable Inventory page appears.
- Press the Download Template button to download the Inventory Template file. This file is a CSV file.
- Be sure to include the required fields for each inventory item that you are importing.
- When preparing your import file, be sure to follow these guidelines:
- Maintain the Header row and the Header row name, as it is entered in the template. This is the database name of the field and it is what the import process uses to add the data in the template into the appropriate fields.
- Note the required fields. The required fields must be part of the template for the item to be imported.
- The optional fields may be removed from the template.
- For fields that require a On/Off, True/False, or Yes/No value, the import file will recognize: True/False, T/F, or 1/0.
- Save the import file that you create.
- From the Inventory Import page, select the Choose File button. Navigate to the file and select it.
- Press the Upload File button.
- A message will appear to notify you that the import is being processed.
- When the import is finished, a results message is sent to your email. The message contains details about the results of the import.
Inventory Print Options
The Inventory page has print options for:
- Inventory item labels,
- Inventory Location Report.
Inventory Item Labels
You are able to print inventory item labels in IntelliTrack from the Inventory page. Optionally, the item’s description and location may be included in the label.
Select the checkbox to the left of the item that you want to print the label or labels for.
Press the Print button in the upper right area of the page.
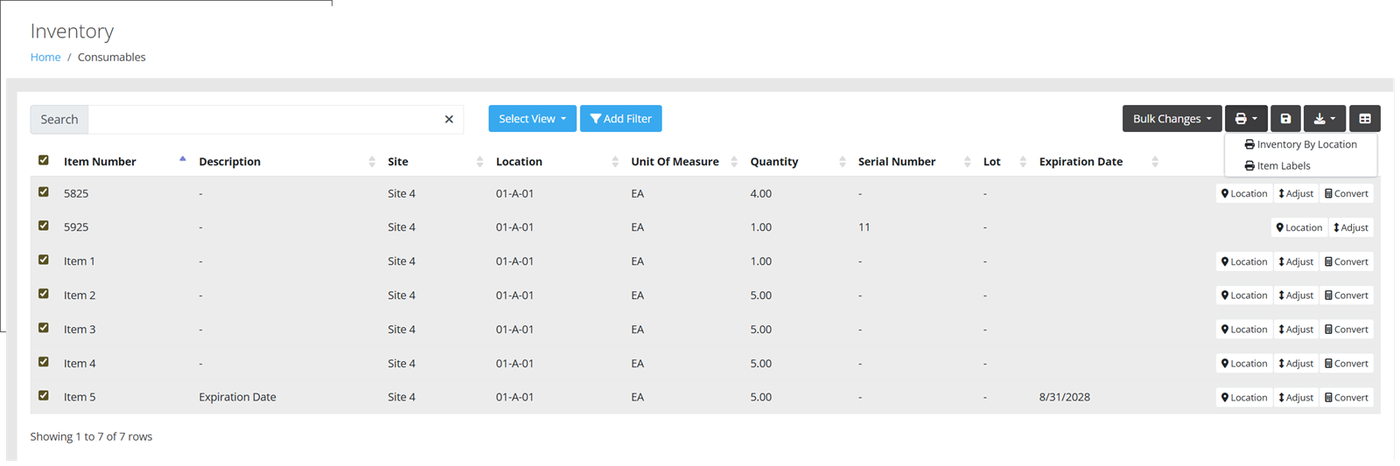
Select the Item Labels option.
The Print Labels popup appears onscreen.
Label Size: press the drop-down arrow and select the label size from the options in the drop-down list.
Include Description option: toggle this setting the Enabled to include the item’s description in the label.
Include Location option: toggle this setting to Enabled to include item’s location in the label.
Press the Print button in the popup window. A Print Preview window appears onscreen. It shows you a preview of the labels. The Preview window shows a label preview. At this point, you may need to adjust the label selections so that the preview looks good. (The preview is an indicator of how the labels will be printed.)
Inventory by Location Report
The Print button also has an Inventory by Location option. This option will send a formatted report to a selected printer (including a PDF printers).
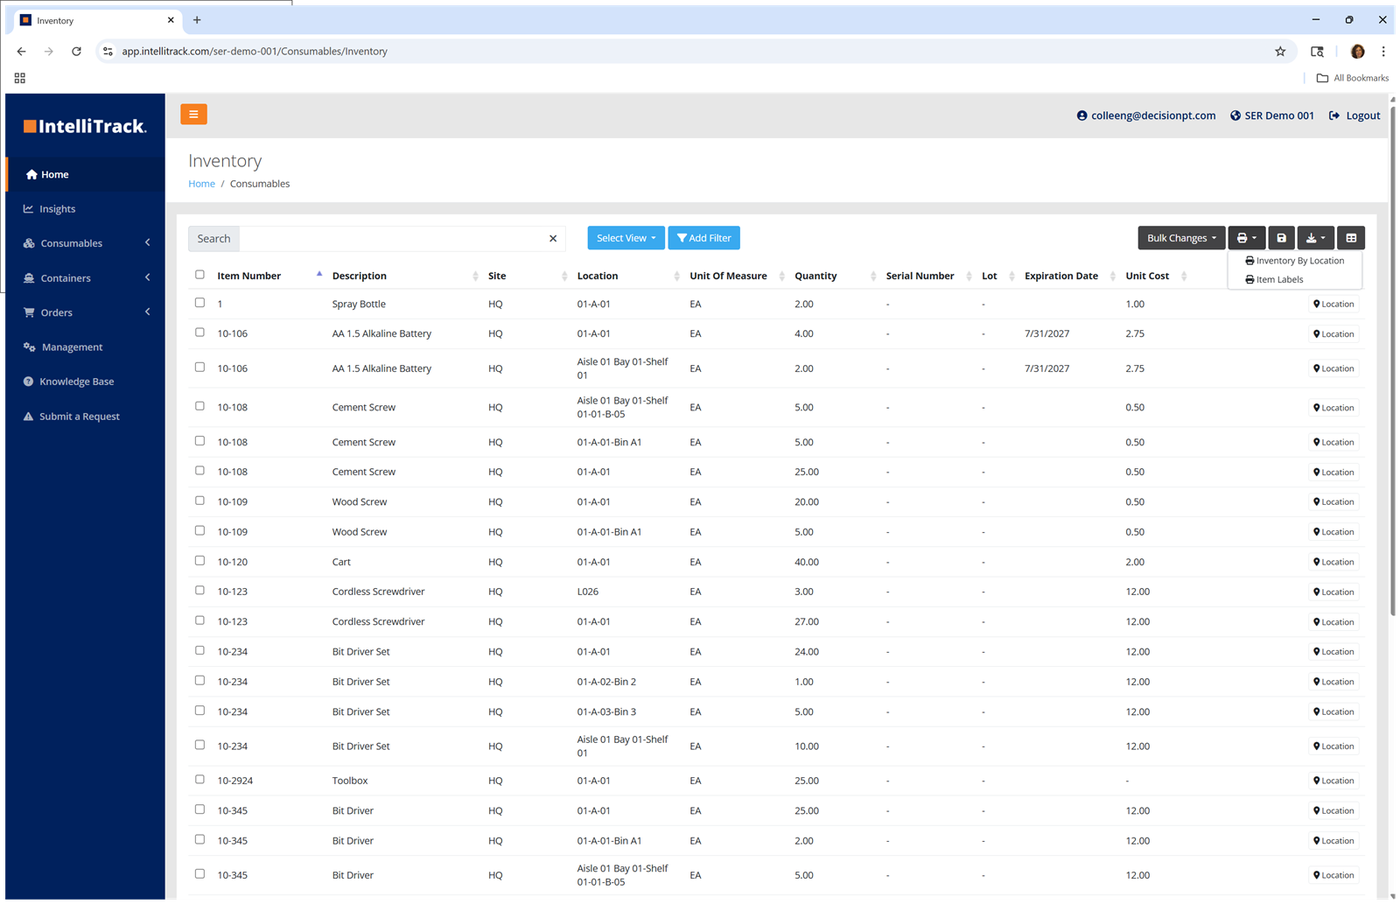
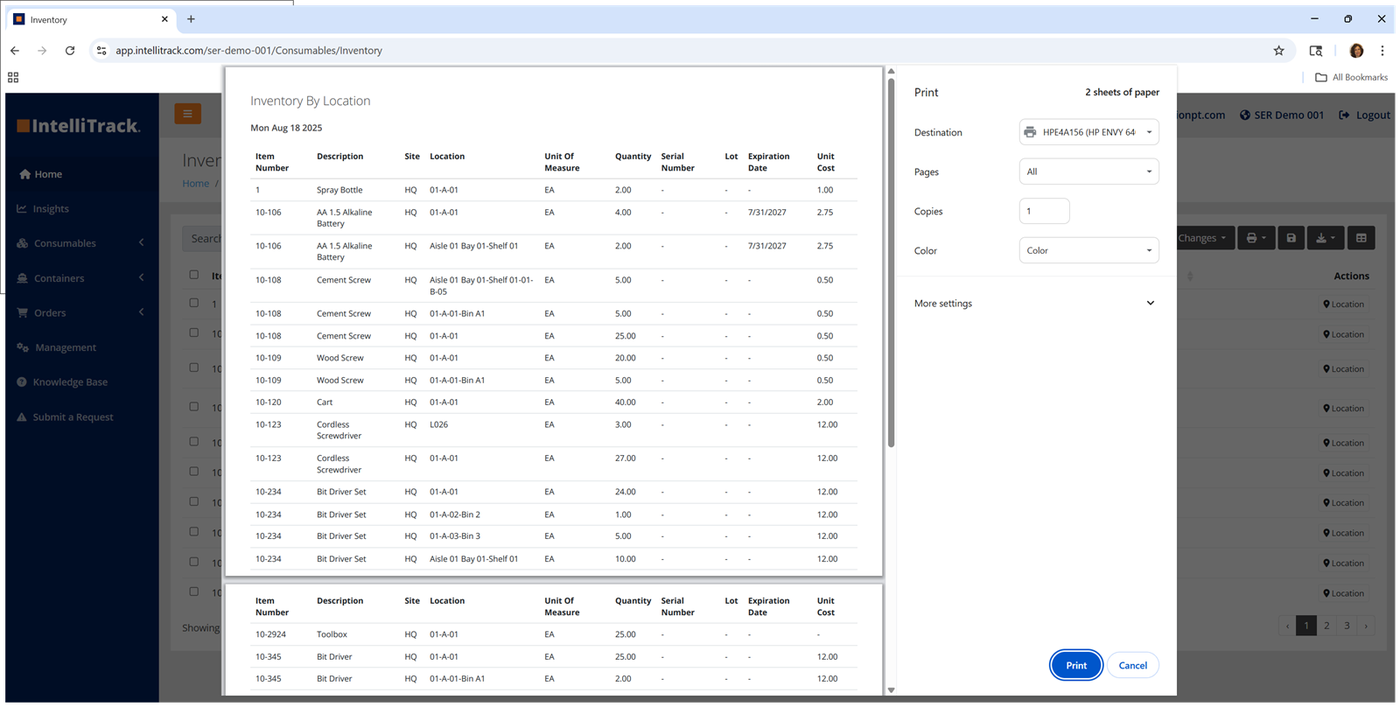
Note
If you place a cost field on the page via the Manage Columns option, the report will also total the cost of the inventory.
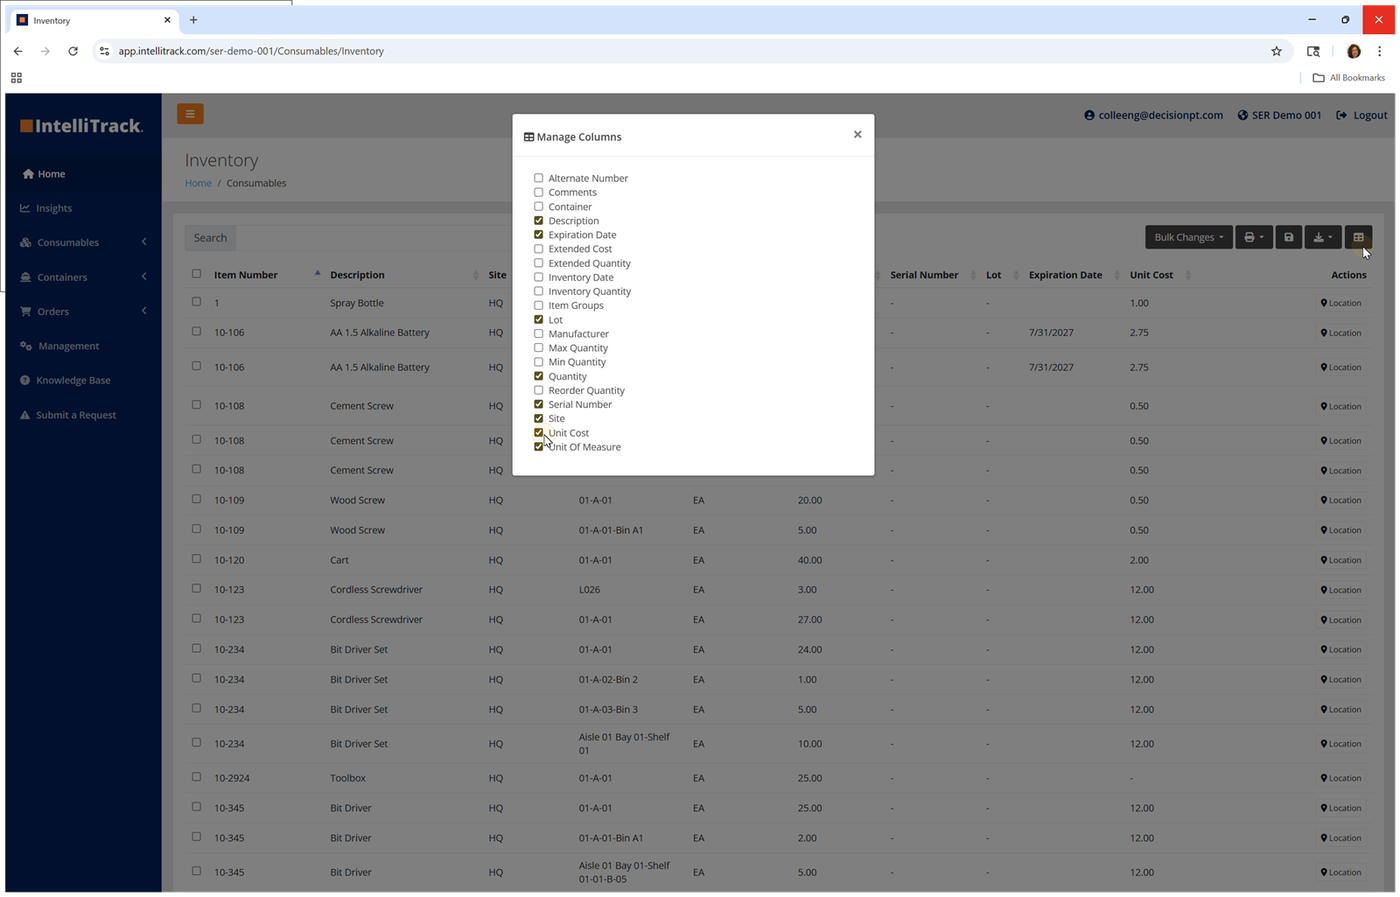
Chapter 5 - Order Management
Stock orders in IntelliTrack include Issue, Receipt, and Return.
- Issue Order: removes items from your inventory. During the Issue process, the items that are removed from inventory are issued to a customer.
- Receipt Order: adds items to your inventory. During the Receipt process, items are added to inventory from a vendor receipt.
- Return Order: adds previously issued items back into your inventory. During the Return process, items are added back into inventory from a customer return.
Warehouse orders include Receiving and Picking.
- Receiving Order: a predefined order that adds items to you inventory. During an item receive, the items that received are added to a site-location.
- Picking Order: a predefined order that removes items from your inventory. During an item pick, the items are removed from your inventory and sent to a customer.
The Management > Orders menu options are used to add customers, vendors, and shipping carriers.
- Customers: required to add an issue order or a picking order.
- Vendors: required to add a receipt, return, or receiving order.
- Shipping Carriers: may optionally be added to a picking order.
Vendors
IntelliTrack maintains vendor data to help you accurately track them by name and address and keep contact information up-to-date. In IntelliTrack, a vendor is associated with an inbound stock receipt order.
The vendor records may be viewed and worked with at the Vendors page. Select Management > Orders > Vendors to reach this page.
Note
To add, edit, or delete a Vendor, Administrator access is required.
Adding a Vendor
A vendor is added from the Add Vendor page. Select the Add button from the Vendors page to reach this page. When the Name (required) is added and the address (optional), press Save to save this vendor to the system.
Editing a Vendor
A vendor is edited from the Edit Vendor page. This page is reached from the Vendors page. Find the vendor that you want to edit. Next, press the Edit button for this vendor. The Edit button is found in the Actions column to the right of the vendor. When you are finished editing the vendor, press the Save button to save the changes and return to the Vendors page.
Vendor Information
The vendor record includes the:
- Name (required)
- Street
- Street 2
- City
- Country
- State
- Postal Code
- Contact Name
- Account Number
- Phone Number
Deleting a Vendor
Note
A Vendor in use cannot be deleted.
A vendor is deleted from the Vendors page. Select the Delete button to the right of the vendor that you want to delete and follow the Confirmation prompts to delete the vendor.
Customers
IntelliTrack maintains customer data to help you accurately track them by name and address and keep contact information up-to-date. In IntelliTrack, a customer is associated with an outbound stock issue order, an inbound stock return order, or an outbound pick order.
The customer records may be viewed and worked with at the Customers page. Select Management > Orders > Customers to reach this page.
Note
To add, edit, or delete a Customer, Administrator access is required.
Adding a Customer
A customer is added from the Add Customer page. Select the Add button in the top right of the Customers page to reach this page. A customer name is required. All other customer information is optional. When you are finished adding the customer, press the Save button to save the customer record to IntelliTrack.
Editing a Customer
A customer is edited from the Edit Customer page. To reach this page, go to the Customers page and locate the customer that you want to edit. Press the Edit button for this customer, which is found in the Actions column to the right. The Edit Customer page appears. All fields may be edited. When you are finished editing the customer, press the Save button to save the changes to IntelliTrack.
Customer Information
The customer record includes the:
- Name (required)
- Street
- Street 2
- City
- Country
- State
- Postal Code
- Contact Name
- Account Number
- Phone Number
Deleting a Customer
If a customer is not being used, you may delete the customer from the Customers page. Click the Delete button for this customer and follow the prompts to delete the customer.
Note
If a customer is currently being used, it cannot be deleted.
Customer Ship To Addresses
You may add an unlimited amount of "Ship To Addresses" to the customer. Press the Ship To Addresses button to reach the Ship To Address page for the customer.
Adding a Ship To Address for a Customer
A Ship To Address is added to the customer via the Ship To Address for the customer page. To add a Ship To Address, press the Add button along the top of the page. The Add Ship To Address for this customer page appears. After adding the address, press the Save button to save the Ship To Address to the list of ship to addresses for this customer.
Editing a Ship To Address for a Customer
A Ship To Address may be edited. It is edited from the Edit Ship To Address for the customer page. To edit a Ship To Address, locate the Ship To Address found in the Ship To Addresses for the customer page and then select the Edit button found in the Actions column to the right.
Deleting a Ship To Address for a Customer
A Ship To Address may be deleted. It is deleted from the Ship To Addresses for the customer page. To delete a Ship To Address locate the address that you want to delete and press the Delete button found in the Actions column.
Note
If a Ship To Address is currently being used, it cannot be deleted.
Shipping Carriers
Shipping Carriers and Shipping Methods are managed from the Shipping Carriers page and the Shipping Methods for the Carrier page. When entered in the application, the carriers list becomes available for carrier selection when adding or editing a Picking order.
Note
To add, edit, or delete a Shipping Carrier, Administrator access is required.
Adding a Shipping Carrier
To add a Shipping Carrier, please refer to the steps that follow.
- Select Management > Orders > Shipping Carriers. The Shipping Carriers page appears.
- Select the Add button. The Add Shipping Carrier page appears.
- Name: add the name in this field.
- Description: add a description (optional) in this field.
- Press the Save button.
- The Add Shipping Carrier page closes and you are returned to the Shipping Carriers page. The Shipping Carrier has been added to the list.
Editing a Shipping Carrier
A Shipping Carrier is edited from the Edit Shipping Carrier page. To reach this page, select the Edit button for the carrier that you want to edit. The Name and Description may be edited.
Deleting a Shipping Carrier
Note
A Shipping Carrier in use on a Picking Order cannot be deleted.
A Shipping Carrier is deleted from the Shipping Carriers page. Select the Delete button to the right of the carrier that you want to delete and follow the Confirmation prompts to delete it.
Shipping Methods
The Shipping Method list is specific to the Shipping Carrier. To view the Shipping Method list for a Carrier, press the Shipping Methods button for the carrier, at the Shipping Carrier page.
Note
To add, edit, or delete a Shipping Method, Administrator access is required.
Adding a Shipping Method
A Shipping Method is added to a Shipping Carrier. To add a Shipping Method to a carrier, please refer to the steps that follow.
- Select Management > Orders > Shipping Carriers. The Shipping Carriers page appears.
- Locate the Shipping Carrier. Select the Shipping Methods button in the Actions column. The Shipping Methods for this Carrier page appears.
- Press the Add button. The Add Shipping Method page appears.
- Enter the Name for this Shipping Method in the Name field.
- Enter a Description for this Shipping Method in the Description field, if desired.
- Press Save. You are returned to the Shipping Methods for this Carrier page. The Shipping Method has been added.
Editing a Shipping Method
A Shipping Method may be edited from the Shipping Method for a Carrier page. Locate the Method to edit and press the Edit button in the Actions column. The Edit Shipping Method for Carrier page appears. The Name and the Description may be edited.
Deleting a Shipping Method
A Shipping Method that is not in use may be deleted. Press the Delete button in the Actions column for the Shipping Method that you want to delete and follow the Confirmation prompts to delete it.
Order User Defined Fields
IntelliTrack supports up to six user defined fields for each Order Type (six for Issues, six for Receipts, six for Returns, six for Receiving, and six for Picking). The fields are fully customizable.
Note
To work with Order User Defined fields, Administrator access is required.
Adding an Order User Defined Field
An Order User Defined Field is managed from the Order User Defined Fields page.
Please refer to the steps that follow to add an Order User Defined Field.
- Select Management > User Defined Fields > Order User Defined Fields. The Order User Defined Fields page appears.
- Press the Add button. The Add User Defined Field for Order page appears.
- Name: enter a Name for the User Defined Field in this field.
- User Defined Field: a total of 6 User Defined Fields are available for each Order Type. Select from the available user defined fields.
- Order Type: click the drop-down arrow and select the Order Type for this User Defined Field from the options that appear in the drop-down list:
- Issue
- Receipt
- Return
- Receiving
- Picking
- Display Order (1-6): dictates where this User Defined Field is placed in the Order User Defined field area of the Order page. It matters when you add more than one User Defined Field to this Order Type. The Display Order for an Order Type must be unique.
- Type: select the field type for this field from the following options:
- String: the field will accept alphanumeric characters.
- Numeric: the field will accept numeric characters.
- DateTime: the field will accept a calendar date-time stamp.
- Boolean: the field may be toggled on or off.
- Date: the field will accept a calendar date.
- Press Save to save the Order User Defined Field.
- Repeat steps 1-8 to add another Order User Defined Field.
- The Order User Defined Field will appear for each order type in the User Defined Fields area of the Order page (i.e., Issues page, Receipts page, Returns page, Receiving pages, Picking pages).
Chapter 6 - Issues
Note
To perform a stock issue, Administrator or User access is required.
Stock is issued to a customer. When you issue stock, you are withdrawing it from inventory. A stock issue requires the following:
- Order Number
- Order Date
- Customer
- Issue Item
When a stock issue order is fulfilled, items are withdrawn from inventory and dispensed to a customer. An Issue decreases the on hand quantity in the issue location.
Note
When Issue Order Auto-Numbering is enabled in the Tenant Settings for Stock Order, the Order Number is automatically entered into the Order Number field by the system.
Performing a Stock Issue
A stock issue is performed at the Add Issue page. Select Home > Orders > Issues to reach the Issues page. From the Issues page, select the Add button to reach the Add Issue page.
To issue items at the Add Issue page, refer to the steps that follow.
- Order Number (required): If your Tenant is set for Issue Order Auto-Numbering, the system automatically enters an Issue Order number in the Order Number field.
- Order Date (required): automatically set at today's date. If you want to enter a different date in this field, click the drop-down arrow in the Order Date field and select the date from the calendar control that appears.
- Customer (required): the customer to whom the stock is being issued; the customers available are pulled from the customer list in the system (Management > Orders > Customers). Click the drop-down arrow in the Customer field and select a customer from the list that appears.
- Ship To address (optional): click the drop-down arrow in the Ship To field and select a shipping address for the customer from the list that appears. The Ship To address is added to the customer at Management > Orders > Customers > Ship To Addresses for Customer. If this customer does not contain a ship-to address, the Ship-To list will be empty.
- Enter the item or items to be issued (at least one line item is required).
- Item Number (required): Select the item to issue by clicking the drop-down arrow and selecting it from the list that appears.
- Site: select the site of the issue item.
- Location: select the location of the issue item.
- Unit of Measure: select the Unit of Measure of the issue item.
- Available Quantity: the available quantity in the site-location-unit of measure for the selected item appears in this field.
- Serial Number: automatically entered in this field for an item that uses serial numbers.
- Lot: automatically entered in this field for an item that uses lots.
- Expiration Date: automatically entered in this field for an item that uses expiration dates.
- Comments: enter any relevant comments, if applicable.
- Quantity: enter the issue quantity. (If the item is uses serial numbers, 1 is automatically entered in this field and cannot be changed.)
- Press Save to perform the stock issue.
Delivery Note
A Delivery Note is available for each Issue Order. It contains the order items and signature blocks for:
- Prepared By
- Checked By
- Transported By
- Received By
To print a Delivery Note for the Issue Order:
Navigate to the Issues page.
For the Issue Order, in the Actions column, select the More Options button. The Delivery Note option appears. Select the Delivery Note option.

A Print window appears onscreen. The Delivery Note for this Issue Order is ready to be printed.
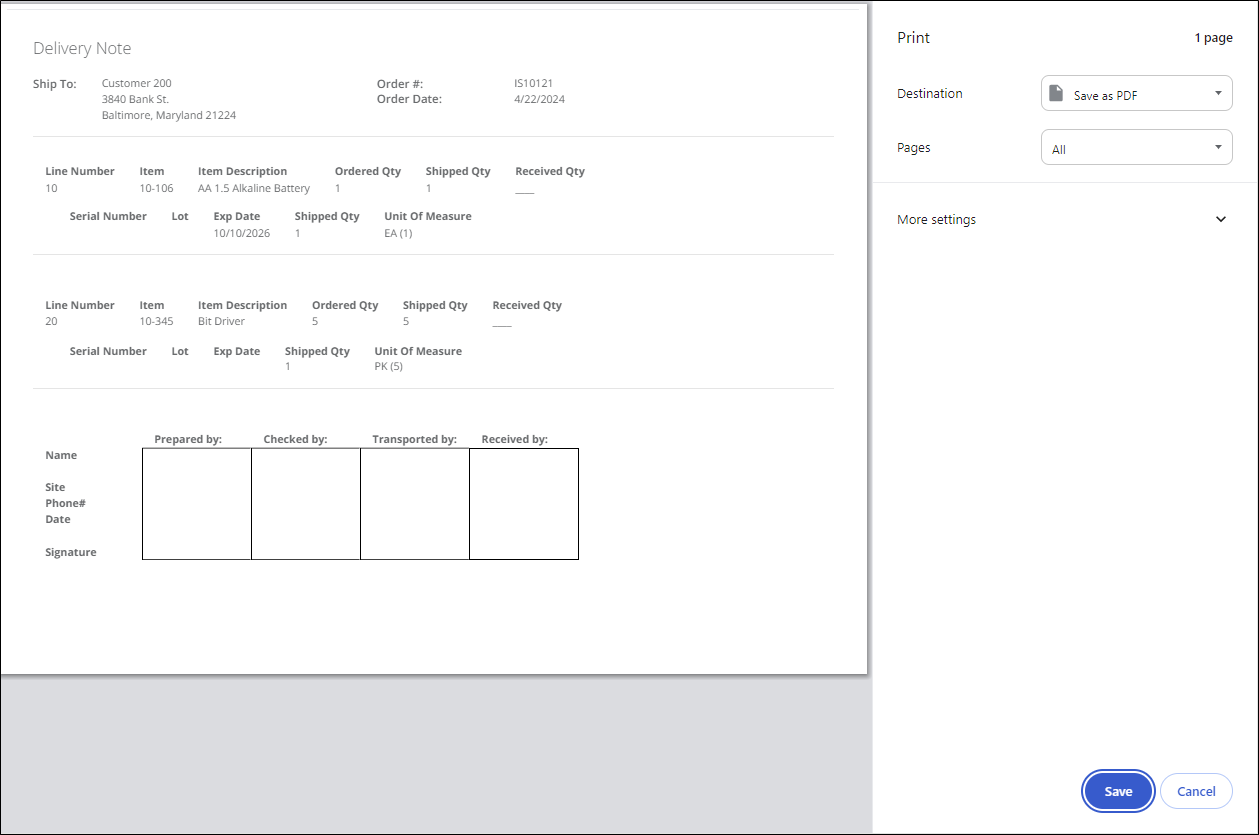
Chapter 7 - Receipts
Note
To perform a stock receipt, Administrator or User access is required.
A receipt is an inbound order of incoming goods into inventory. A stock receipt order requires an:
- Order Number
- Order Date
- Vendor
- At least one item for stock receipt
Note
When Receipt Order Auto-Numbering is enabled in the Tenant Settings for Stock Order (Management > Settings > Tenant Settings), the Order Number is automatically entered into the Order Number field by the system.
Performing a Stock Receipt
Stock is received at the Add Receipt page. Follow the instructions below to perform a stock receipt.
- Select Order > Receipts. The Add Receipt page appears.
- Click the Add button, which is above the grid in the top right area of the page. The Add Receipt page appears.
- In the Order Header area of the page, you will notice an Order Number field, Vendor field, and an Order Date field. This is all required information for the order.
- Order Number: If Auto-Numbering is turned on, the system will automatically generate the next order number and place it in this field.
- Vendor: Click the drop-down arrow in the Vendor field and select a vendor from the list that appears.
- Order Date: Today's date is automatically filled in this field. The date may be changed.
- In the Order Details area of the page, you will add each line item to the order. When adding a line item, the site, location, item information, and quantity are required.
- Site: click the drop-down arrow and select the site from the list that appears.
- Location: click the drop-down arrow and select the location from the list that appears.
- Item Number: click the drop-down arrow and select the item from the list that appears.
- Unit of Measure: click the drop-down arrow and select the unit of measure from the list that appears.
- Serial Number: for an item that uses serial numbers, a serial number is required and it must be unique.
- Lot: for an item that uses lots, a lot is required and it must be unique.
- Expiration Date: for an item that uses expiration dates, an expiration date is required and it must be unique.
- Unit Cost: for an item that tracks cost, a unit cost is required.
- Comments: any item comments may be placed in this field. A comment is optional.
- Add button: click the Add button to add this item, as a line item, to the stock receipt.
- Cancel button: click the Cancel button if you want don't want to add this item to the stock receipt.
- Line Items: The item or items that are added to the order as line items appear underneath the Order Details area of the page.
- When you are finished adding all items to the order, press the Save button to save the order to the system and add the items to inventory.
Chapter 8 - Returns
Note
To perform a stock return, Administrator or User access is required.
A return is an inbound order to your warehouse through a stock return. When you perform a return, you are returning items into inventory that have previously been issued to a customer. Stock Orders accommodates stock returns at the Return page. A stock return requires an Order Number, an Order Date, a Customer, and at least one return item.
Reference Order Number
The Reference Order Number field provides the option to reference the stock return order to a stock issue order; see "Return / Issue Reference" for more information.
Performing a Stock Return
Stock is returned from a customer. A stock return requires:
- Order Number
- Order Date
- Customer
- At least one return item
Returning Stock
To return stock into inventory:
- Select Orders> Return from the navigation pane. The Add Return page appears.
- Order Number (required): If your Tenant is set for auto return order numbering, the system automatically enters a Return Order number in the Order Number field.
- Customer (required): Select the Customer who is returning the stock item or items by clicking the drop-down arrow in the Customer field and selecting a customer from the list that appears.
- A customer is added to the system at the Management > Orders > Customers page.
- If the Customer list is empty, it is because no customers have been added to the system.
- Ship To (optional): To select a shipping address for the selected customer, click the drop-down arrow in the Ship To field and select from the address list that appears.
- A ship-to address is added to the customer at the Management > Orders > Customers > Ship To Addresses for Customer page.
- (If the customer does not contain a shipping address, the list will be blank.)
- Reference Number (optional): Click the drop-down list to view a list of Issue orders for this customer. Select the Issue order that is being referenced to this Return order. (If this list is blank, this Customer does not have Issue orders.)
- When a Return is referenced to an Issue, the user is alerted if the returned stock item is not part of the referenced Issue order or if the item-UOM-quantity exceeds the amount in the issue order, and this item may not be added to the return order.
- Once the basic order information is added, add the returned items to the order.
- If the return references a prior issue order, you will be alerted when an item is added to the order detail if it is not part of the referenced issue order or if it exceeds the maximum issue quantity.
- An item is added to the Return from the details area of the page.
- Site field (required): The default site of the logged-in user is automatically entered in this field, if applicable. If the logged-in user has access to more than one site, another site may be selected.
- Location field (required): Click the drop-down arrow to select the site-location for the return item.
- Item Number field (required): Click the drop-down arrow to select the Item Number (required) of the return item.
- Unit of Measure (required): Select the unit of measure for the return item.
- Quantity (required): Enter the item-UOM quantity for the return item in this field.
- For a serialized item, the returned quantity is automatically set to 1 and cannot be changed.
- Serial Number Required if the item uses serial numbers.
- Lot Required if the item uses lots.
- Expiration Date Required if the item uses expiration dates.
- Unit Cost Required if the Track Unit Cost setting is enabled for the item.
- Comment (optional): Enter a comment about the return item in this field.
- Click the Add icon to add this item to the order. It will appear as a line item in the Details portion of the page. (To clear this line item information instead of adding it, click the Clear icon. The item fields will clear and this item will not be added as a line item.)
- Continue adding to the order until you are finished. As each item is added to the order, the item is placed in the Details portion of the page. (To remove an item from the order, select the Delete icon to the far right of the item.)
- Click the Save icon along the bottom of the page to process the stock return. The page clears to indicate that the return was performed. The inventory is adjusted to reflect the stock return.
Note
When adding the same location-item number-unit of measure to the order more than once, a single line item is created. When the same location-item number-unit of measure is added to the order for a Track Cost item, the first Unit Cost entered is the unit cost associated with this line item.
Return / Issue Reference
You have the option to reference a stock return order to a stock issue order. The Reference Order Number field at the Add Return page will list the Issue Orders performed by the Customer that is selected for the Return Order. When you select an Issue Order Number as the Reference Order Number, this Return will reference this Issue for the item return.
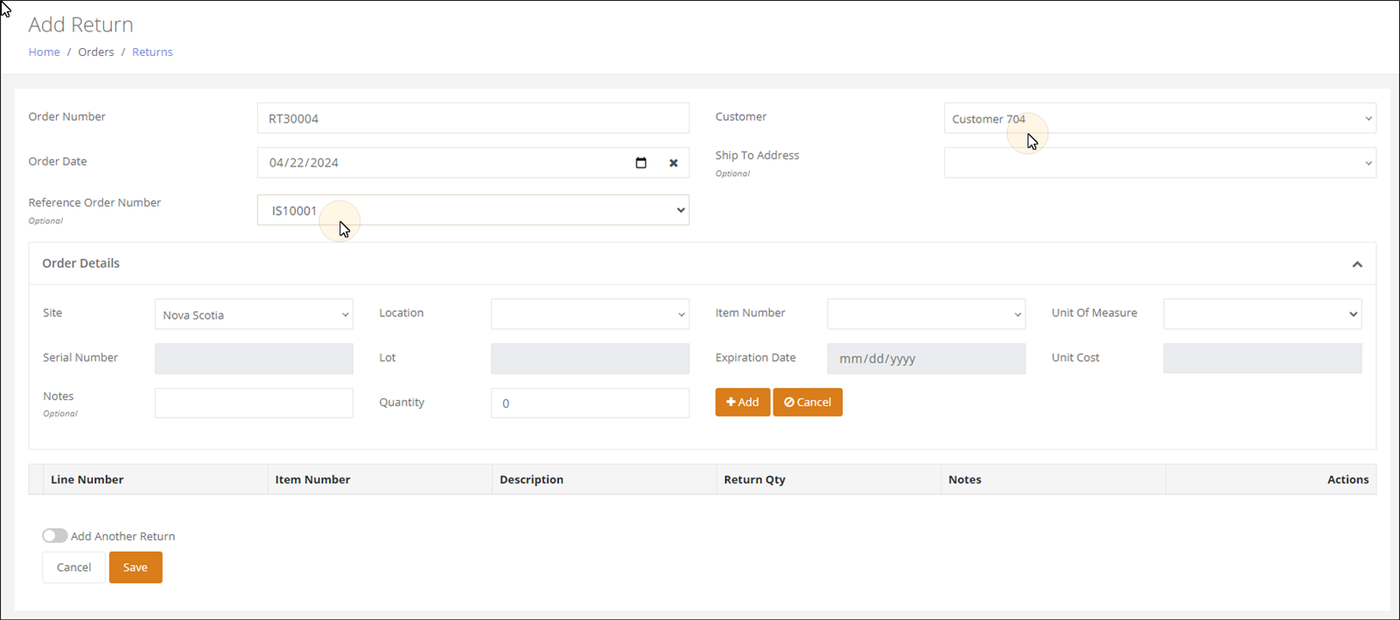
- An item may only be added to the Return order if was part of the referenced Issue order.
- The Return quantity may not exceed the Issue quantity.
- The Issues with Returns report provides reporting on this information; see "Issues with Returns" for more information.
Chapter 9 - Receiving
Note
To work with Receiving Orders, Administrator or User access is required.
Receiving orders that have been added are managed from the Receiving page. In the Main menu, select Orders > Receiving to reach this page. A Receiving order is a Pre-defined order that:
- Is added at the Add Receiving page.
- Is editable at the Edit Receiving page.
- Allows for item receive at the Receive page.
- May be deleted if the order does not have any item receive transaction associated with it
- Has a status of Open or Closed
Adding a Receiving Order
A Receiving Order is added at the Receiving page.
- Select Orders > Receiving from the Main menu.
- The Receiving page appears.
- Select the Add button. The Add Receiving page appears.
- Order Number (required): automatically added by the system when Receiving Order Auto-Numbering is Enabled for the Tenant.
- Vendor (required): press the drop-down arrow and select the Vendor from the list that appears.
- Order Status (required): the status is automatically set to Open when adding an order.
- Order Date (required): defaults to today's date.
- Due Date (optional): set a due date for the order, if applicable.
- Next, add the Order Details.
- Item Number
- Quantity
- Comments
- Press Add to add the Item to the Receiving order.
- Repeat Steps 10-11 until all items are added to the Receiving order.
- Press Save to save the order. The Add Receiving page closes and you are returned to the Receiving page. The Receiving order has been added to the list of Receiving orders.
Receive an Item
An item is received for an order at the Receiving page for the order. When an item is received, it is added to a site-location and becomes part of your inventory. To receive an item, please refer to the steps below:
- Select Orders > Receiving from the Main menu. The Receiving page appears.
- Locate the Order in the list that has the item or items that you want to receive.
- In the Actions column, press the Receive button. The Receive page for this order appears.
- In the Line Item area of the page, you will see the item or items included on this order. Each line item includes:
- Line Number: the identifier for this line item in the order.
- Item Number: the item number.
- Ordered Quantity: the quantity that has been ordered, in eaches
- Actual Quantity: the quantity that has been received, in eaches.
- Comments: any comments that were added to this line item.
- To receive the item, press the Receive button for the line item. The Receive Item popup appears. Enter the item receive information in the popup.
- The Receive Item popup includes the following fields:
- Line Item (Read-Only): displays the line number.
- Item Number (Read-Only): displays the item number.
- Description (Read-Only): displays the item description, if applicable.
- Ordered Quantity (Read-Only): displays the ordered quantity, in eaches.
- Actual Quantity (Read-Only): displays the actual quantity that has already been received, in eaches. (The Actual Quantity cannot exceed the Ordered Quantity.)
- Quantity: displays the quantity that is being received in this session.
- Site: click the drop-down arrow and select the Site.
- Location: click the drop-down arrow and select the Location.
- Unit of Measure: click the drop-down arrow and select the Unit of Measure for the item being received. The Unit of Measure-Each Count is displayed next to the Unit of Measure in parentheses.
- Serial Number (Read-Only unless the item uses serial numbers): required when the item uses serial numbers.
- Lot (Read-Only unless the item uses lots): required when the item uses lots.
- Expiration Date (Read-Only unless the item uses expiration dates): required when the item uses expiration dates.
- Unit Cost (Read-Only unless the item tracks unit cost): required when the item tracks unit cost.
- Press the Receive button.
- The Receive Item popup closes and you are returned to the Receive page for this order. The Actual Quantity field in the line item is updated to reflect the Quantity that was received in Steps 6-7.
- When an item is received in full, the Ordered Quantity equals the Actual Quantity. The Receive button becomes disabled and a beachcomber appears next to it.
Edit Receiving
A Receiving order may be edited from the Edit Receiving page for the order.
Note
The Order Number and Order Status are not editable fields.
- Select Orders > Receiving. The Receiving page appears.
- Locate the Order that you want to edit. In the Actions column, press the Edit button. The Edit Receiving page appears for this order.
- Vendor: click the drop-down list in the Vendor field and select another vendor.
- Order Date: click the calendar control to update the order date.
- Due Date: click the calendar control to update or clear the due date.
- Order Details may be changed by:
- Adding a new line item
- Editing a line item
- Deleting a line item if its Actual Quantity is 0.
- Press Save to save the changes to the order. The Receiving page appears. The changes to the order have been saved.
Delete Receiving
A Receiving order may be deleted if it is not in use.
Note
A Receiving order is considered to be in use when at least one item in the order has been received.
- Select Orders > Receiving. The Receiving page appears.
- Locate the Order that you want to edit. In the Actions column, select the ... More Options button. The Delete button appears.
- Press the Delete button.
- A Confirmation prompt appears. Press the Yes option to continue with deleting the order. The prompt closes.
- If the order is not in use, a message appears across the top of the page to notify you that the order has been deleted.
- If the order is in use, a message appears across the top of the page to notify you that the order is in use and cannot be deleted. (The order is considered to be in use when at least one item has an actual quantity of at least 1.)
Receive Order Status
The Receiving order has a status of Open or Closed, which is indicated on the Receiving page by a Lock icon. When the Lock icon is unlocked, the order is Open. When the Lock icon is locked, the order is Closed.
Open Order
The order is automatically marked as open when it has at least one line item with an Actual Quantity that is less than the Ordered Quantity.
Closed Order
The order is automatically marked as closed when the Actual Quantity and the Ordered Quantity for all line items are equal, meaning that all line items have been fulfilled.
Manually Changing the Order Status
The order status may be manually changed from the Receiving page. To manually change the order status:
- Select Orders > Receiving.
- Locate the order that needs its status changed. Select the ...More Options button.
- Closed Order: an Open option appears.
- Open Order: a Close option appears.
- Select the Open / Close option.
- A prompt appears asking you to confirm this action.
- Confirm the Open / Close action.
- The prompt closes and a message appears along the top of the page to notify you that the order status has been changed.
Import Receiving Orders
The receiving order import capability provides for importing new receiving order data or updating existing receiving order data. The Receiving Order Import feature uses a CSV file, created from a downloadable template to import the data. Refer to the steps that follow to import item data:
- Select Orders> Import Receiving from the navigation pane.
- The Import Receiving Orders page appears.
- Press the Download Template button to download the Import Template file. This file is a CSV file.
- Be sure to include the required fields for each item that you are importing.
- When preparing your import file, be sure to follow these guidelines:
- Maintain the Header row and the Header row name, as it is entered in the template. This is the database name of the field and it is what the import process uses to add the data in the template into the appropriate fields.
- Note the required fields. The required fields must be part of the template for the item to be imported.
- The optional fields may be removed from the template.
- For fields that require a On/Off, True/False, or Yes/No value, the import file will recognize: True/False, T/F, or 1/0.
- Save the import file that you create.
- Select the Choose File button at the Import Receiving page. Navigate to the file and select it.
- Press the Upload File button.
- A message will appear to notify you that the import is being processed.
- When the import is finished, a results message is sent to your email. The message contains details about the results of the import.
Chapter 10 - Picking
Note
To work with Picking Orders, Administrator or User access is required.
Picking orders are managed from the Picking page. In the Main menu, select Orders > Picking to reach this page. A Picking order is a Pre-defined order that:
- Is added at the Add Picking page.
- Is editable at the Edit Picking page.
- Allows for item pick at the Pick page.
- May be deleted if the order does not have any item receive transaction associated with it
- Has a status of Open or Closed
Add Picking Order
To add a Picking order, click the Add button at the Picking page.
- Select Orders > Picking from the Main menu.
- The Picking page appears.
- Select the Add button. The Add Picking page appears.
- Order Number (required): automatically added by the system when Picking Order Auto-Numbering is Enabled for the Tenant.
- Customer (required): press the drop-down arrow and select the Customer from the list that appears.
- Ship To Address (optional): press the drop-down arrow and select the Ship To Address from the list that appears.
- Carrier (optional): press the drop-down arrow and select the Carrier from the list that appears.
- Method (optional): press the drop-down arrow and select the shipping Method from the list that appears.
- Order Status (required): the status is automatically set to Open when adding an order.
- Order Date (required): defaults to today's date.
- Due Date (optional): set a due date for the order, if applicable.
- Next, add the Order Details.
- Item Number
- Quantity
- Comments
- Press Add to add the Item to the Picking order.
- Repeat Steps 12-13 until all items are added to the Picking order.
- Press Save to save the order. The Add Picking page closes and you are returned to the Picking page. The new order has been added to the list of Picking orders.
Pick Item
An item is picked from a Picking order at the Picking page for the order. When an item is picked from a Picking order, an item quantity is removed from a site-location in your inventory. To pick an item quantity from an inventory site-location, please refer to the steps below.
- Select Orders > Picking from the Main menu. The Picking page appears.
- Locate the Order in the list that has the item or items that you want to receive.
- In the Actions column, press the Pick button. The Pick page for this order appears.
- In the Line Item area of the page, you will see the item or items included on this order. Each line item includes:
- Line Number: identifier for this line item.
- Item Number: the item number.
- Ordered Quantity: the quantity that has been ordered, in eaches
- Actual Quantity: the quantity that has been picked, in eaches.
- Comments: any comments that were added to this line item.
- To pick the item, press the Pick button for this line item. The Pick Item popup appears. Enter the item pick information in the popup.
- Line Number (Read-Only): displays the line number for this pick item.
- Item Number (Read-Only): displays the item number.
- Description (Read-Only): displays the item description, if applicable.
- Ordered Quantity (Read-Only): displays the ordered quantity, in eaches.
- Location: click the drop-down arrow to view the inventory information for this item. Select the pick location. Select the item pick location.
- Site (Read-Only): automatically populates upon item inventory location selection.
- Actual Quantity (Read-Only): displays the actual quantity that has been picked for this order, in eaches.
- Available Quantity (Read-Only): displays the available site-location-unit of measure-qty for this item.
- Quantity: enter the quantity of this item that is being picked. The quantity cannot exceed the actual quantity or the available quantity. For an item that uses serial numbers, the quantity cannot exceed 1.
- Unit of Measure (Read-Only): automatically populates when inventory location is selected for the item pick. It displays the unit of measure. The each count for the unit of measure is displayed next to it in parentheses.
- Lot (Read-Only): automatically populates when the item uses lots.
- Serial Number (Read-Only): automatically populates when the item uses serial numbers.
- Expiration Date (Read-Only): automatically populates when the item uses expiration dates.
- Press the Pick button to pick the item. The Pick Item popup closes and you are returned to the Pick page for this order. The Actual Quantity for the line item is updated to reflect the pick that has been performed.
- When a line item is picked in full, the Ordered Quantity will equal the Actual Quantity. The Pick button becomes disabled and a check mark appears next to it.
Edit Picking Order
A Picking order may be edited from the Edit Picking page for the order.
Note
The Order Number and Order Status are not editable fields.
- Select Orders > Picking. The Picking page appears.
- Locate the Order that you want to edit. In the Actions column, press the Edit button. The Edit Picking page appears for this order.
- Customer: Click the drop-down arrow in the Customer field and select another customer from the list that appears.
- Ship To Address: Click the drop-down arrow in the Ship To Address field and select a new Ship To Address from the list that appears.
- Carrier: Click the drop-down arrow in the Carrier field and select a new carrier from the list that appears.
- Method: Click the drop-down arrow in the Method field and select a new shipping method from the list that appears.
- Order Date: click the Calendar Control to update the order date.
- Due Date: click the Calendar Control to update or clear the due date.
- Order Details may be changed by:
- Adding a new line item
- Editing a line item
- Deleting a line item if its Actual Quantity is 0.
- Press Save to save the changes to the order. The Picking page appears. The changes to the order have been saved.
Delete Picking Order
A Picking order may be deleted if it is not in use.
Note
A Pickingorder is considered to be in use when at least one item in the order has been picked.
- Select Orders > Picking. The Picking page appears.
- Locate the Order that you want to edit. In the Actions column, select the ... More Options button. The Delete button appears.
- Press the Delete button.
- A Confirmation prompt appears. Press the Yes option to continue with deleting the order. The prompt closes.
- If the order is not in use, a message appears across the top of the page to notify you that the order has been deleted.
- If the order is in use, a message appears across the top of the page to notify you that the order is in use and cannot be deleted. (The order is considered to be in use when at least one item has an actual quantity of at least 1.)
Picking List
A picking list may be printed for each Picking Order at the Picking page. The Picking List shows, for each line item in the order, the inventory location and quantity available for the item to be picked.
To print a Picking List for a Picking Order:
Navigate to the Picking page.
For the Picking Order, in the Actions column, select the More Options button. Select the Print Pick option.
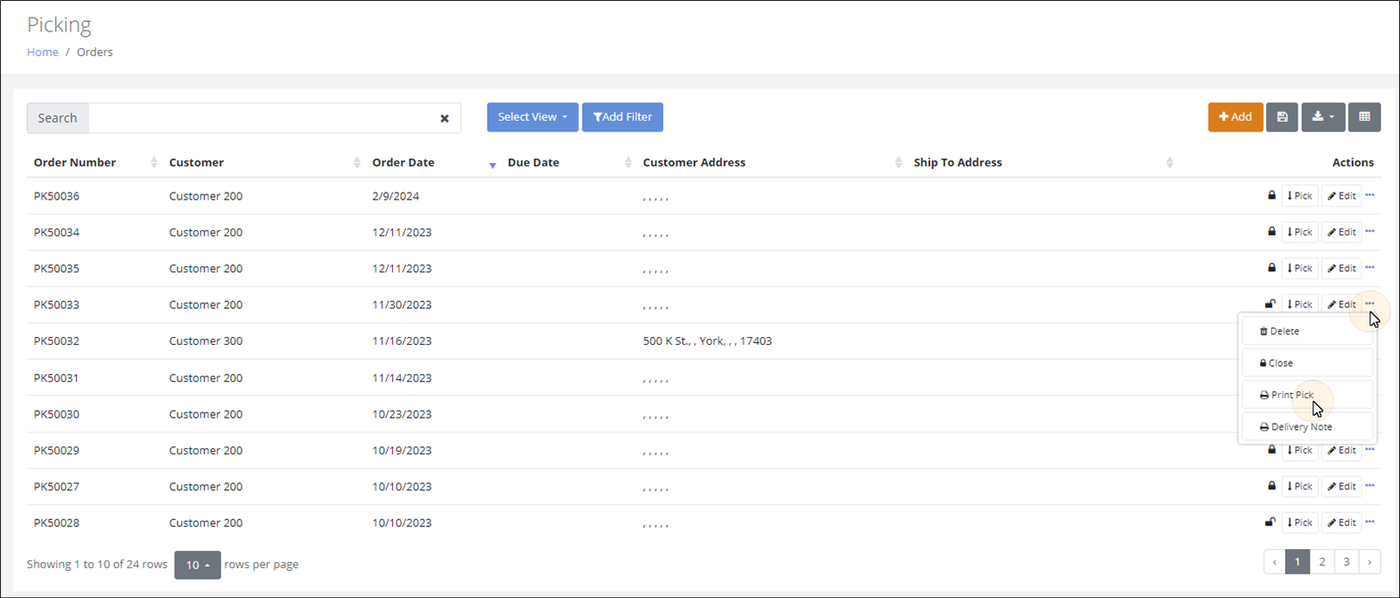
A Print window appears onscreen. The Picking List for this Picking Order is ready to be printed.
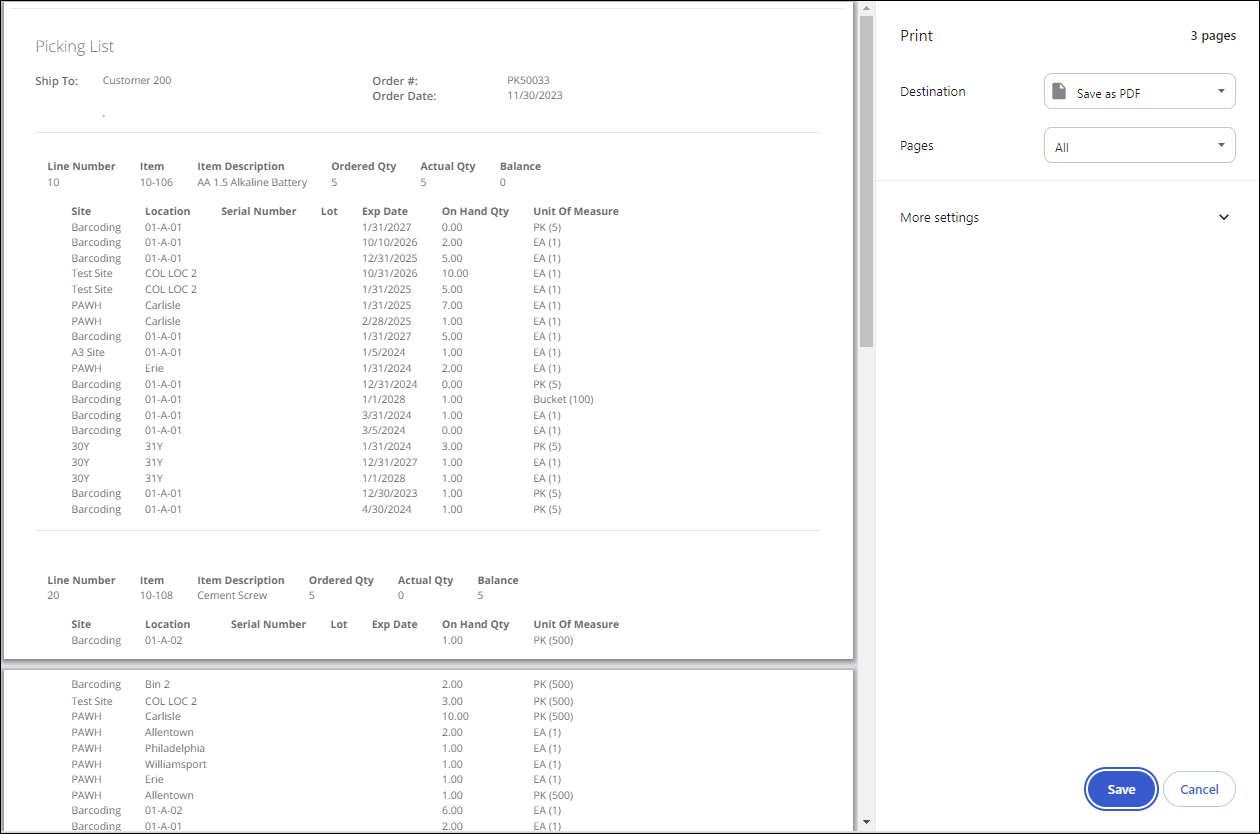
Pick Delivery Note
A Delivery Note is available for each Picking Order. It contains the order items and signature blocks for:
- Prepared By
- Checked By
- Transported By
- Received By
To print a Delivery Note for a Picking Order:
Navigate to the Picking page.
For the Picking Order, in the Actions column, select the More Options button. The Delivery Note option appears. Select the Delivery Note option.
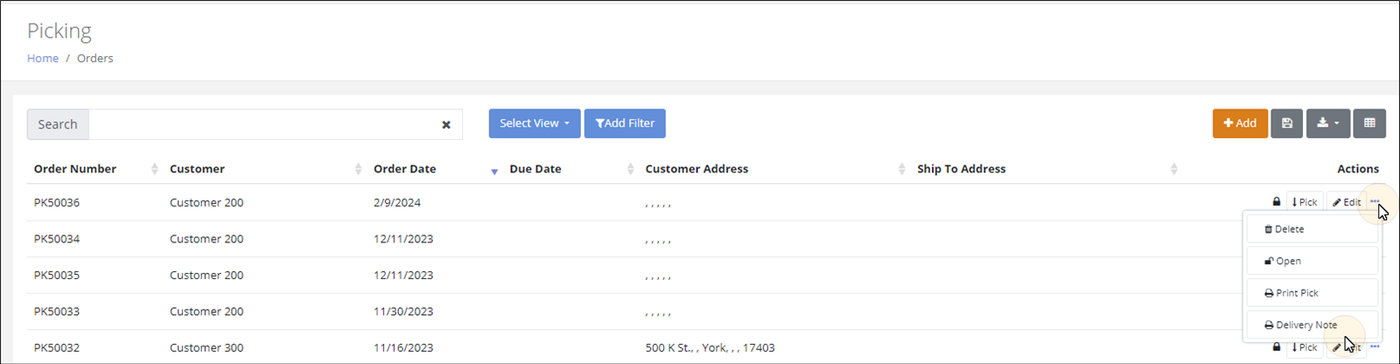
A Print window appears onscreen. The Delivery Note for this Picking Order is ready to be printed.
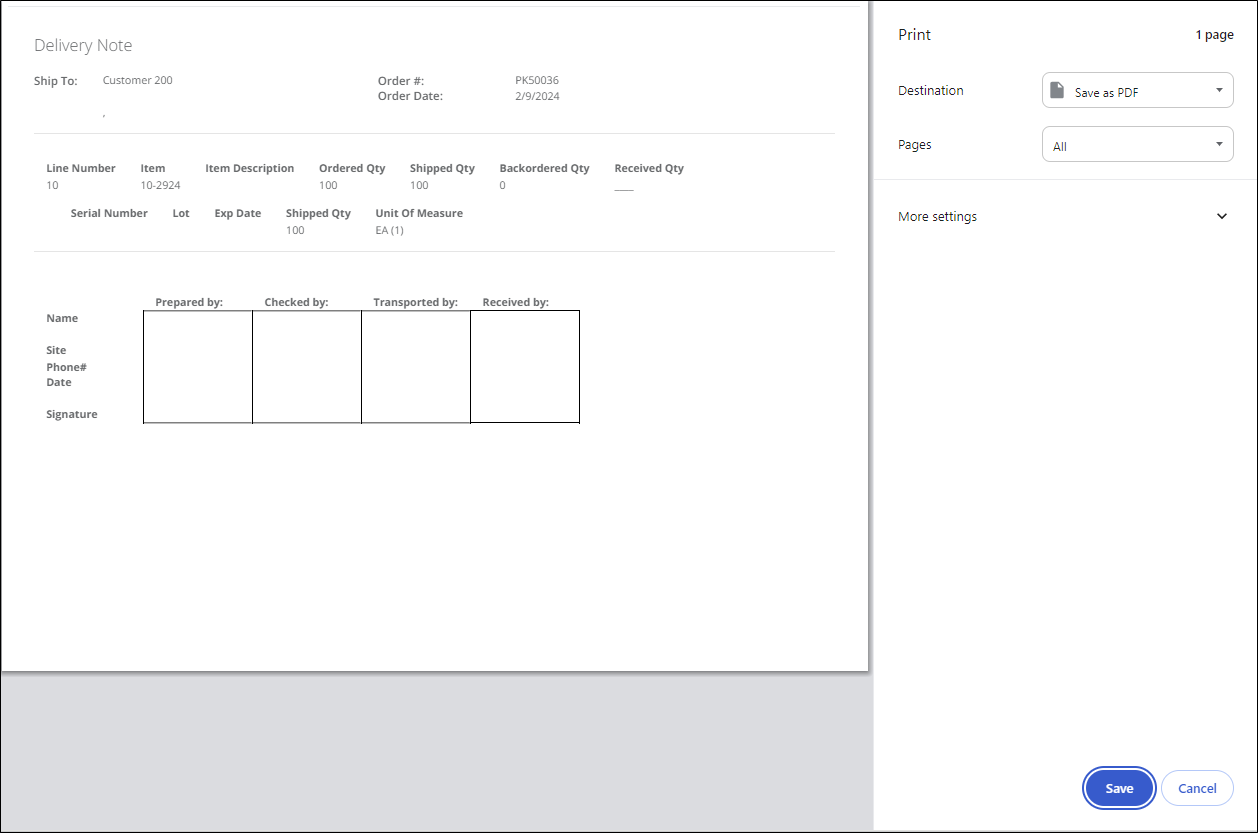
Order Status
The Picking order has a status of Open or Closed, which is indicated on the Picking page by a Lock icon. When the Lock icon is unlocked, the order is Open. When the Lock icon is locked, the order is Closed.
Open Order
The order is automatically marked as open when it has at least one line item with an Actual Quantity that is less than the Ordered Quantity.
Closed Order
The order is automatically marked as closed when the Actual Quantity and the Ordered Quantity for all line items are equal, meaning that all line items have been fulfilled.
Manually Changing the Order Status
The order status may be manually changed from the Picking page. To manually change the order status:
- Select Orders > Picking.
- Locate the order that needs its status changed. Select the ...More Options button.
- Closed Order: an Open option appears.
- Open Order: a Close option appears.
- Select the Open / Close option.
- A prompt appears asking you to confirm this action.
- Confirm the Open / Close action.
- The prompt closes and a message appears along the top of the page to notify you that the order status has been changed.
Packing List Print Option
The Picking page has a Print option available that is used to print a Packing List for the selected order or orders. This allows you to print the Packing List(s) directly from the Picking page.
Packing List
The Print button will send a formatted Packing List to a selected printer (including a PDF printers). To print a Packing List for an order or for multiple orders, please refer to the steps below.
At the Picking page, select the checkbox to the left of the order or orders for which you want to print the Packing List.
Press the Print button in the upper right area of the page.
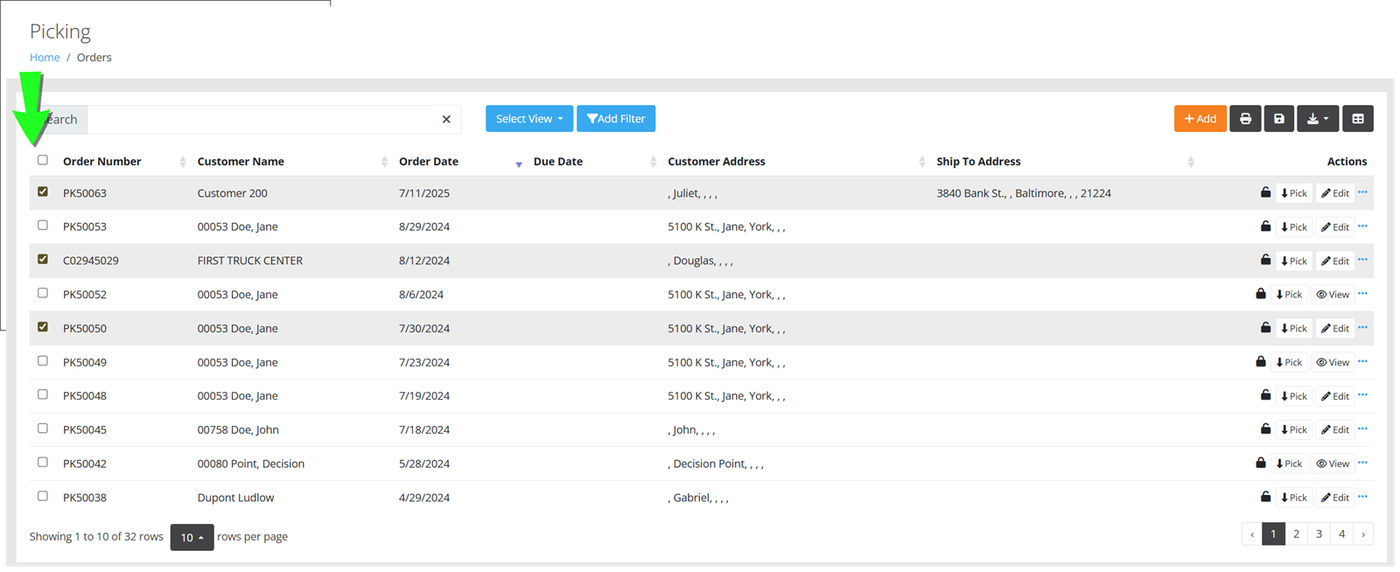
Press the Print button in the upper right area of the page.
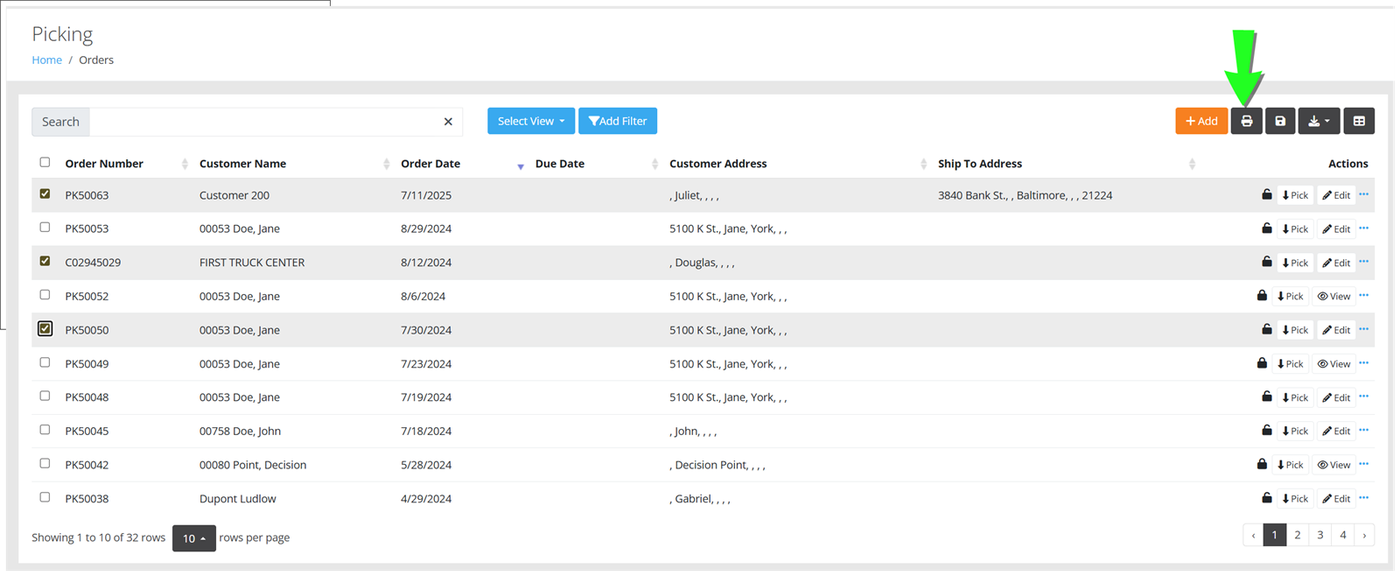
A Packing List Columns window appears onscreen.
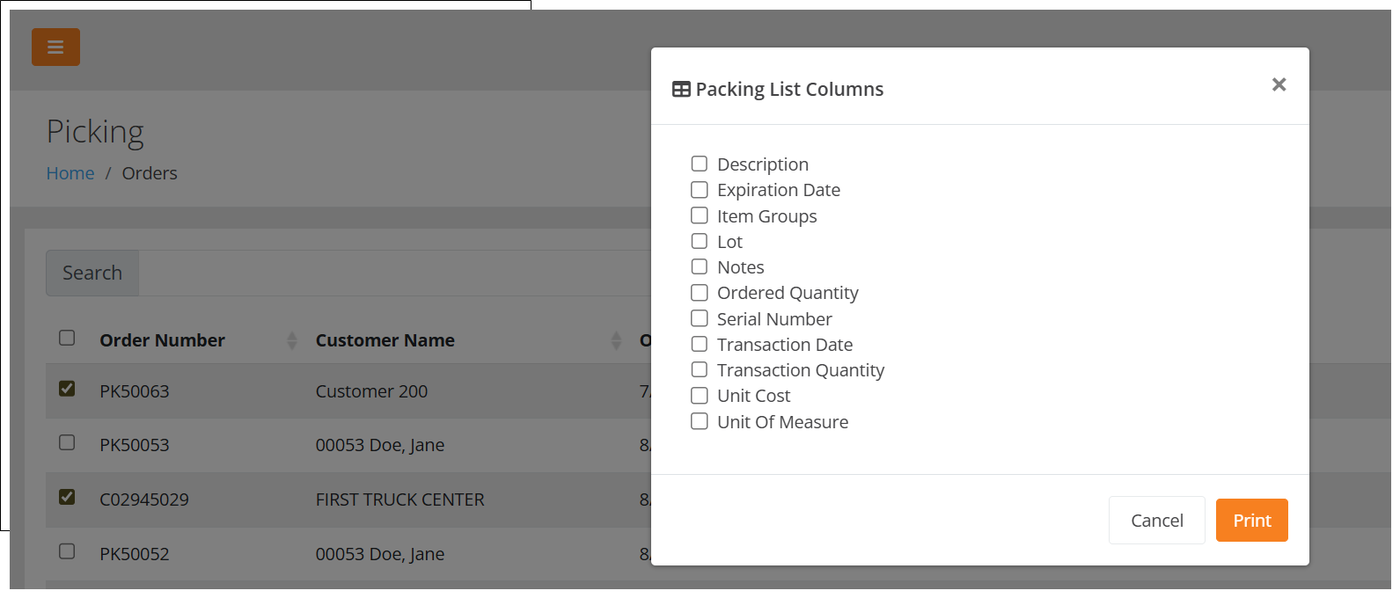
To add an additional column or columns to the Packing List, mark the checkbox to the right of the option. Note that this is an optional step.
Press the Print button to close the Packing List Columns window.
A Print Preview window appears. You are able to save the Packing List(s) as a PDF or send them to a printer in your network.
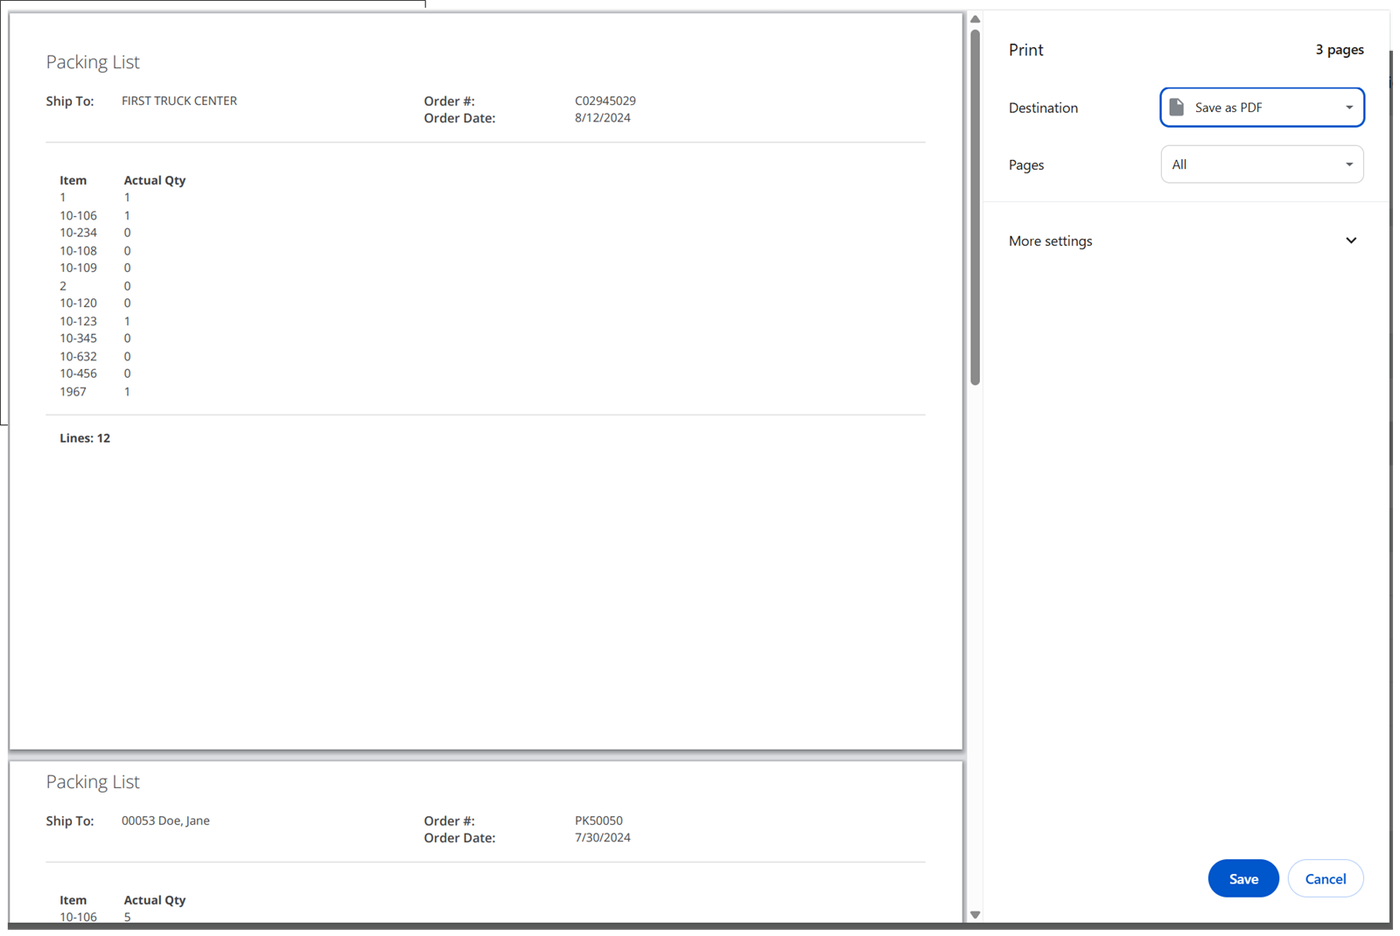
Import Picking Orders
The picking order import capability provides for importing new receiving order data or updating existing receiving order data. The Picking Order Import feature uses a CSV file, created from a downloadable template to import the data. Refer to the steps that follow to import item data:
- Select Orders> Import Picking from the navigation pane.
- The Import Picking Orders page appears.
- Press the Download Template button to download the Import Template file. This file is a CSV file.
- Be sure to include the required fields for each item that you are importing.
- When preparing your import file, be sure to follow these guidelines:
- Maintain the Header row and the Header row name, as it is entered in the template. This is the database name of the field and it is what the import process uses to add the data in the template into the appropriate fields.
- Note the required fields. The required fields must be part of the template for the item to be imported.
- The optional fields may be removed from the template.
- For fields that require a On/Off, True/False, or Yes/No value, the import file will recognize: True/False, T/F, or 1/0.
- Save the import file that you create.
- Select the Choose File button at the Import Picking page. Navigate to the file and select it.
- Press the Upload File button.
- A message will appear to notify you that the import is being processed.
- When the import is finished, a results message is sent to your email. The message contains details about the results of the import.
Chapter 11 - Container Management
A container is a movable storage unit. You are able to add items to a container and move the container and all the items in it.
Container Types
The Container Type is required for a Container. The Container Type list is maintained at the Container Types page. Once added, the Container Type is available as an option in the Container Type down-down list when adding or editing a Container.
To reach the Container Types page, follow these steps.
Select Management > from the Home menu bar.
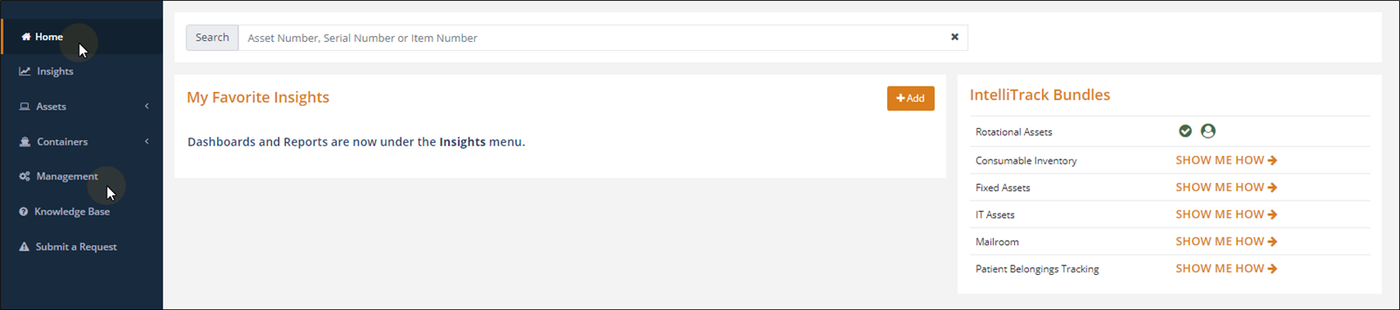
The Management menu options appear in the Menu bar. Select Containers> Container Types from the menu. The Container Types page appears.
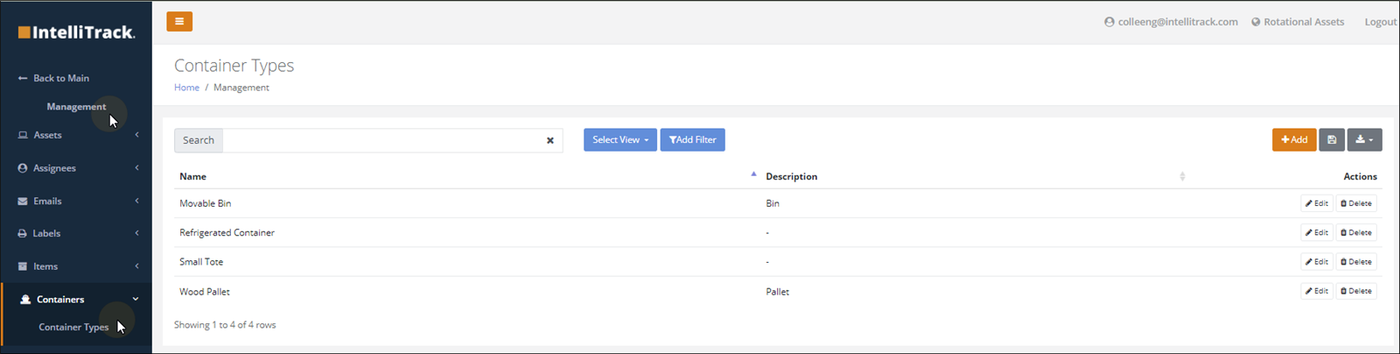
Note
To add, edit, or delete a Container Type, Administrator access is required.
Adding a Container Type
To add a new container type to IntelliTrack, please refer to the steps that follow.
From the Container Types page, select the Add button.
Note
The Add button is found along the top of the page, above the Actions column.
The Add Container Type page appears.
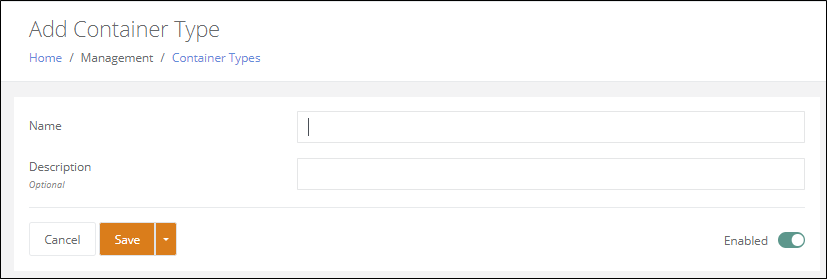
Enter the name of the Container Linotype the Name field.
- The Container Type Name is required and must be unique.
Enter the Description for this Container Type in the Description field. The Description is optional.
Press the Save button to save the Container Type.
Save & New option: press the drop-down arrow in the Save button to select the Save & New option, save the container type, clear the page, and add another container type.
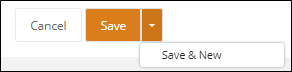
You are returned to the Container Types page. A message appears along the top of the page to notify you that the Container Type has been saved.
Editing a Container Type
A Container Type is edited at the Edit Container Type page. From the Container Types page, select the Edit button for a Container Type that you want to edit. The Edit Container Type page appears for this container type. The Name and Description may be edited. Be sure to press the Save button to save any changes to the Container Type.
Deleting a Container Type
Note
A Container Type that is associated with a Container is "in use" and may not be deleted.
From the Container Types page, select the Delete button for the Container Type that you want to delete. A Confirmation prompt appears asking you if you are sure that you want to delete this Container Type. If the Container Type is being used on a Container, you are also notified that this container type is in use and cannot be deleted.
Containers
A Container is a movable storage unit. It is separate from the Location list. Containers are managed from the Containers page.
Select Home > Containers > Containers to reach this page.
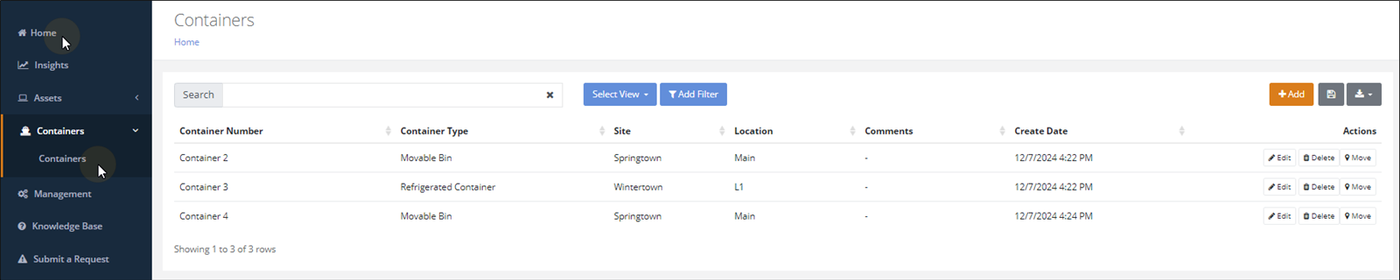
Adding a Container
From the Containers page, select the Add button.
The Add Container page appears.
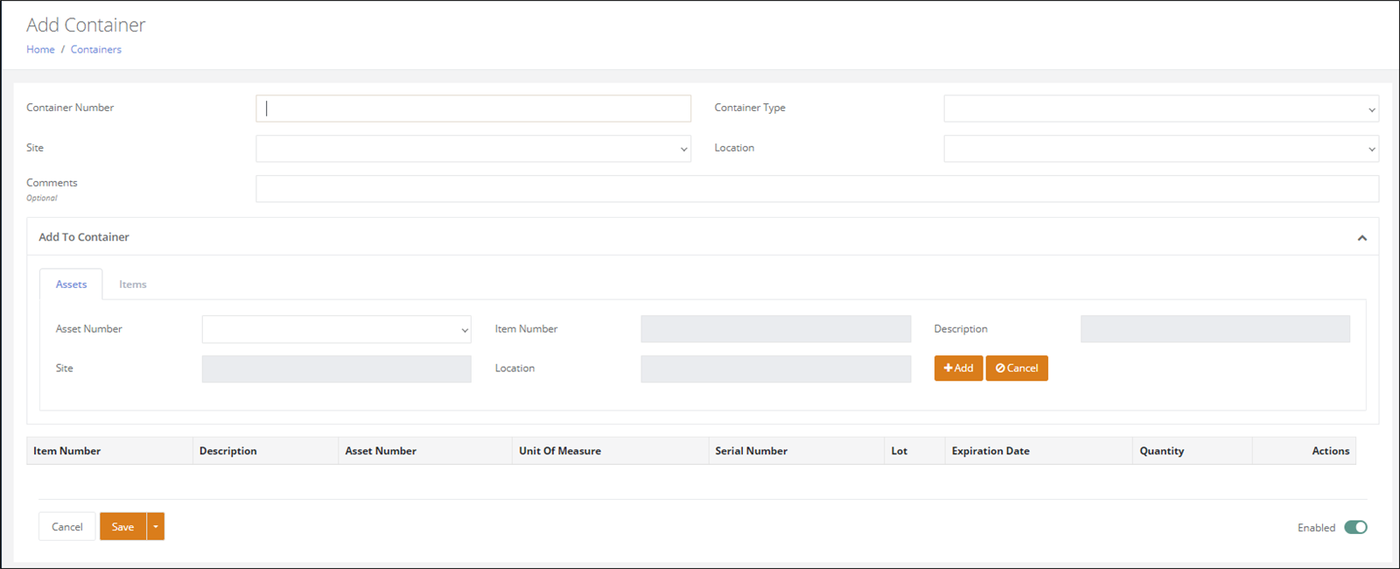
Container Number (required): add a Container Number.
Container Type (required): select a Container Type from the list.
Site: select a Site from the list.
Location: select a Location from the list.
The Container may be saved when this information is added to it. To add an item or items into the Container, see the next section.
Adding Items to a Container
When an item is added to a Container, it is moved from its site-location into the container. An item is added to the container at the Add Container page or Edit Container page via the Add to Container section of the page.
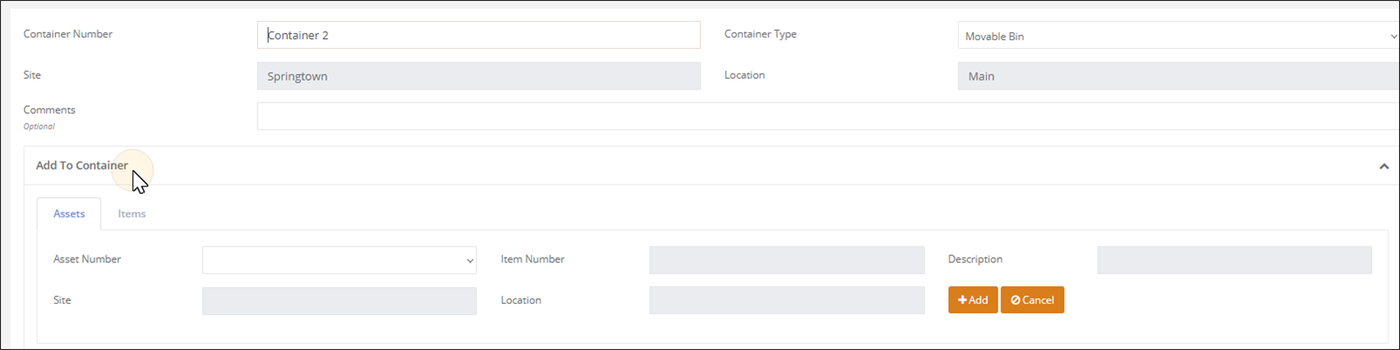
Note
The Consumable Inventory bundle supports moving items into a Container.
Important
An item in a container cannot be placed on an order.
Important
An inventory adjust transaction and an inventory convert unit of measure transaction cannot be performed on an item in a container.
Note
To place items on an order and to perform an inventory adjust or unit of measure conversion, the item must be moved out of the container.
Item Number: this field is a type ahead field. Begin typing the item number and a list of items will appear that match the entry.
Note
An item must be in a site-location to be added to a container.
- Site: select the site the item resides in.
- Location: the location or locations the item resides in automatically appears in the location field drop-down list.
Press the Add button to add this Item to the Container. Continue until you are finished adding the items and then press the Save button. The Items are saved to this Container.
Moving a Container
A Container is moved from the Containers page.
Note
Any items in the container are also moved with it.
To move a container and its contents into another Site-Location, press the Move button for the Container. The Move button is found in the Actions column.
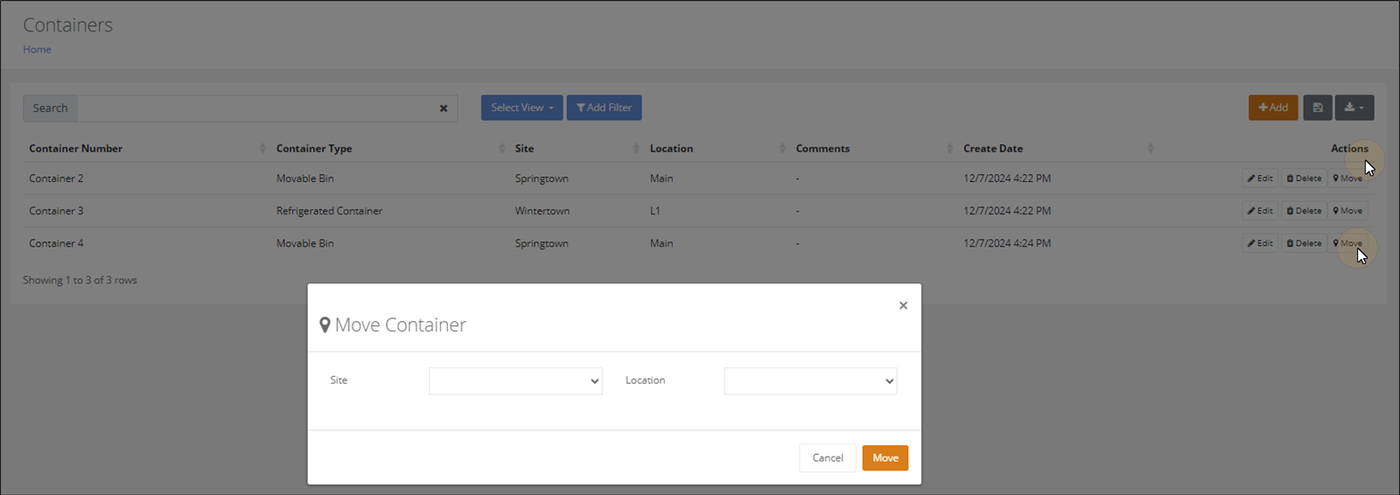
- In the Move Container popup, press the drop-down arrow in the Site field and select the Site for the Container move.
- Next, press the drop-down arrow in the Location field and select the Location for the Container move.
- Then, press the Move button to close the popup and move the Container into this Site-Location.
- You are returned to the Containers page, a message appears along the top of the page to notify you that the move was successful.
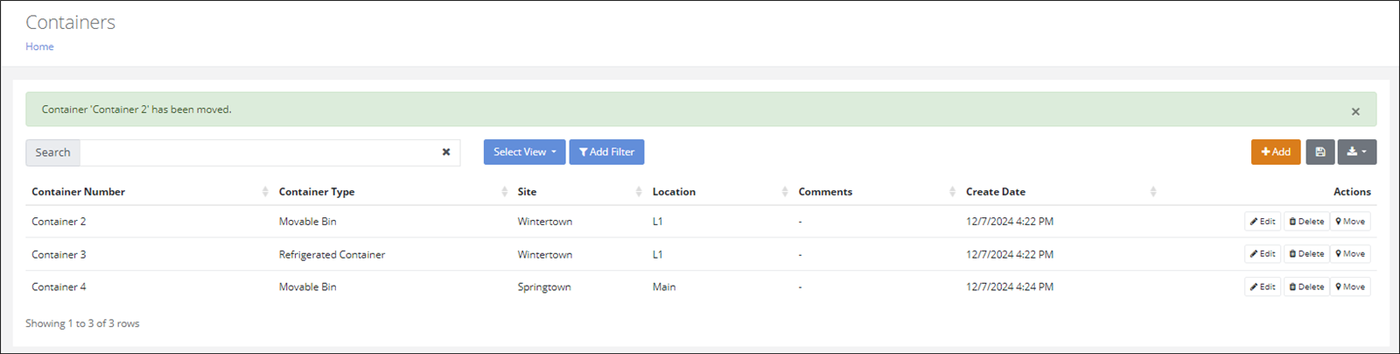
Container Summary Report
The Containers page has a Print option available that is used to print a Container Summary Report for the selected container or containers. This allows you to print the Container Summary Report directly from the Containers page.
Steps to Print the Container Summary Report
Note
If the container is empty, the report is blank.
The Print button has a Packing List option. This option will send a formatted Container Summary Report to a selected printer (including a PDF printers). To print a Container Summary Report for an order or for multiple orders, please refer to the steps below.
At the Containers page, select the checkbox to the left of the order or orders for which you want to print the Container Summary Report.
Press the Print button in the upper right area of the page.
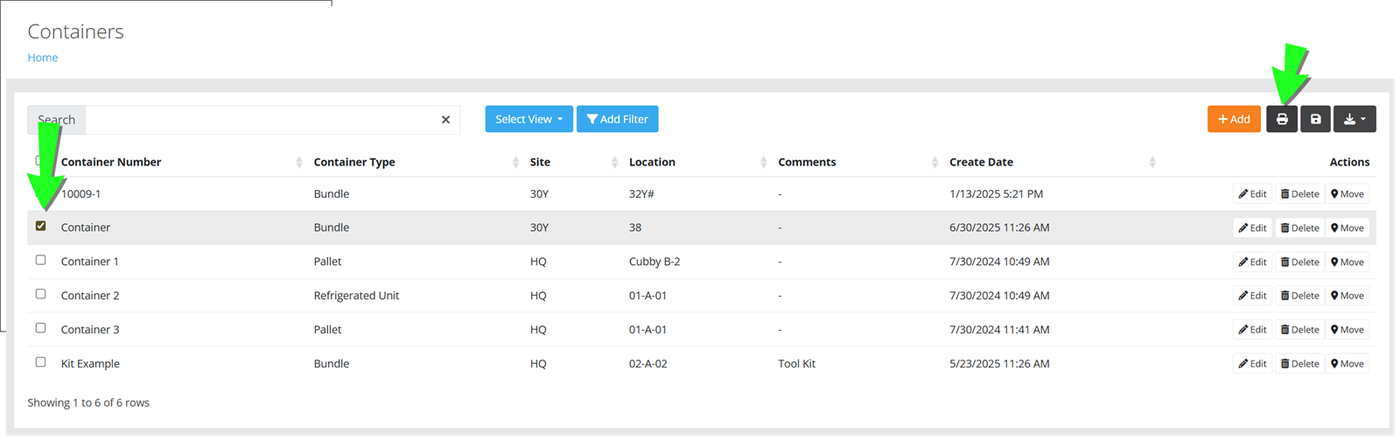
A Print Preview window appears. You are able to save the Container Summary Report as a PDF or send it to a printer in your network.
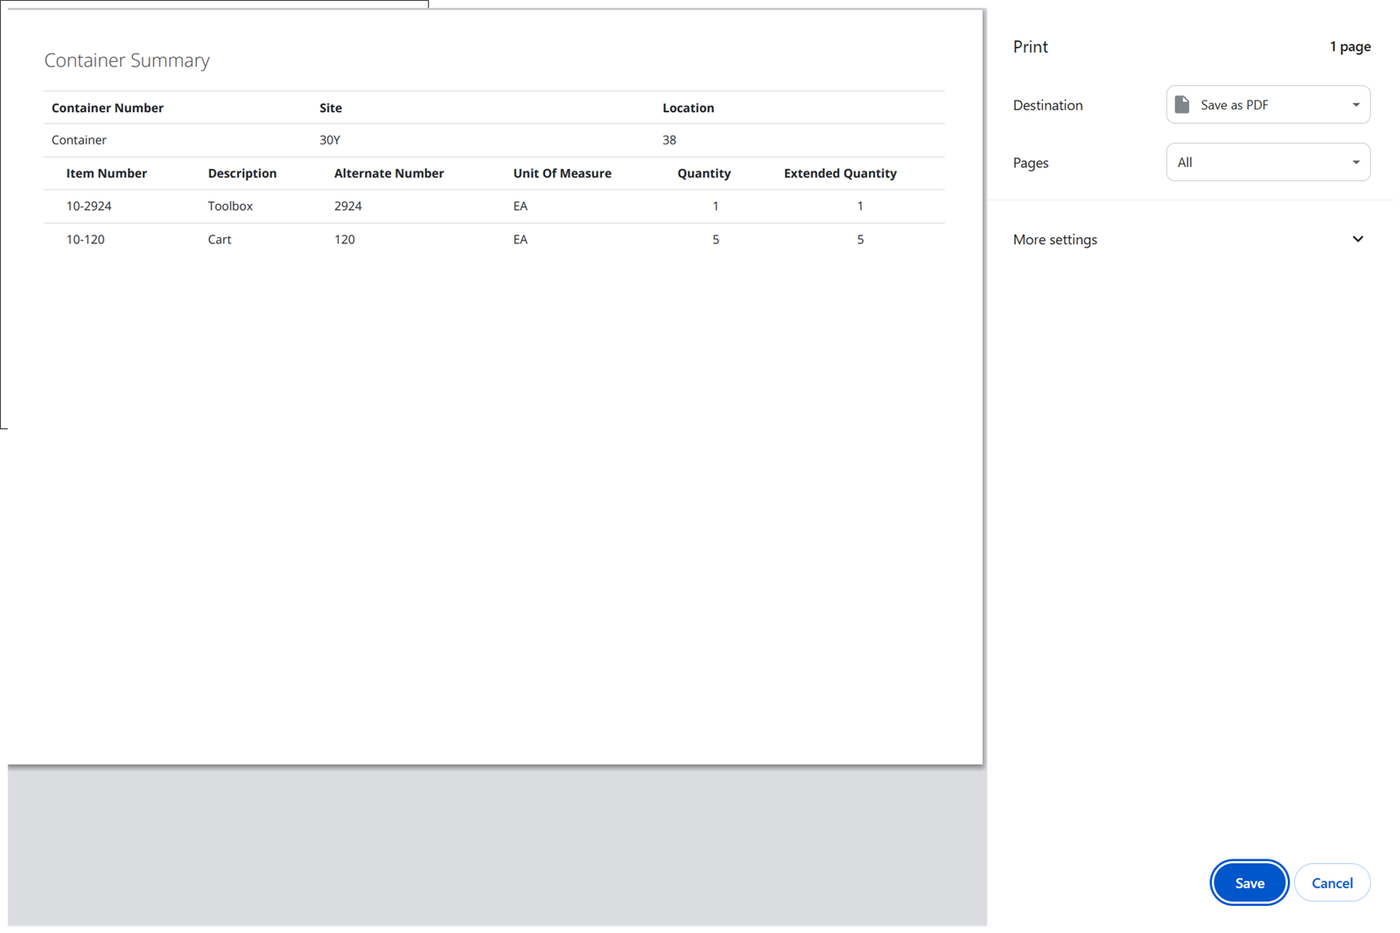
Related
- IntelliTrack Getting Started Guide — users, sites and locations, which this guide builds on
- Setting Up a Label Printer for IntelliTrack — printer setup for item and inventory labels
- What file types are supported for attachments? — the files you can attach to items