Appearance
IntelliTrack® IT Assets User Guide
How to work with the IntelliTrack IT Assets bundle: adding and managing assets, user defined fields, custom page views, service contracts, RMAs, orders, insights, dashboards, subscriptions and exports.
Chapter 1 – Defining The IT Asset Bundle
Welcome to the IT Assets Bundle User Guide. In IntelliTrack®, a Bundle is a collection of workflows and features designed to support a specific set of asset tracking requirements. The IT Assets Bundle allows you to track IT Assets with an emphasis on your mobile device pool, which includes managing the repair process and service contracts. In the IT Assets Bundle, you will find features to fully manage not only IT Assets, but any other assets you wish to track.
In this Bundle, it is important to understand the difference between Assets and Items to effectively utilize the system. The following narrative serves to help you with these two definitions.
Assets
An asset is a useful or valuable object that has unique attributes and needs to be tracked by an organization. An asset is a unique instance of an item and may be identified by a unique serial number. Assets can inherit unique attributes from the item that it is tied to.
Items
An item is an article or unit that typically exists in multiple quantities and can be used, sold, or stored by an organization. Synonyms include Part Number, Component, or SKU. Items are typically considered a Parent of assets.
Chapter 2 – Asset Management
An organization’s assets are displayed on the Assets page, which is accessed from the Main Menu > Assets > Assets option. This page contains all assets that have been entered into IntelliTrack®.
Note
The maximum number of entries that a page can hold is 1000. Additional pages can be accessed from the lower right corner of the page.
Depending on the User’s Role, they may be able to view all assets in the organization or just the assets for the Sites they have been assigned to.
When the Assets page is launched, a “default” view is shown, which contains the following fields:
- Asset Number
- Serial Number
- Status
- Item Number
- Description
- Site
- Location
- Actions
- View
This view, however, can be customized to fit your needs by adding or removing columns or incorporating filters.
Searching for An Asset
From the Home page, Users can conduct a Search for an Asset using any one of the following four fields:
- Asset Number
- Serial Number
- Item Number
- RMA Number
This is considered a “Quick” Search since it can be performed immediately upon logging into IntelliTrack®, thereby eliminating the need to launch the Assets page.
A Search from the Assets page can also be performed based on the columns that have been applied to the page.
Note
The Search option incorporates a “type ahead” feature, resulting in a return of Assets that contain the characters as they are being typed.
Adding An Asset
From the Assets page, select the Add button to launch the Add Asset page. At the Asset Details tab, proceed by completing the required fields, which are as follows:
- Asset Number
- Serial Number
- Status
- Item Number
- Site
- Location
Note
Selecting an Item Number from the drop-down list will automatically populate the Description and Manufacturer fields. In addition, if a Site has only one Location, it will be automatically populated.
After the required fields have been entered, you may elect to click on the Service Contract tab to associate a Contract Number to this Asset. To do so, select the valid contract from the drop-down list.
Note
In order to perform this action, the Service Contract must already exist in IntelliTrack®.
Important
In the IT Asset Bundle, the Asset Number and Serial Number are typically the same. The Asset Number can be unique; however, the Serial Number is required to submit a repair request.
Once all fields have been entered and the Service Contract has been selected, click on Save.
Adding Multiple Assets
If more than one Asset needs to be entered into IntelliTrack®, the User has multiple options to choose from, as detailed below.
Save & New
From the Add Asset page > Asset Details tab, proceed by completing the required fields, which are as follows:
- Asset Number
- Serial Number
- Status
- Item Number
- Site
- Location
Next, click the down arrow found to the right of the Save button and select the Save & New option. This will result in clearing the Add Asset page, thereby allowing for the addition of another Asset. This process can be followed repeatedly until the final Asset is ready to enter, at which time the Save button will be used to return to the Assets page.
Save & Clone
From the Add Asset page > Asset Details tab, proceed by completing the required fields, which are as follows:
- Asset Number
- Serial Number
- Status
- Item Number
- Site
- Location
Next, click the down arrow found to the right of the Save button and select the Save & Clone option. This will result in clearing the Asset Number, Serial Number, and Status fields only. The remaining fields will be retained, thereby allowing for a very efficient way to add multiple Assets that have the same Item Number as well as the same Site and Location.
The Save & Clone option can also be used for adding multiple Assets with a different Item Number to the same Site and Location by simply selecting the appropriate Item Number while retaining the Site and Location fields. This process can be followed repeatedly until the final Asset is ready to enter, at which time the Save button will be used to return to the Assets page.
Import
This function is found under the Main Menu > Assets > Import. Upon launching the Import page, you will see a list of Required Fields as well as Optional Fields.
Important
All the Required Fields are necessary when importing new assets; however, when updating existing Assets, while other fields may be modified, the only Required Field is the Asset Number.
To prepare the Assets for Import,
- Click on the Download Template button.
- A .CSV file will be downloaded which contains all the fields available to you.
- Complete the fields you wish to populate, keeping in mind those that are required.
- Save the file.
- Click the Browse button to search for the saved file.
- Once located, click the Upload File button.
After the import has been processed, you will receive an email notification that shows the status of the import. This email will contain .txt files with both good and bad results that will assist you with correcting any import failures that may have occurred.
Performing Bulk Changes
When changes are needed that affect multiple assets, you can perform a “Bulk” transaction vs. processing each change individually.
On the Assets page, you will find a checkbox to the far left of the page next to each individual Asset as well as one to the immediate left of the Asset Number column. These checkboxes are used to select those Assets that require a Bulk Change.
To choose multiple Assets:
Check in each box to select the Asset.
Note
If all Assets require this change, click in the box next to Asset Number. This will automatically populate all Assets with a checkmark.
When all Assets have been selected, click on the Bulk Changes button found in the upper right portion of the page.
Select the change you wish to perform from the drop-down list, which contains several options. Two of the most common Bulk Changes are detailed below.
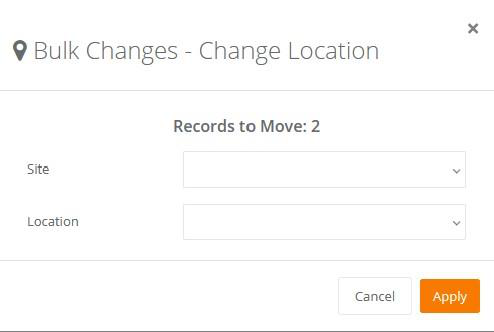
Change Location: Updating the location of Assets when they are reassigned to another Site is critical to data integrity. When changing Locations via the Bulk Changes feature, you will be prompted to select a new Site and Location, as seen below. Upon clicking on Apply, the records you have selected will be processed.
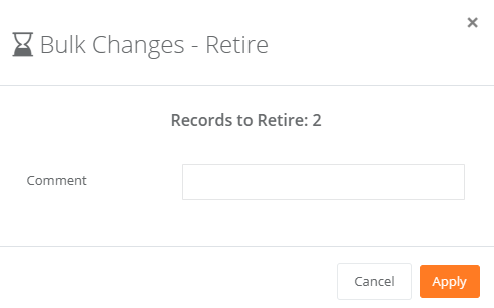
Retire: When Assets are no longer in use, you may use the Bulk Changes feature to Retire multiple Assets. As seen here, the number of Records involved in any Bulk Change is noted. In addition, a Comment can be entered.
Important
Assets are not deleted from IntelliTrack® – they are Retired.
Viewing Asset Details
To see the details for a specific Asset, follow the steps below.
- Search for the Asset from either the Home page using the Quick Search feature or from the Assets page.
- If searching via the Home page, the View Asset page at the Asset Details tab will be displayed. If searching via the Assets page, click the View button under the Actions column to access the View Asset page.
The Asset Details will include, but are not limited to:
- Asset Number
- Serial Number
- Status
- Manufacturer
- Item Number
- Description
- Item Groups
- Site – to include the physical address.
- Location
Additional information can be viewed by selecting from the available tabs found along the top portion of the page.
Performing Actions
Several Actions can be performed upon an Asset. These can be found on the View Asset > Asset Details tab to the far right of the page. Some of the options available are:
- Edit: Launches the Edit Asset page where changes to the Asset can be made.
- Create RMA: Opens the Create RMA page where a new repair request can be processed.
- Change Location: Allows the User to change the Site and Location of an Asset.
- Set Ownership: Allows the User to assign Ownership to the Asset.
- Maintenance/Calibration: Allows for scheduling a Maintenance and/or Calibration Date.
- Change Asset Number
- Change Serial Number
- Change Item Number
- Change Service Contract
- Retire
Note
The list of Actions available is based on the User’s Role. In addition, many Actions contain an optional Comments field.
Viewing Asset History
Throughout the lifecycle of an Asset, from the day of Procurement until End-of-Life, IntelliTrack® records an event for every Transaction that has occurred. This information can be found on the View Asset > Asset History tab.
Events are displayed by most recent and include the following information:
- Transaction Date and Time
- Transaction Description
- Comments
- User
This historical data provides total visibility to the actions taken against an Asset.
Adding Attachments
IntelliTrack® allows the User to add up to five attachments to Assets as well as Items, excluding .exe files. To add an attachment, follow these steps:
- Search for the Asset from either the Home page using the Quick Search feature or from the Assets page.
- If searching via the Home page, the View Asset page at the Asset Details tab will be displayed. If found via the Assets page, click the View button under the Actions column to access the View Asset page.
- At the Asset Details tab, choose the Edit option under Actions.
- At the Edit Asset page, click the Attachments tab.
- Click on Browse to locate the file and then click the Add button.
- The file chosen will then be listed under Asset Attachments by File Name and Description.
- When all attachments have been added, click on Save.
Note
Attachments can be Downloaded or Deleted by launching the Edit Asset page, clicking on the Attachments tab, and selecting from the two options found under Actions. Upon Downloading or Deleting the File, click on Save.
Chapter 3 – Asset User Defined Fields
Note
To work with Asset User Defined Fields, Administrator level access is required.
IntelliTrack® supports up to 25, fully customizable, User Defined Fields for an Asset. Using them requires three basic steps:
- Adding an Asset User Defined Field Group to the Tenant
- Adding an Asset User Defined Field to a User Defined Field Group
- Adding the Asset User Defined Field Group to an Asset
These steps are outlined below.
Step One: Adding An Asset User Defined Field Group
An Asset User Defined Field Group is used to group like Asset User Defined Fields together. Before you add an Asset User Defined Field, you must add a Group for it. To add an Asset User Defined Field Group, refer to the steps that follow.
Important
An Asset User Defined Field Group is required to add an Asset User Defined Field.
- Select Management > User Defined Fields > User Defined Field Groups.
- The User Defined Field Groups page appears.
- Click the Add button.
- The Add User Defined Field Group page appears.
- Name Field: Enter a Name for the User Defined Field Group.
- Entity: Click the drop-down arrow and select Asset since we are adding a User Defined Field Group for use with Assets.
- Display Order: The Display Order matters when you have more than one User Defined Field Group For Assets because it dictates the order that the Field Group appears in the Add/Edit Asset User Defined Fields tab. if this is the first User Defined Field Group that you are adding, enter 1.
- Click Save. You are returned to the User Defined Fields Group page. The new Asset User Defined Field Group has been added.
Step Two: Adding An Asset User Defined Field To A User Defined Field Group
An Asset User Defined Field is managed from the Asset User Defined Fields page. It must be part of an Asset User Defined Field Group, as detailed in Step One above.
Please refer to the steps that follow to add an Asset User Defined Field.
- Select Management > User Defined Fields > Asset User Defined Fields. The Asset User Defined Fields page appears.
- Click the Add button. The Add User Defined Field for Asset page appears.
- Name: Enter a Name for the User Defined Field.
- User Defined Field: A total of 25 Asset User Defined Fields are available. Use the drop-down list to select from the available User Defined Fields.
- Group: Click the drop-down arrow in this field and select the Asset User Defined Group that this Asset User Defined Field belongs to from the list that appears.
- Display Order: Dictates where this User Defined Field appears in the User Defined Field Group. It matters when you add more than one User Defined Field to this User Defined Field Group because the Display Order Number determines the placement of the User Defined Field inside this User Defined Field Group.
- Type: Select the Field Type for this field from the following options:
- String: The field will accept alphanumeric characters.
- Numeric: The field will accept numeric characters.
- DateTime: The field will accept a calendar date-time stamp.
- Boolean: The field may be toggled on or off (Yes / No).
- Date: The field will accept a calendar date.
- Click Save to add the Asset User Defined Field to the Asset User Defined Field Group.
- Repeat steps 1-8 until you have added all the Asset User Defined Fields to this Group.
Step Three: Adding The Asset User Defined Field To An Asset
Once the Asset User Defined Field is saved to an Asset User Defined Field Group, the User Defined Field Group must be added to the Item Number that the Asset will be associated with. This allows for the User Defined Fields tab to be displayed on the Add Asset and/or Edit Asset page for an Asset with this Item Number.
The Asset User Defined Field Group may be associated with the Item when it is added or edited via the Add Item page > User Defined Fields tab or the Edit Item page > User Defined Fields tab.
To add the Asset User Defined Field Group to an Item, please refer to the steps that follow.
- At the Add Item page, click the User Defined Fields tab to bring this section of the page to the front or Navigate to the Edit Item page for an Item that already exists.
- In the User Defined Fields Group field, click the drop-down arrow and select the Asset User Defined Field Group that you want to add to this Item.
- Click the Add button.
- The User Defined Field Group will appear onscreen. The fields will be read-only. This is because they are used for an Asset that becomes associated with this Item at the Add Asset page or the Edit Asset page.
- Repeat steps 1-4 until all Asset User Defined Field Groups are added to this Item.
- Click the Save button to save the Item. The Add Item page or the Edit Item page closes and you are returned to the Items page. The Asset User Defined Field Group(s) have been saved to this Item.
Step Four: Accessing The Asset User Defined Fields At The Asset
When an Item associated with an Asset has an Asset User Defined Field Group, the User Defined Fields tab will be available for the Asset at the Add Asset, Edit Asset, and View Asset pages.
Important
The Item associated with the asset MUST HAVE at least one Asset User Defined Field Group associated with it for the User Defined Fields tab to be visible for the Asset at the Add Asset, Edit Asset, and View Asset pages.
To access the Asset User Defined Fields, please refer to the steps that follow.
- Access the Assets page from Main Menu > Assets > Assets.
- Select the Add button to launch the Add Asset page.
- Enter the required information for the Asset at the Asset Details tab:
- Asset Number
- Serial Number
- Status
- Item Number: Click the drop-down arrow in the Item Number field and select the Item from the list that appears. The Description and Manufacturer will be automatically populated. If the Item has at least one Asset User Defined Fields Group added to it, the User Defined Fields tab will appear. It will contain the Asset User Defined Fields found in its Asset User Defined Field Group.
- Site
- Location
- Click the User Defined Fields tab to bring it to the front.
- The Asset User Defined Fields Group(s) that have been added to the Item Number appear.
- Enter information into the User Defined Fields as needed.
- Click the Save button.
Note
The value in an Asset User Defined Field can be modified at the Edit Asset page. This page can be reached via the View Asset page > Asset Details tab for the Asset by selecting Edit from the Actions options and then selecting the User Defined Fields tab.
Chapter 4 – Creating A Custom Page View
A Custom Page View is created by adding a filter or filters from the Add Filter popup and/or by adding or removing optional columns utilizing the Manage Columns popup.
Managing Columns
To the far right on the Assets page above the Actions column, a Manage Columns icon can be found. Upon clicking this icon, a popup that contains a list of fields for the Assets page will be displayed. From this list, you can add or remove fields from the default view.
- To remove an optional field from the page, unmark the checkbox to the left of the field.
- Once removed, a field may be added back to the page by marking the checkbox to the left of the field.
Adding Filters
The Add Filter option provides the ability to query page data by a field value. Filtering page data allows you to display only the records that meet certain criteria.
To add a filter to the page:
Select the Add Filter button that is found above the page's list of data.
The Add Filter popup appears, as seen below.
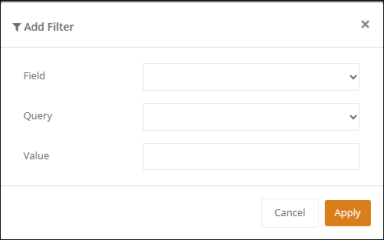
Field: Click the drop-down list to select the Field for querying.
Query: Click the drop-down list to select the Query to apply.
Value: Enter the Query Value.
Click the Apply button.
Note
For examples of each Query option, refer to the chart that follows.
Add Filter Dialog Query Options
| Query | Query Description | Example |
|---|---|---|
| Begins With | Only retrieves data for the field that begins with the exact criteria. | For example, to only retrieve data that begins with D1, select the Begins With query and enter D1 in the Value field. |
| Contains | Retrieves data for the field that is found in the criteria. | For example, to only retrieve data that contains 5, select the Contains query and enter 5 in the Value field. |
| Does Not Equal | Only retrieves data that doesn’t equal the criteria. | For example, to exclude data that contains a specific value, select the Does Not Equal query and then enter the criteria in the Value field. Data that does not match the criteria is excluded. |
| Ends With | Only retrieves data that ends with the exact criteria. | For example, enter 01 in the Value field. Only data that ends with 01 is displayed. |
| Equals | Only retrieves data that is equal to the criteria. | For example, to retrieve data that equals 1000, select the Equals query and enter the criteria in the Value field. Only data for the selected field that equals 1000 is displayed in the column. |
Saving A Custom Page View
When your View is configured on the page via Filters and Columns, it is ready to be saved as a Custom Page View. To save a view, refer to the steps below.
Click the Save View button along the top of the page.
The Save View dialog appears.
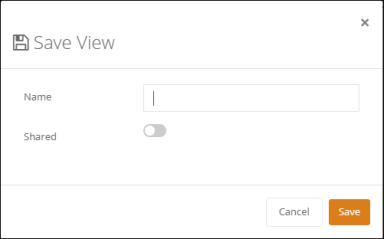
Enter the name of the view in the Name field.
Toggle the Shared button if you want this View to be available to all Users in the Tenant.
Click the Save button to close the Save View dialog box and return to the Assets page.
The Custom Page View has been saved and is available from the Select View drop-down list.
Selecting A View
To select a Custom Page View, refer to the steps below.
- To select a View that you have saved, click the drop-down arrow in the Select View button. A list of Saved Views appears.
- Select the View that you want to load onto the page. A checkmark appears to the left of the View.
- The list closes and the View loads onscreen.
Configure Options For The View
Configure options include:
- Setting a View as the Page’s Default View.
- Deleting a Page View that you have created.
Setting A View As The Page’s Default View
To set a Saved View as the page’s default view, refer to the steps that follow.
- From the Select View button, click the drop-down arrow.
- Select the Configure option.
- A Configure popup appears.
- Mark the Star to the left of the view. The Star turns Orange.
- Close the Configure popup.
- Refresh the page.
- The Selected View appears; it is now the Default Page View.
Note
To remove a Saved Custom Page View, select the Configure option and unmark the Star to the left of the view. You may now select another view or revert to the Default View.
Deleting A View
To delete a Saved View that you have created, refer to the steps that follow:
- From the Select View button, click the drop-down arrow.
- Select the Configure option.
- A Configure popup appears.
- Click the Delete button.
Important
There are three Access Levels for Page Views:
- Private: Created by the User for their use only.
- Shared: A View that is available to all Users within the Tenant.
- Public: A System-Created View that cannot be deleted.
Chapter 5 – Service Contracts
IntelliTrack® facilitates the management of your Service Contracts by enabling you to see which contracts are nearing expiration, thereby ensuring that your assets are always covered for repair and service.
To access, go to Main Menu > Service Contracts > Service Contracts. The default page view will display the following information for those Contracts that are currently Active:
- Contract Number
- Start Date
- End Date
- Contract Holder
- Contract Type
- Invoice Cycle
- Spare Pool Option
- Number of Assets Covered: This is a hyperlink that, upon clicking, will launch the Assets page and display the list of covered Assets.
In addition, the Bar Chart will reflect the following day ranges for when those Active contracts will expire:
- 30 Days or Less
- 31-60 Days
- 61-90 Days
- 91-120 Days
- Over 120 Days
You may also view Contracts whose expiration dates have ended by turning on the Expired toggle, which can be found above the Bar Chart. Doing so will add an Expired bar to the chart. Each of the bars contain the Number of Contracts associated with the day ranges and serve as hyperlinks to filter the Contract information.
Lastly, you can apply a filter by entering a date range in the From and To End Date fields. This allows you to specifically view those Contracts that fall within the dates entered.
Adding A Service Contract
Note
To perform this function, Administrator level access is required.
From the Service Contracts page,
- Click the Add button found below the Bar Chart.
- The Add Service Contract page will be displayed.
- Populate the following fields, all of which are required, and click on Save.
- Contract Holder
- Contract Number
- Contract Type
- Invoice Cycle
- Spare Pool Option
- Start and End Dates
This new Contract is now available to add to individual Assets or to multiple Assets via an Import.
Chapter 6 – RMA Management
Due to IntelliTrack®’s integration with multiple OEM portals, Users can submit repair requests and monitor them from the moment of creation to receipt by the Repair Depot to shipment following repair. This feature frees the User from having to access another portal for RMA Management.
Below please find more information on the RMA process.
Creating an RMA
To create a new RMA, follow the steps found below.
Locate the Asset that requires a repair using the Quick Search feature from the Home page or from the Assets page.
If found via the Home page, the View Asset page at the Asset Details tab will be displayed. If found via the Assets page, click the View button under the Actions column to launch the View Asset page.
From the Asset Details tab, navigate to the RMA tab and then click on the Create RMA button or click the Create RMA option under the Actions Menu.
This will launch the Create RMA page, which will identify the Repair Depot and will auto-populate the Serial Number as well as the Service Contract Number and Contract Expiration Date, if available. It will also populate the Contact Name, Email address, and the Return Site.
Select from the drop-down list of Symptoms offered knowing that more than one can be chosen.
The remaining fields are optional, although completing the Reason field, which is limited to 40 characters, is highly recommended as it will provide more information regarding the problems with the Asset.
When completed to your satisfaction, click on the Create button to submit the RMA request.
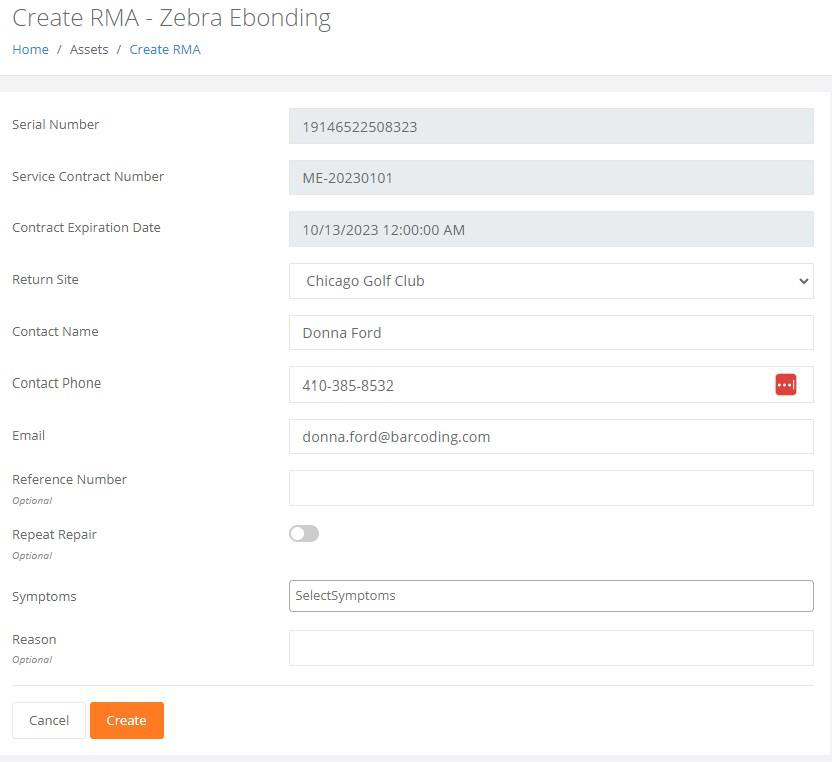
You will now see your newly created RMA on the RMA tab with a Status of Open.
Important
The Return Site can be modified, if necessary, by using the drop-down arrow to select from the list of Return Site options. If, however, the Return Site is pre-populated and “read only” due to re-provisioning requirements, the Return Site cannot be modified.
Viewing RMA Details
Once a repair request has been submitted, the User may wish to view the details for the RMA. To do so,
From the View Asset > RMA tab, click on the three dots found under the Actions column.

A list of options will be displayed. Select View RMA Details.
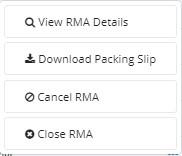
At the RMA Details page, you will see the information associated with this RMA, which includes, but is not limited to:
- RMA Number
- Serial Number
- Repair Depot Location
- Site Address
- RMA Creator and Contact Information
- Symptoms
This page will also be populated with the following Dates as the repair progresses:
- Date Created
- Received At Repair Depot
- Shipped From Repair Depot
- Shipped To Customer
- Replacement Shipped, if applicable
- Replacement Serial Number, if applicable
Tracking Numbers, along with hyperlinks to the Carrier’s website, will also be contained on the RMA Details page.
Chapter 7 – Orders
IntelliTrack® provides “real-time” visibility to Orders that have been placed through Barcoding, Inc. This feature can be found at the Main Menu > Fulfillment > Orders page, where the User can:
- Search for an Order Number
- Add Filters
- Export Data to a .CSV File
- Create a Subscription
If you wish to view an individual order:
- Click on the Details option found under the Actions column.
The Fulfillment Order Details page will contain detailed information about the Order, to include individual Item Numbers and Quantities Ordered as well as Fulfilled.
Chapter 8 – Insights
The system provides you with data insights at the Insights page (Main Menu > Insights) in the form of Reports and Dashboards. Access to these Insights may be Public, Private, or Shared among other Users within your Tenant. Each is identified with a unique icon.
On the Insights page, multiple Reports or Dashboards can be designated as a “Favorite” by clicking in the Star. When a “Favorite” is marked, a link to the Report or Dashboard is created on the Home page under My Favorite Insights. Adding these to the Home page allows for instant access without having to launch the Insights page.
In addition to marking these as a “Favorite”, a Report or Dashboard can also be subscribed to from the Insights page. To do so:
- Launch the Report or Dashboard
- Choose the Create Subscription option where you will identify the day(s) of the week or a specific date within the month to receive this report via email.
Note
Reports or Dashboards that are subscribed to will contain a green checkmark under the Subscribed column on the Insights page.
While the Insights page contains several Reports and Dashboards available to IntelliTrack® Users, there are a few that are invaluable for monitoring Asset Statuses and Repair Requests, as detailed below.
Assets by Status Dashboard
This Dashboard contains a summary of all Assets within your Tenant by Status. The following statuses are standard; however, Custom Statuses can be entered based on the needs of your organization.
- In Field
- In Transit
- In Repair
- In Spare Pool
- In Stock
Three statuses in the IT Asset Bundle are specifically related to RMAs – In Field, In Transit, and In Repair, as described below:
- In Field – An Asset that is Actively in Use.
- In Transit – An Asset that has an Open RMA and is enroute to the Repair Depot.
- In Repair – An Asset that has been received by the Repair Depot and is currently going through the repair process.
Important
When a repair is complete, the status of the Asset will be updated from In Repair to In Field and the Open RMA will be Closed. This is based on a Standard RMA Workflow.
RMA Summary Report
The RMA Summary Report contains a list of repair requests that, when launched, defaults to all Open RMAs; however, a Filter may be applied by RMA Status and Repair Depot.
The columns contained in this report will be populated as the repair progresses and are based on the RMA Workflow for that Item Number.
As detailed in the Custom Page View section of this Guide, these columns can be adjusted by using the Manage Columns feature to add and remove fields as desired.
In addition, a Search as well as Filters may be applied to the data. The report can then be exported to a .CSV file or a Subscription can be created.
RMAs In Transit Report
This report contains a list of Assets whose Status is currently In Transit.
Why is this important? Because, depending on the Repair Depot, RMA’s can be cancelled if the Asset has not been received in 30 days. This report, therefore, is extremely useful for monitoring repairs, as it serves as an alert that Assets have not yet reached the Repair Depot.
The report contains the details of the RMA, to include:
- RMA Number
- Serial Number
- Item Number
- Site Details
More importantly, it displays not only the RMA Created Date, but also the Cancelation Date, which is the date that the device needs to be received by the Repair Depot.
This report can be exported to a .CSV file or a Subscription can be created.
RMA Replacements Report
This report contains a list of RMAs for which a Replacement device needs to be shipped. This typically occurs when a Spare Pool is utilized to replenish a Tenant’s Asset following the creation of an RMA vs. waiting for the damaged device to be repaired. When the Replacement shipment has been processed, the RMA will be removed from the report.
Note
Depending on the RMA Workflow settings created for the Tenant, this Report may not be applicable.
Chapter 9 – Dashboards
Dashboards allow Users to customize their data into graphic displays. They contain one or more Widgets, which are built using KPIs (Key Performance Indicators), Optional Queries, and Output Data.
When a Dashboard is created, the Edit Widget Wizard steps you through three tabs, as follows:
1 – Configuration: Allows you to
- Select a Data Source
- Choose the Type of Visualization (Bar, Card, Donut, Gauge, or Pie)
- Choose the Widget Width
- Enter a Title
- See a Preview of the Widget
2 – Input: At the Input tab, you
- Select a Query
- Add a Value to Filter
Note
Entering a Query on the Input tab is optional and can be bypassed.
3 – Output: Allows you to
- Select a Data View
- Choose the Results
- Select a Color to apply to the Results
- Save the Widget
Multiple Widgets can be added and edited prior to finalizing the Dashboard, to include moving their positions and resizing.
Once the Widgets have been created and the Dashboard is complete, several Actions can be performed while in Edit mode, such as:
- Renaming the Dashboard
- Deleting the Dashboard
- Changing Access from Private (only seen by the Creator) to Shared (all Users within the Tenant have access).
- Cloning the Dashboard
- Transferring the Dashboard
Chapter 10 – Subscriptions
A Create Subscription option is available on many pages, which allows you to subscribe to a page view. When you subscribe to a page view, the data from the page view is exported into a .CSV file and sent to you via an email attachment on a user-selectable day(s) of the week and/or day of the month.
Creating A Subscription
To create a Subscription to a page, refer to the steps that follow.
- At the top right of the page, click the Download button.
- Click the drop-down arrow and select the Create Subscription option.
- The Create Subscription popup appears.
- Enter the Name for your subscription in the Name field.
- Schedule when you want to receive the Subscription to this report.
- Weekly: Select the Weekly tab and mark the checkbox to the left of each Day of the Week that you want to receive the email along with the Requested Time, noting that multiple days of the week can be chosen.
- Monthly: Select the Monthly tab to bring this portion to the front and select a Day of the Month, from 1-31, that you want to receive the email along with the Requested Time.
Managing Subscriptions
Reports that you have subscribed to are managed at the Subscriptions page. Each Subscription is listed along with its Name, Page, View, and Schedule Summary. If you no longer want to receive a Subscription, a Delete option is available under Actions.
There are two ways to access the Subscriptions page:
- User Profile Page
- Select your username found in the upper right corner of the page.
- The User Profile page is displayed.
- From the Subscriptions field, click the Manage button.
- The Subscriptions page appears.
- Insights Page
- Select Insights from the Main Menu.
- Select the Subscriptions button found to the right above the page’s grid.
- The Subscriptions page appears.
Chapter 11 – Exporting Page Data
The data that you are viewing on a list page can be exported out of the system into a .CSV file. To export the page data from IntelliTrack®, refer to the steps that follow.
- At the top right of the page, click the Download button.
- Click the drop-down arrow and select the Export CSV option.
- The data on the page is exported to a .CSV file; it is usually found in the Downloads folder.
Related
- IntelliTrack Getting Started Guide — signing in, users, roles, licenses, and sites and locations
- IntelliTrack VeriMy™ Quick Reference Guide — VeriMy, the add-on to the IT Assets bundle
- What file types are supported for attachments? — the file types you can attach to asset records