Appearance
IntelliTrack Getting Started Guide
The essentials for setting up a new IntelliTrack tenant: signing in, finding your way around, adding users and roles, assigning licenses, and building out your sites and locations.
Welcome
Welcome to IntelliTrack. IntelliTrack is a secure cloud-based platform that is built on a microservices architecture. It is designed to connect you to the data you need to optimize your daily business operations.
Advantages to IntelliTrack
IntelliTrack delivers the following advantages:
- Rapid installation and implementation
- User-friendly procedures
- Access from anywhere with an Internet connection
- Secure, state-of-the-art data center
- Encrypted HTTPS secure session connections
- Seamless software updates or configuration changes that are accomplished without any down time
- Android device transactions available (Android v4.4 and higher)
Contact Information
We are headquartered in Baltimore, Maryland. Reach out anytime; we are here to help you.
- Telephone (toll free in USA): 1-888-412-7226
- Website Address: www.intellitrack.com
- Support Email Address: tech.support@decisionpt.com
Browser
IntelliTrack operates in a web browser. This means that information is displayed, sent, and gathered within a browser application that operates on the Internet.
IntelliTrack Web Address
Load IntelliTrack by entering the IntelliTrack web address in the browser to reach the IntelliTrack Login page.
The URL to reach IntelliTrack is https://app.intellitrack.com/Login
Supported Browsers
IntelliTrack supports the latest version of the following web browsers:
- Google Chrome
- Microsoft Edge
Invitation Email
Upon receipt of the IntelliTrack Invite Email, you will be able to set up your IntelliTrack login credentials.
- When you receive this email, click on the Accept Invitation button link to set up your login credentials.
- The Accept Invitation link in this email is valid for 24 hours. When you click this link you will be directed to the Login page.
- Your username will already be entered in the Username field. The Username is your email.
- You are required to set your password. A strong password is required. The password must be at least 6 characters and contain an uppercase and a lowercase letter, a number and a non-alphanumeric character.
- When you log into IntelliTrack you land at the Home page of the Tenant.
Navigation
The Navigation Pane is the blue bar that is anchored in the left side of the page. Use it to traverse IntelliTrack. It has two states: expanded and collapsed. It is in the expanded state when you initially log into the application. However, you can toggle the menu to a collapsed state via the Hamburger menu in the upper left corner. The collapsed state gives you more space for viewing data on the IntelliTrack webpage. The Navigation Pane has two menus: Main and Management.
Main Menu
The Main menu contains the Home, Insights, and other options that are present if they are part of the Tenant Bundles; for example, depending on your Tenant Bundle or Bundles, you may see these options in the Main menu: Assets, Inventory, Order, Service Contract options, and other options that pertain to the Tenant Bundles. When you log into IntelliTrack, you "land" at the Home page; the Main menu is active.
The Main menu options are where you will access the reporting and transactional areas of IntelliTrack.
- Administrators and Users have full access to the options in the Main menu.
- Viewers have read-only access to the options in the Main menu.
Management Menu
The Management menu contains the Administrative options for IntelliTrack.
It is where you will find the options to add, edit, and delete the "core" IntelliTrack data such as items, sites and locations. It is also where you administer the Users, their Roles, and Tenant Settings.
- Administrators have full access to the options in the Management menu.
- Users have read-only access to the options in the Main menu with the exception of Users in the Consumable Inventory bundle who are able to add an item to inventory via the Items page.
- Viewers have read-only access.
Moving Between the Two Menus
You are able to easily move from the Main menu to the Management menu and vice versa.
- To reach the Management menu from the Main menu, select the Management option.
- To reach the Main menu from the Management menu, select the Back to Main option along the top of the Management menu.
Users
Note
You must have Administrator access to the Users page to add or edit a User.
When your account is set up, an Administrative User is set. The Administrative User can add additional users.
A valid system user has these qualities:
- Has been invited to your tenant.
- Has accepted the invitation and set up login credentials.
- Is assigned to a Site Group. (By default all users are set to the All Sites Site Group.)
- Is assigned a Role.
- Is licensed to use the bundle.
User Profile
Each logged-in User may reach their User Profile page from any application page by pressing on their Username in the upper right corner. The following information is available:
- Name: The logged-in User's first name, last name as entered in the system. Press the Change button to the right and follow the onscreen prompts to change this information.
- Email Address: The Username - email address of the logged-in User. It may not be changed.
- Email Verification: A green check mark is found to the right of the email address, which indicates that the email has been verified.
- Password: The password may be changed by pressing the Change button to the right and following the onscreen prompts.
- Phone Number: The phone number may be changed by pressing the Change button to the right and following the onscreen prompts. Note: If you are using this phone number for two-factor authentication, it must be a phone number that will accept text messages.
- Two-Factor Authentication: Two-Factor Authentication may be enabled or disabled by pressing the Change button to the right of the Two-Factor Authentication switch and following the prompts. Important: Two-Factor Authentication is enforced at the Administrator level or when it is turned on for the Tenant. In these two cases, Two-Factor Authentication cannot be disabled.
- Subscriptions: Press the Manage button to reach the Subscriptions page. The Subscriptions page shows Page data views to which the logged-in User is subscribed.
- Default site: When the logged-in User selects a default site, the default site will automatically load in the Site field at certain application forms and pages; see Default Site for the User for more information.
Note
For the Default Site setting to take effect, you must log out of IntelliTrack and then log back into IntelliTrack.
Two-Factor Authentication
Important
Two-Factor Authentication is enforced at the Administrator Access Level. It cannot be turned off for an Administrator.
Important
When Two-Factor Authentication is ENABLED for the Tenant via the Tenant Security Settings, it cannot be turned off for any User, regardless of the User's role.
When Two-Factor Authentication is enabled, you will be prompted to enter a Verification Code to verify your identity after you enter your username and password at the Login page. A unique Verification code will be emailed to your email address or texted to a verified cell phone number, which you must retrieve and enter into the Verify field in order to log into the application. If you mark the Remember Me checkbox, the browser will remember you and you will not have to continually re-enter a Verification code to log into IntelliTrack.
Note
To have the option to receive the Verification code via a text message, you must validate your phone number at your User Profile page.
Users Page
Users are managed from the Users page. To reach the Users page, select Management > Users > Users from the Navigation Pane.
The Users page shows the current list of users in the page grid.
Each User is listed at this page along with the ability to view the User's permissions and edit the User's record.
Add User
Users may be imported or added at the Add User page. This section steps you through adding a User at the Add User page.
Note
If you are interested in adding Users via the import process, see Import Users.
Refer to the steps that follow to add a user from the Add User page:
- Select Management > Users > Users. The Users page appears.
- Press the Add button.
- The Add User popup appears.
- Enter an email address in the popup.
- Press Next.
- The Add User popup closes and the Add User page appears.
- First Name field: enter a first name for the user in this field.
- Last Name field: enter a last name for the user in this field.
- Email Address field: this field is read-only. It displays the email address entered in the Add User popup.
- Phone Number field: enter the user's phone number.
- Roles field: assign a system role for the user from the list that appears.
- Send Invite setting: enable this setting to send an invitation email to the new user's email address.
- Sites field: assign access to a site or sites in the tenant.
- Site Groups field: by default the user is assigned to the All Sites group in the tenant. You may assign another site group if desired.
- Enabled setting: this setting is enabled by default. It means that the User is active. (If you wish to disable the User, disable this setting. When a User is disabled, the User is denied access to IntelliTrack.)
- Press Save to save this User to your IntelliTrack Tenant.
- The new User is added and should have a Role and Site assignment. You now have to assign the User a License; see Licenses.
Edit User
After a User is added to the system, the User's record may be edited. The User's record is edited from the Edit User page.
Note
You must have Admin access to the Users page to edit a User.
When editing a User's record, you may edit the details, role, and license.
User Details Tab
Refer to the steps below to edit a User's details.
- In the User's list, select the Edit button to the right of a user.
- The Edit User page appears for the User. The User Details tab is to the front.
- You are able to edit all fields except for the Email Address field.
- When you have finished editing the User's record, press the Save button to save the changes.
Roles Tab
A User is assigned a role at the Edit User page. To assign or change the user's role, press the Roles tab to bring this portion of the Edit User page to the front.
- Assign a Role: To assign a role to the User, press the Assign button.
- Unassign a Role: To remove a role from the User, press the Unassign button.
System Roles
The system roles include:
- Administrator: this role grants Write access to the Main and Management menu options.
- User: this role grants Write access to the Main menu options and Read-Only access to the Management menu options.
- Viewer: this role grants Read-Only access to the Main and Management menu options.
Tenant Roles
A Tenant Administrator may create specific tenant level roles for the tenant, but this is not required.
Licenses Tab
A User is assigned a License to the Bundle at this tab. Mark the checkbox to the left of the bundle to assign a license to this User. When the User is assigned to a license, the User is able to perform bundle-related workflows in this tenant.
You may also assign the User a License at the Licenses page; see Licenses.
Disabling a User
A User cannot be deleted. The alternative to deleting a User is to disable a User. When a User becomes disabled, the User is denied access to IntelliTrack and any License given to the User is revoked. A disabled User may be enabled again.
To disable a User in IntelliTrack, follow the steps below.
Important
The logged-in User is unable to disable self.
- Select Management > Users > Users to reach the Users page.
- Locate the User in the list that you want to disable.
- Press the Edit button. The Edit User page appears for this User.
- The Enabled setting is found along the bottom right of the form area.
- Toggle the Enabled setting to disabled. The color of the setting changes from green to red to denote that the setting has been changed to disabled.
- Press the Save button.
- You are returned to the Users page.
- A Cancel icon appears for this User in the Actions column. This denotes that the User is now disabled. Any license given to this User will be revoked.
Inactive User
If a User does not log into IntelliTrack for a set amount of days, the User will become Inactive. This means that the User will not be able to log into IntelliTrack again until the User reactivates their account. When a User is inactive, at the time of login, the User will be denied access to IntelliTrack and this message is displayed at the Login page: User account is inactive.
Note
The default "Inactivity Period for Inactivating a User" in IntelliTrack is 60 Days. A Tenant Administrator may change this setting to anywhere from the minimum of 7 to the maximum of 90 Days via the Tenant Settings > Settings for Security page.
User Reactivation Process
The User is able to reactivate the account by:
- Pressing the Reactivate User Account link at the Login page, which appears above the User account is inactive message, and
- Following the prompts to receive an IntelliTrack Account Reactivation Email Message from no-reply@decisionpt.com that contains a Reactivation Link.
Once reactivated, the User is able to log into IntelliTrack again.
Note
The Reactivate link in the Reactivation Email is valid for 24 hours.
Import Users
You are able to add new Users to IntelliTrack or edit existing Active Users in IntelliTrack via the User Import process. This includes:
- Adding the User;
- Assigning the User's role;
- Assigning the User to a Site or Site Groups;
- Updating information for an existing active user.
How to Import Users
At the Import Users page you may access the Import Users template. The page also lists the Required Fields and Optional Fields for a Users import.
Note
If you are unable to reach this page, it may be due to your permission level.
Note
When a User is Disabled, the User cannot be updated via the User Import.
To import Users, please refer to the steps below.
Select Management > Users > Import Users. The Import Users page appears.
Download Template button: Press this button to download the Import Users template; the template is downloaded as a .csv file named UsersImport.csv.
The import file that you upload must be in this .csv extension. We recommend that you use the downloaded template file as the basis for the import file that you will upload.
Header Row: The header row in the import template must be part of the import file in order for proper field mapping during the import. Do not remove the header row from the import template.
Required Fields: Required fields are indicated in the Required Fields column. The Required Fields must be part of the import file for a successful import of the data. When importing Users, you may add a new User or update an existing User.
This import has two required fields when adding a new User:
- Email Address and
- Site and / or Site Group.
This import has one required field when updating an existing User:
- Email Address.
Optional Fields: Optional fields are indicated in the Optional Fields column. A value is not required in these fields for the import to succeed.
First Name: Enter the value for the First Name field.
Last Name: Enter the value for the Last Name field.
Phone Number: Enter the value for the Phone Number field.
Role: Enter the value for the role for this User in this field.
Send Invite: The Send Invite option relates to the Send Invite setting for the User; it is a Boolean value (i.e., Enabled or Disabled; True or False; On or Off).
To Enable this Setting, which means to send the Invitation Email as a result of adding the User during this import: Enter T in this field.
To Disable this Setting, which means that you do not want to send the Invitation Email during this import: Enter F in this field or leave this field blank.
When you are finished preparing the import file, Save it.
To import the Users via the saved file, go to the Import Users page and press the Choose File button.
An Open window appears. Browse to the prepared UserImport.csv file. The file will appear in the File name field. Press the Open button.
The Open window closes and you are returned to the Import Users page. The import filename appears to the right of the Choose File button.
The file must contain a .csv extension.
Press the Upload File button.
A message appears along the top of the page: Your import is being processed. You will receive an email notification with the results shortly.
An email notification will arrive at your IntelliTrack Username Email address. It has the following subject line: IntelliTrack User Import Results and it is sent from no-reply@decisionpt.com.
The newly added Users appear in the Users page. The existing Users included in the import will be updated accordingly.
You are now ready to assign a license to the new Users. Go to the Licenses page to do this (Management > Users > Licenses).
User License
In order to access the workflows in the Tenant's bundle, the User must also be assigned to a License. The import process does not manage user licensing. This is accomplished at the Licenses page.
Important
To assign a license to the User, go to the Licenses page (Management > Users > Licenses).
Licenses
The Licenses page lists the Licenses available in the Tenant. Select Management > Users > Licenses to reach this page. For each Tenant Bundle, the following information is displayed: amount of Available Licenses, Assigned Licenses, and Renewal Date.
Managing Licenses
You are able to manage each bundle's licenses via the License Management page for each Bundle in your Tenant. This includes the ability to assign a license or unassign a license.
- Press the Manage button in the Actions column to the far right to reach the License Management page for the Bundle.
- The License Management page for the Bundle appears. The Bundle Name is listed. A progress bar shows the ratio of total licenses and available licenses.
Unassign a License
The User's license may be unassigned from the License Management page.
- To free up a license, you may unassign one from a User. To unassign a license from a User, check the User by marking the checkbox to the left of the User.
- The Assign License button in the upper right area of the page will refresh and become the Unassign License button.
- Press the Unassign License button.
- A Confirmation prompt appears. Press Yes to continue.
- The Confirmation prompt closes.
- You are returned to the License Management page. The license for this bundle has been removed from the User or Users.
Assign a License
The User's license may be assigned from the Assign User Licenses popup.
- An Assign License button is found in the upper right area of the page.
- Press the Assign License button to reach the Assign User Licenses popup for the Bundle. It shows how many licenses are remaining and also lists the Users in the Tenant who do not have this license assigned to them.
- To assign a User to this license, check the User by marking the checkbox to the left of the User.
- Press the Assign button.
- The Assign License popup closes. You are returned to the License Management page for this Bundle.
- This User now has a license. It is part of the Licensed User list.
Important
The User must log out and then log back into IntelliTrack for the license change to take effect.
User Roles
A Role is used to assign system permissions to a User. A Role is managed from the Roles page. Select Management > Roles to reach this page.
Note
A User may have one Role or multiple Roles. A Role is not required for a User; however, if the User is not assigned to a Role, the User will not be able to use the system in a meaningful way.
System Roles
Three system roles are available.
Note
The system roles of Administrator, User, and Viewer may not be edited or deleted.
- Administrator: This role grants full access to all system pages and forms. When a User is assigned to this role, Two-Factor Authentication is required. It cannot be disabled.
- User: This role grants full access to all Main menu options and read-only access to Management menu options.
- Viewer: This role grants read-only access to all application areas.
Tenant Roles
You may create tenant level roles, which are specific to your tenant.
Note
A tenant role may be edited. It may not be deleted.
Adding a New Role
Note
To add a Role, Administrator access is required.
You may add a new role by cloning an existing role or by adding a new role from scratch. When you add a new role to the tenant, it is considered a tenant role, which means that this new role is found only in your tenant.
Cloning a Role
One way to add a new role to your tenant is by cloning an existing role and then adjusting the permissions for the new role. To clone a role, refer to the steps that follow:
Note
The system roles of Administrator, User, and Viewer may be cloned.
Select the Clone button to the right of the role that you want to clone.
The Add Role page appears. The features assigned to this role are already set.
Name field: Enter the name for the role in this field.
The System Permissions are listed in the page. Add or remove the system permissions as necessary for the new role that you want to create.
Note
The item and asset level permissions are found in the item group permissions. To filter the list of permissions by the item group permissions, enter item in the Search bar at the Add Role page.
Press the Save button to save your changes.
The Add Role page closes and you are returned to the Roles page.
The new role is found in the list of roles. It is ready to be assigned to a User.
Adding a New Tenant Role
You are also able to add a new role to your tenant from scratch. To add a new role this way, refer to the steps below:
- Select the Add button.
- The Add Role page appears.
- Name field: Enter the name for the role in this field.
- The System Permissions are listed in the page. Add the system permissions as necessary for the new role that you want to create.
- Press the Save button to save your changes.
- The Add Role page closes and you are returned to the Roles page.
- The new role is found in the list of roles. It is ready to be assigned to a User.
Editing a Tenant Role
Important
The system roles of Administrator, User, and Viewer cannot be edited.
Note
A role that has been created in your tenant may be edited. To edit a Role, Administrator access is required.
To edit a tenant role, please refer to the steps that follow:
- For a tenant role, select the Edit button found in the Actions column to the right.
- The Edit Role page appears for this role.
- Adjust the role by adding or removing permissions.
- Press the Save button to save the changes to this role.
Assigning a Role to a User
A role is assigned to a User at the User's record when adding or editing it; see Add User or Edit User.
Sites and Locations
The Tenant is the highest level of organization hierarchy. This means that the Site is added to the Tenant and the Location is added to the Site. The Tenant-Site-Location form the basis of your asset or item location tracking in IntelliTrack. A Tenant may contain unlimited Sites; a Site may contain unlimited Locations.
Tenant Setup
When you initially log into IntelliTrack, you are in your default Tenant. The Tenant is your database and holds all of your IntelliTrack data. The following data should be loaded into your Tenant before you start adding the Item data.
- Add the Site(s) to the Tenant.
- Add the Locations to each Site.
- Add the Users to the Tenant.
- Review the Tenant Settings.
Important
Each Tenant is unique and independent. You may only work in one tenant at a time. If your IntelliTrack instance has more than one Tenant, you will have to change your Tenant at the Change Tenant page to switch between the Tenants.
Default Tenant
When a User logs into IntelliTrack, the User reaches the Default Tenant.
Single Tenant Setup
When a User is added to a single Tenant, this Tenant is considered to be the User's default Tenant. It is automatically set for this User.
Multiple Tenant Setup
When a user is added to more than one Tenant, this means that the User has access to multiple tenants. In this case, the User's Default Tenant is set at the Change Tenant page. When logging into IntelliTrack, the User automatically logs into the Default Tenant, but may change the Tenant at any time via the Change Tenant page.
Switching Between Tenants
You are able to switch between Tenants at the Change Tenant page. You may reach the Change Tenant page from any application page by pressing your Tenant Name in the upper right corner. The following information is found at the Change Tenant page:
- List of your Tenants
- To switch to another Tenant, select it from the list of Tenants.
Setting or Changing a Default Tenant
The Default Tenant is the Tenant that you will automatically reach when you log into IntelliTrack. You are able to set and change the Default Tenant at the Change Tenant page. Follow the steps below to set or change your Default Tenant.
- In the upper right corner of any page, press on the Tenant name.
- The Change Tenant page appears.
- The Tenants that you have access to are listed in the page.
- If you have access to more than one Tenant, you will see multiple tenants.
- To set or change your default Tenant, locate the Tenant in the list.
- To the far right of the grid, in the Actions column, press the Set Default button for the Tenant.
- A Confirmation popup appears asking you to confirm this action.
- Select Yes to continue with setting this Tenant as your Default Tenant.
- The Confirmation popup closes. You are returned to the list of your Tenants at the Change Tenant page.
- A check mark appears in the Default column, to the left of the Tenant name. This indicates that this Tenant is now set as your Default Tenant. The next time that you log into IntelliTrack, you will log into this Tenant.
Tenant Settings
Each Tenant contains settings that determine how it will manage the data.
- When used, the settings are enforced at the Tenant level.
- Tenant settings are set at the Tenant Settings page. This page is available from the Management menu. Select Management > Settings > Tenant Settings to reach this page.
Settings for Security
Two security settings are available to govern User security for the Tenant:
- Mandatory Two-Factor Authentication: when enabled, two-factor authentication is enforced for all Users in the Tenant. This means that each User will be prompted to verify their identity when logging into IntelliTrack.
- Inactivity Period for Disabling User (Days): this setting governs marking a User as inactive based upon an inactivity period set in Days. If a User does not log into IntelliTrack in the amount of Days specified, the User will become Inactive. The setting range must be between 7-90 days. The default setting is 60 days. An Inactive User must reactivate their account to be able to log into IntelliTrack again.
Sites
A Site is unique to the Tenant, belongs to at least one Site Group (the System automatically places all sites in a default All Sites group), and it contains Locations. In IntelliTrack, your data resides in the Site-Location. The list of sites is found at the Sites page. You are able to work with sites and locations from this page.
Note
To work with Sites and Locations, Administrator access is required.
- Add a Site: click the Add button to go to the Add Site page. A Site is added at the page.
- Edit a Site: click the Edit button to go to the Edit Site page. The Site is edited at this page.
- Delete a Site: click the Delete button to delete the site. A Confirmation prompt appears. Click Yes, delete it! to continue with deleting the site. (If a Site is being used in the system, it cannot be deleted.)
- Locations: click the Locations button to go to the Locations page for this Site.
Locations
A Location is added to a Site.
Locations Page
To reach the Locations page for a site, press Management > Locations > Sites > Locations button. At the Locations page you are able to add, edit, or delete a location.
Note
To work with a Location, Administrator access is required.
Adding a Location
A location is added to a site from the Add Location page.
- From the Locations page, press the Add button to reach the Add Location page.
- A name is required.
- Press Save to save the location to the site. The Location form closes and you are returned to the Locations page. The newly added location is now part of the Location list for this Site.
Editing a Location
A location is edited from the Edit Location page. From the Locations page for your site, press the Edit button to reach this page. After editing the location information, press Save to save your changes and return to the Locations page.
Deleting a Location
If a location is not being used, it can be deleted from the Locations page. Simply press the Delete button for this location and follow the onscreen prompts. The Delete button is found in the Actions column, to the right of the Location entry.
Sub Location
When a Location contains a Parent Location, it is a Sub Location to the Parent Location. This may come in handy for locations that contain a main unit and sub units such as a shelf and bins that reside on the shelf.
Adding a Sub Location
To add a Sub Location:
- Select Management > Locations > Sites > Location button to reach the Locations page for this Site.
- From the Locations page, select the Add button to reach the Add Location page or press the Edit button for an existing Location to reach the Edit Location page: press the dropdown arrow in the Parent Location field and select a location from the list that appears.
- Press Save.
Location Labels
The capability to print Location labels is found at the Locations page (Management > Locations > Sites > Site page, Location button for the Location). It is a Print operation, which is completed from the Print button, found along the top of the Locations for {Site} page.
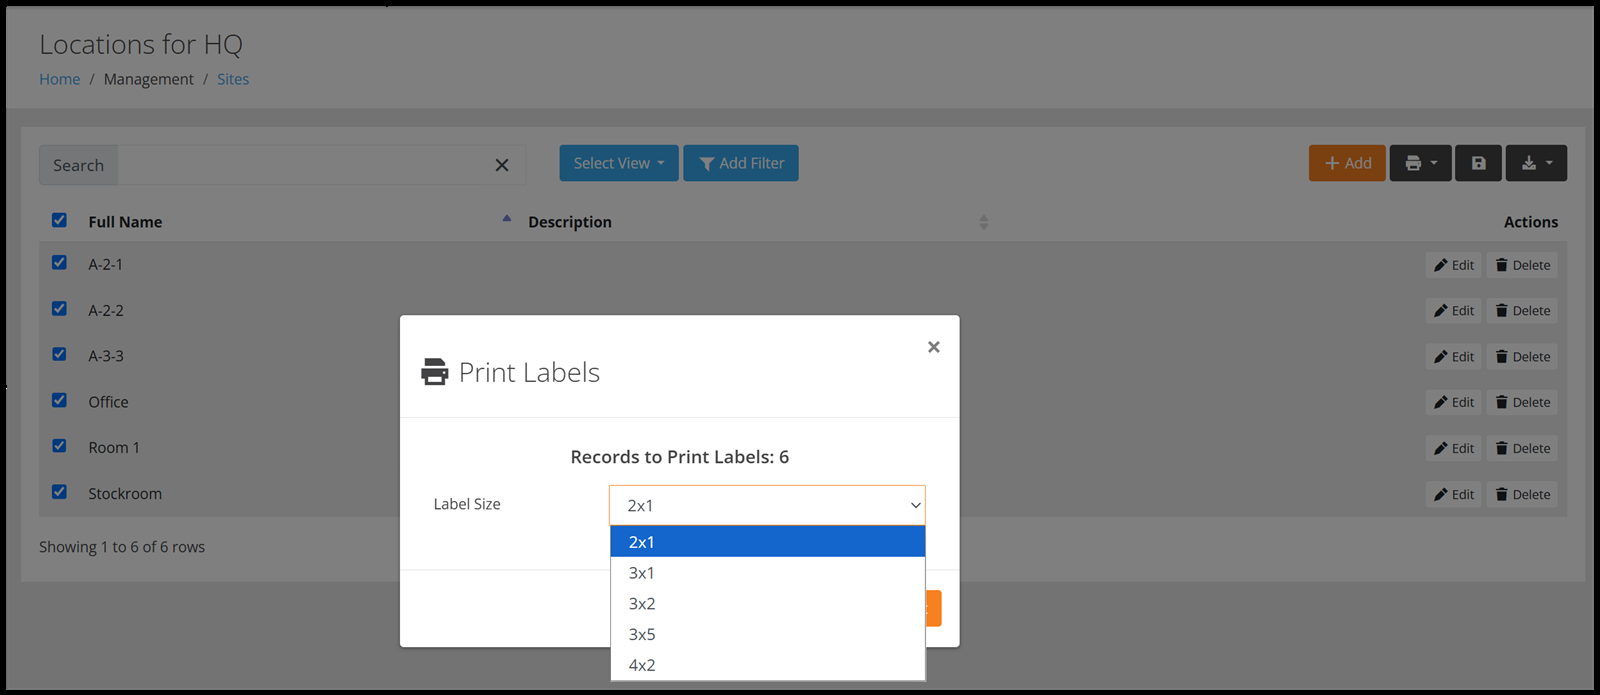
The label sizes that IntelliTrack supports are:
- 2 x 1
- 3 x 1
- 3 x 2
- 3 x 5
- 4 x 2
To print Location Labels:
Select the records to be printed as labels by marking the checkbox to the left of the Location.
- You may select all records on the page by selecting the checkbox above the grid.
- You may select individual records, by marking the individual location checkbox to the left.
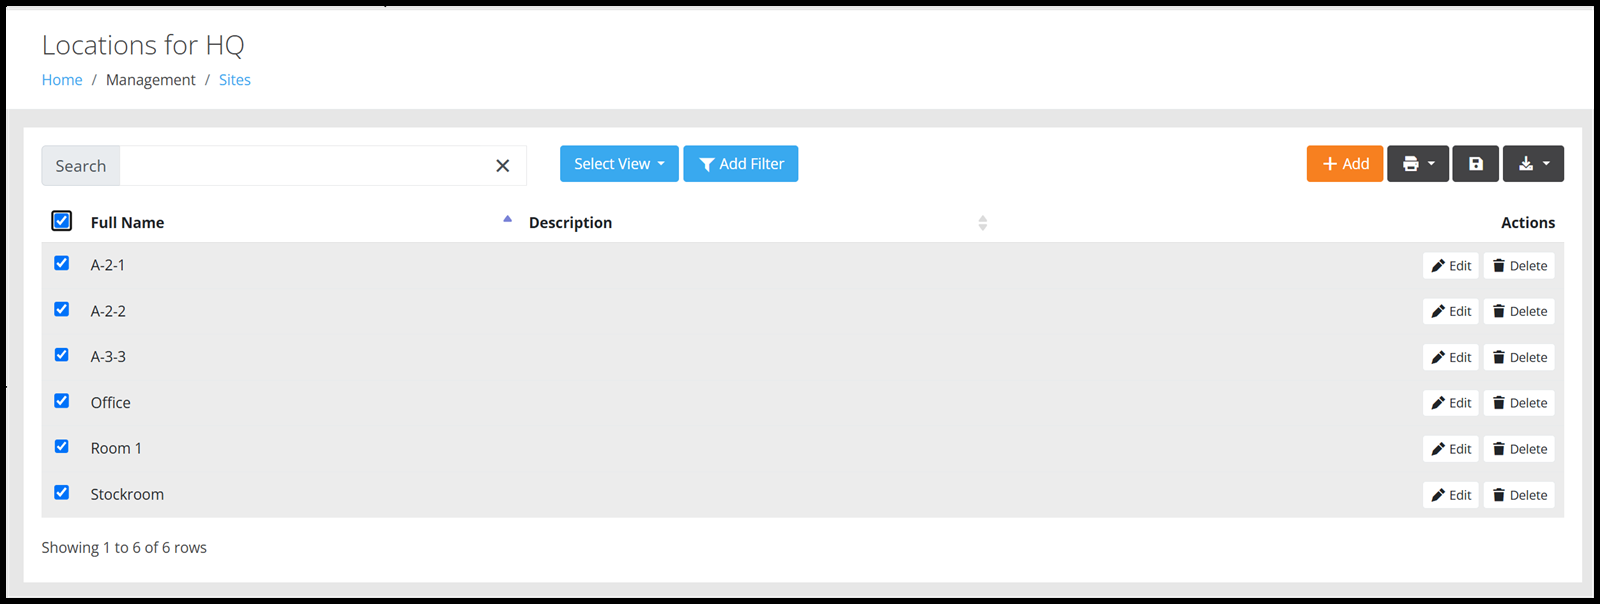
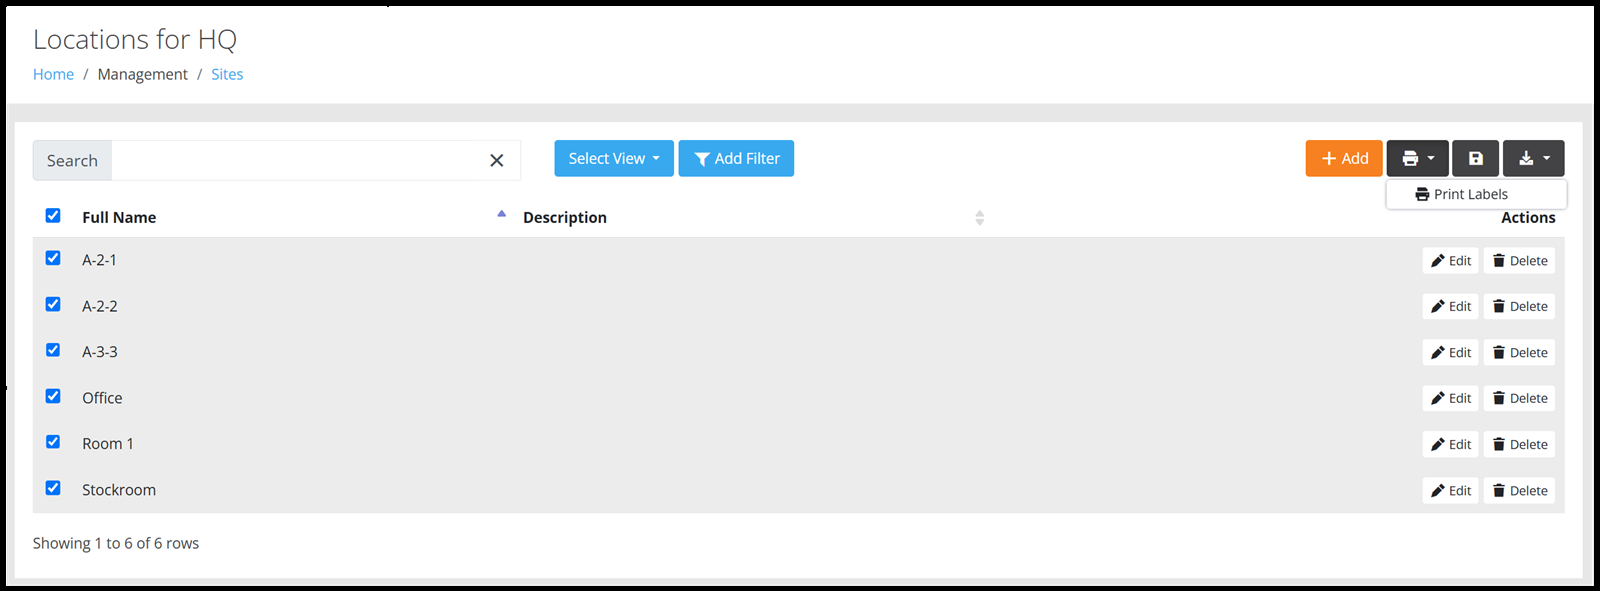
Select Bulk Changes > Print Labels.
A Print Labels popup appears. Select the label size from the options available in the Label Size drop-down list (2 x 1, 3 x 1, 3 x 2, 3 x 5, 4 x 2), and then press the Print button.
The Print window appears with a preview of the selected labels.
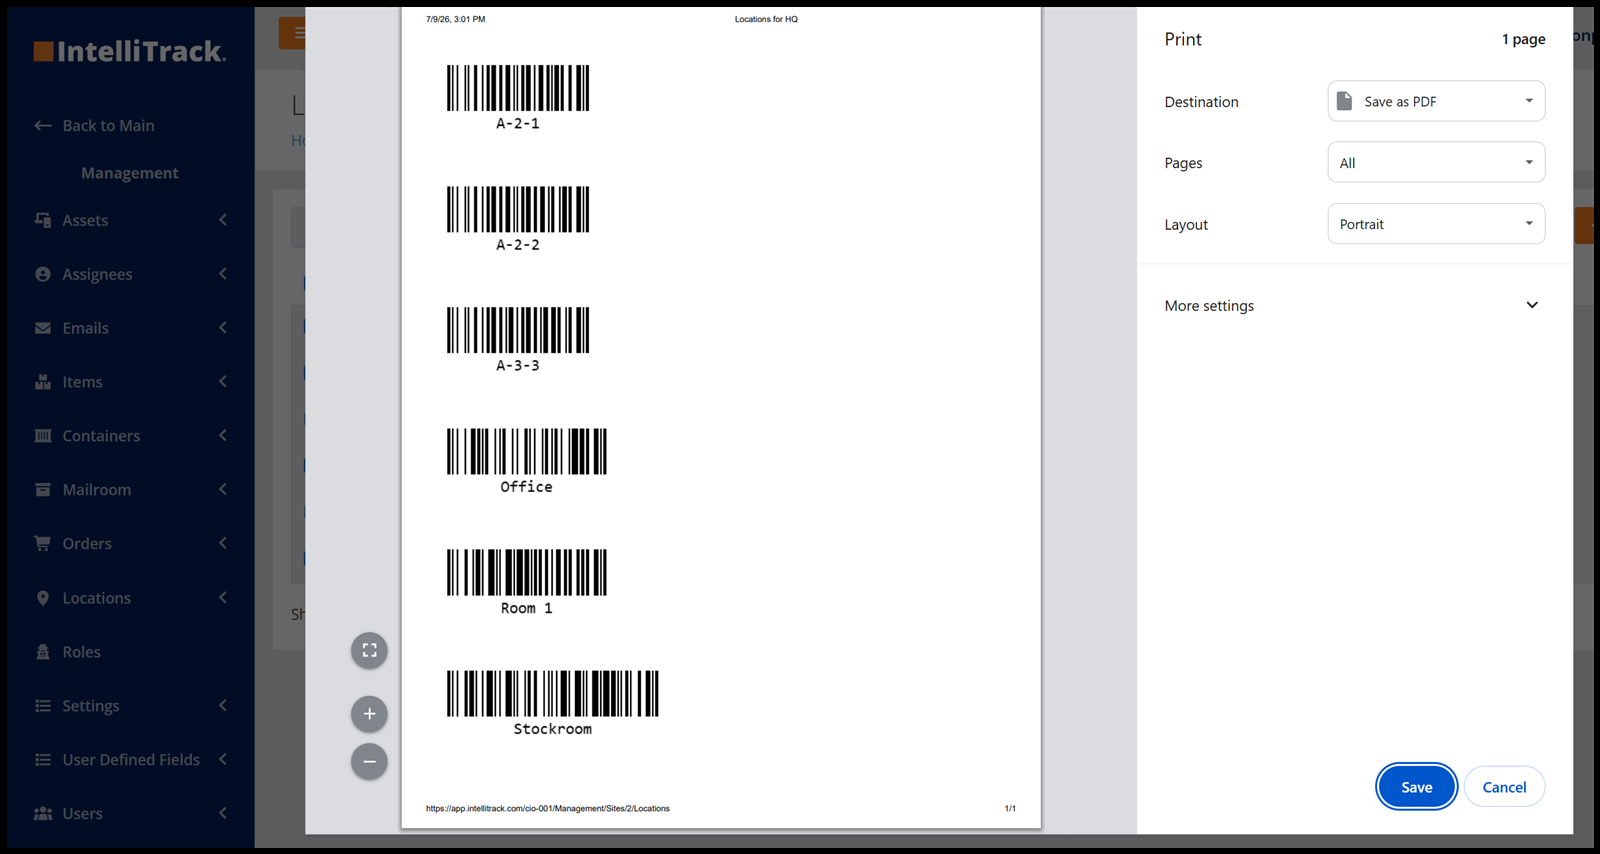
Select the Printer from the list of installed printers.
The Labels are sent to this printer and then printed.
Important
When printing labels from IntelliTrack, the thermal label printer must be set up to accommodate the corresponding label size that is selected in IntelliTrack.
Label Printer Considerations
The most common thermal label printer manufacturers that are sold by DecisionPoint Technologies are:
- Zebra: For Zebra printers, make sure that the latest Printer Drivers are installed. In addition to the printer driver: for each label format, set up a profile to configure the printer so that the specific label size and format is applied when the label is printed.
- Printronix: For Printronix printers, make sure that the latest Printer Drivers are installed. In addition to the printer driver: configure the printer so that the specific label size and format is applied when the label is printed.
Site Groups
A Site Group consists of one or more sites. Once defined, it may be assigned to a User. When a User is assigned to a Site Group the User may only view the Sites and Locations contained therein.
Note
IntelliTrack contains a default Site Group, All Sites. The All Sites group cannot be edited or deleted. It contains all Sites in the Tenant and is automatically assigned to a User when the User is added to your IntelliTrack Tenant.
Important
You may restrict the User to one Site or you may create your own Site Groups for user assignment to restrict User access to a specific group of Sites.
The list of Site Groups is found at the Site Groups page. You are able to add a new Site Group or edit a Site Group from this page. Select Management > Sites > Site Groups from the Navigation Pane to reach this page.
- Add a Site Group: click the Add button to go to the Add a Site Group page.
- Edit a Site Group: click the Edit button to go to the Edit Site Group page.
- Delete a Site Group: click the Delete button to delete a site group.
Add a Site Group
A site group is added from the Add Site Group page. To add a site group, refer to the steps below.
- Select Management > Locations > Site Groups from the Navigation Pane. The Site Groups page appears.
- Click the Add button.
- The Add Site Group page appears.
- Name field (required): enter the site group name in this field.
- Description field: enter the site group description in this field.
- Sites field: place the cursor in this field to view the sites dropdown list. Select the site or sites that are part of this site group.
- Save Changes button: press this button to save this site group. You are directed back to the Site Groups page. A message appears along the top of the page to notify you that the site group has been saved. The new site group is part of the site groups list. (If you do not want to save this site group, press the Cancel button.)
Edit a Site Group
A Site Group is edited from the Edit Site Group page. To edit a Site Group, refer to the steps below.
- Select Management > Locations > Site Groups from the Navigation Pane. The Site Groups page appears. The Site Groups in the system are listed in the page's grid.
- In the Actions column, press the Edit button for the site group that you want to edit.
- The Edit Site Group page appears for this site group.
- Name: this field may be edited.
- Description: this field may be edited.
- Sites: this field may be edited.
- Save Changes: press this button to save the changes to this site group and return to the Site Groups page. (If you do not want to save the changes, press the Cancel button or leave this page without pressing the Save Changes button.)
- At the Site Groups page, a message appears along the top of the page to tell you that changes have been saved to the site group.
Delete a Site Group
A site group may be deleted. To delete a site group, refer to the instructions that follow.
- Select Management > Locations > Site Groups from the Navigation Pane.
- The Site Groups page appears.
- Delete button: In the Actions column, select the Delete icon for the site group that you want to delete.
- A popup appears asking you to confirm deleting this site group.
- Select OK to close the popup and delete the site group. A message appears along the top of the page to notify you that this site group has been deleted.
Note
If the Site Group is in use, it cannot be deleted.
Assigning a Site Group or Site to a User
A Site or Site Group is assigned to the User at the Edit User page in the Site field or the Site Groups field. When a User is assigned to a Site or a Site Group, the User is restricted to working with site data found in the Site Group or the Site. This is used as a way to restrict the User's access to a Site or Sites within the Tenant.
In order to reach data, the User needs to have a Site assignment. By default, the User is assigned to the default All Sites group, which gives the User access to all Sites in the Tenant.
Note
A Site Group is considered to be "in use" when it is assigned to at least one User.
Default Site for the User
The User may set a default site at their User Profile page. When the User sets a Default Site, this site will be automatically selected in the Site field at certain pages and popups where the Site setting is vital; for example, such as at the Change Location popup or Set Location popup.
Important
The Default Site setting is a User setting, which means the User must set their Default Site at their User Profile page.
The User's options for the Default Site are based upon the User's Site Access, as defined in the User's record.
To set a Default Site, please refer to the steps that follow:
- Log into IntelliTrack.
- Select your Username found in the top right of each page.
- Your User Profile page appears.
- Default Site field: select the Change or Set button to the far right of this field.
- A Please Enter Password popup appears. Enter your password in the Password field.
- Press Next.
- A Change Default Site popup appears.
- In the Default Site field, press the drop-down arrow. The Sites that you are able to access appear in the list.
- Select the Site that you prefer to be your Default Site.
- Press Save.
- The popup closes and you are returned to your User Profile page.
- The Default Site field now shows the Site that you selected to be the Default Site.
- Please log out and log back into the application for the default site change to take effect.
- When you perform certain transactions that involve the Site setting, your Default Site will automatically appear in the Site field. This applies to both the Desktop application and the Mobile application.