Appearance
IntelliTrack Q4 2025 Release Notes
Released: December 2025
Quarterly release introducing three major features - 42Gears MDM integration, the Triage RMA workflow, and the RMA Tracker - along with new features, improvements, and fixes for the general platform, Container Enhancements, CheckMy Mobile, VeriMy Web, and the IT Assets, Rotational Assets, and Consumable Inventory bundles.
42Gears MDM Integration
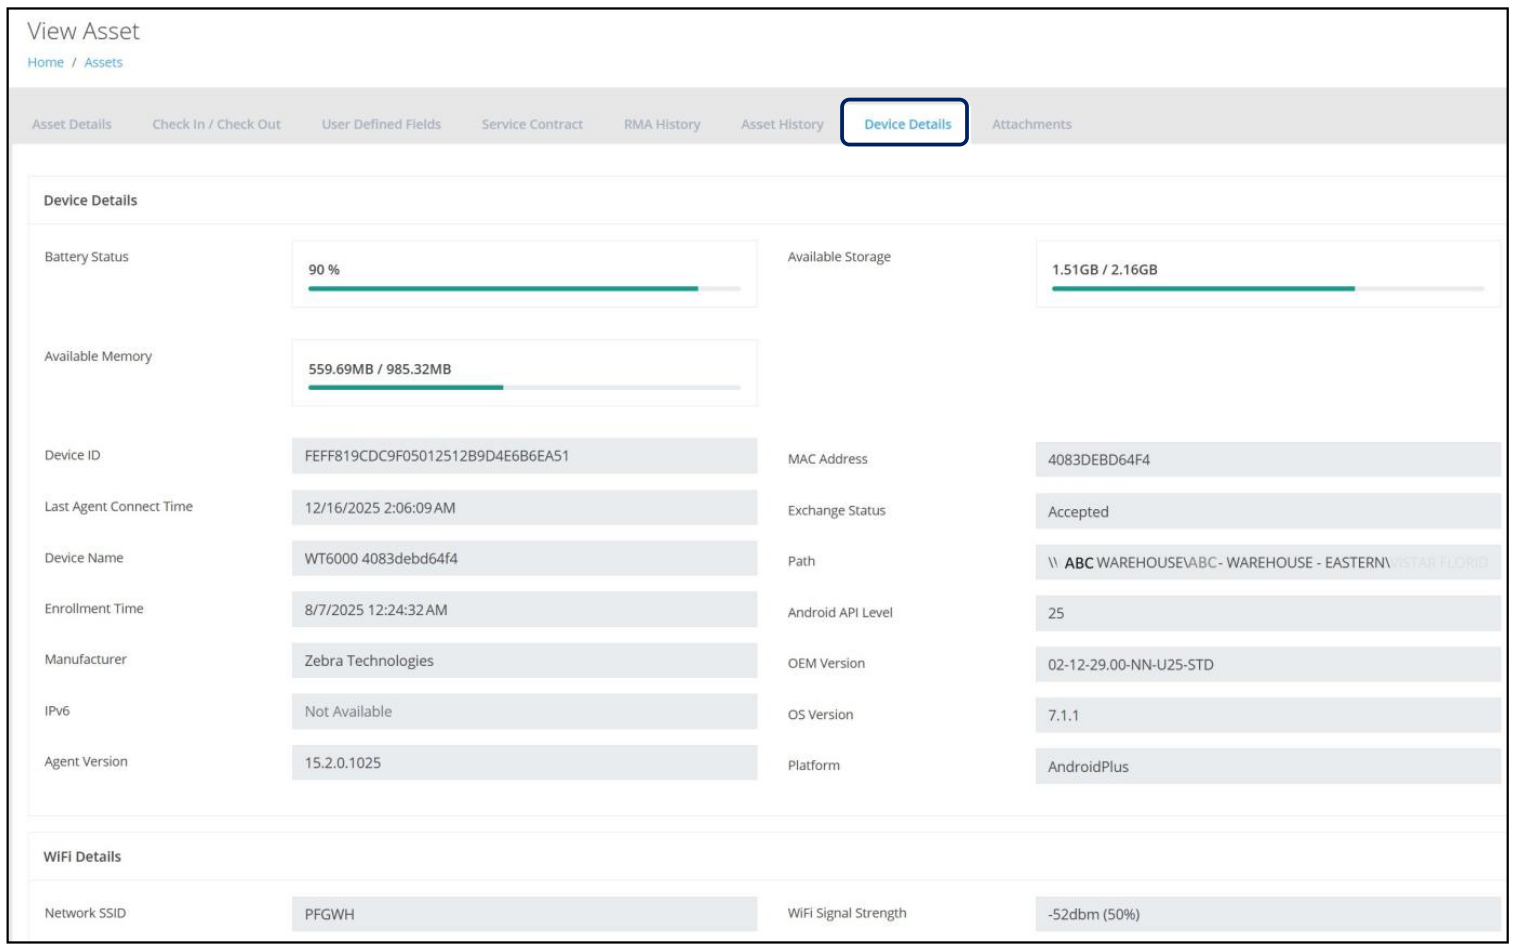
IntelliTrack's integration with 42Gears SureMDM has been implemented. This new feature provides for a nightly sync of Location and Device Details, which will establish 42Gears as the system of record. Real-time lookup of 42Gears device information is displayed at the Assets Device Details tab, shown below.
Triage RMA Workflow
A new RMA Workflow has been implemented that provides for a damaged device to be shipped to a DecisionPoint Center of Excellence for evaluation. This evaluation will determine if the device is:
Sent back to the customer.
or
Requires shipment to the OEM for repair.
In addition, this workflow supports both Standard as well as Advance Replacements.
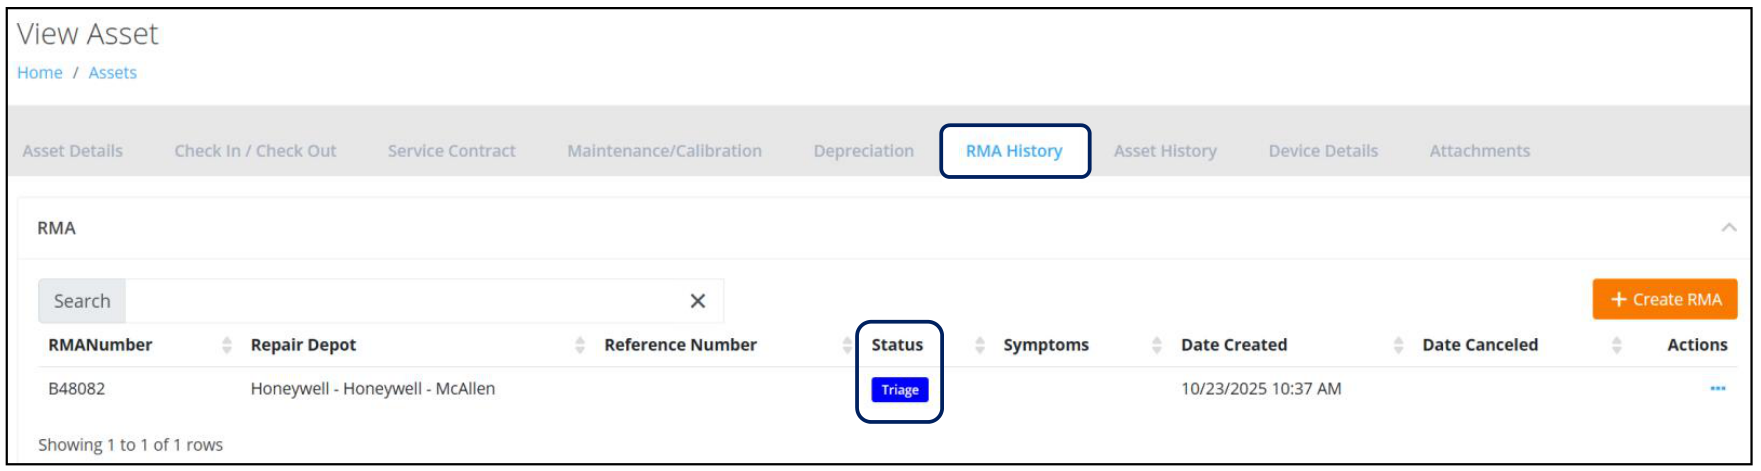
When a repair request is created for an Item Number that has been identified as requiring a "Triage" RMA, the Status will be displayed on the RMA History tab.
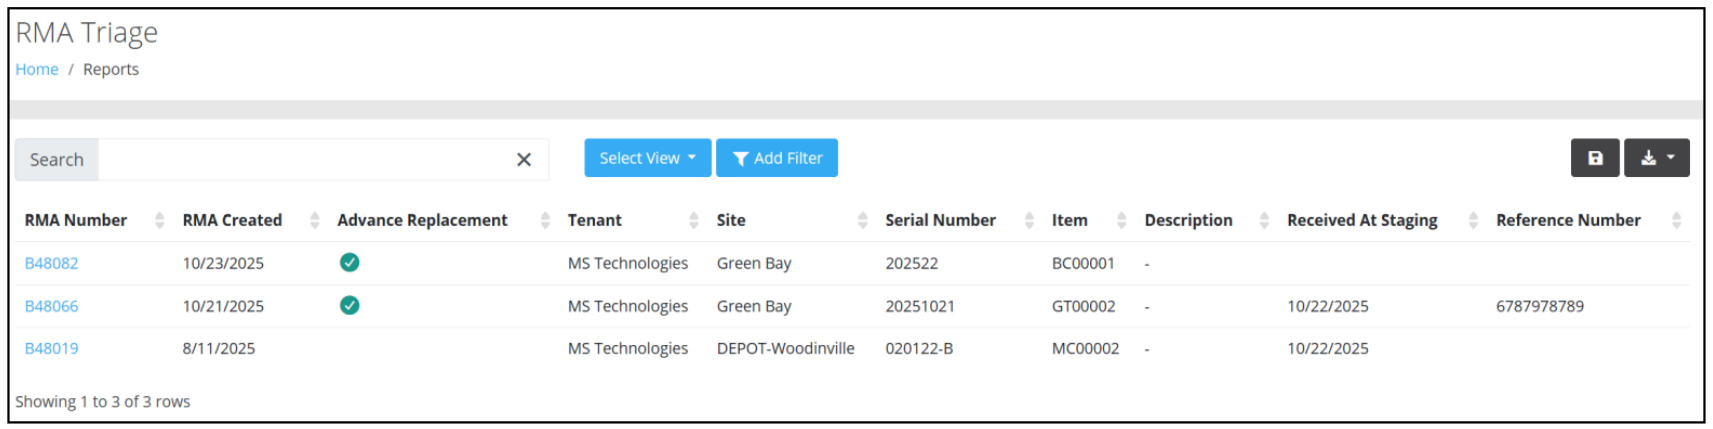
To support this new workflow, a new Triage RMA Summary Report has been developed, as seen below. This will ensure that Triage RMAs can be monitored independently from standard RMAs.
RMA Tracker
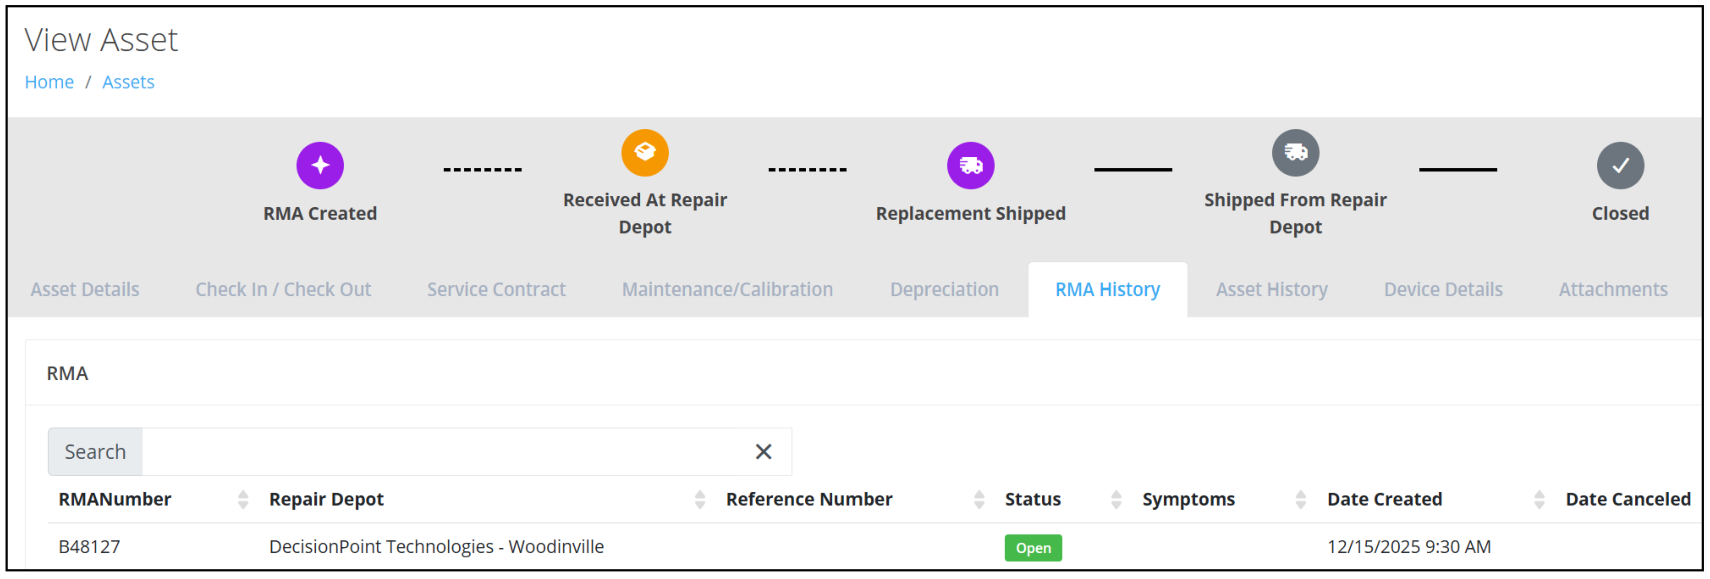
Users can now see the progress of a repair thanks to the newly implemented "RMA Tracker". This feature, as seen in the following screenshot, can be found at the top of the Asset Details page as well as on each tab. It will be displayed for the duration of the repair process and for a designated number of days after the repair has been completed and the RMA Closed.
This visibility will allow Users to follow the RMA from start to finish.
General Platform
Improvements
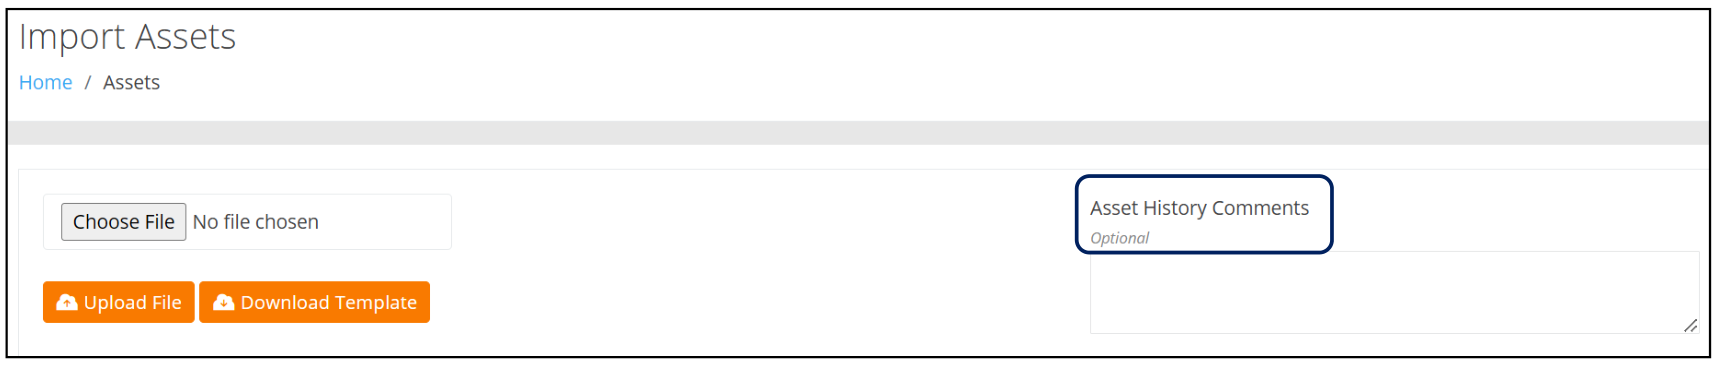
A new "Optional" Asset History Comments field has been added to the Import Assets page. This comment will be included on the Asset History tab as a Transactional Comment for all Imported Assets.
The order of the Country fields has been modified to move the United States and Canada to the top of the Country dropdown list.
On the Login page, the Enter key can now be used to login vs. clicking on the Login button.
When an Asset that has VeriMy Enabled is Retired, it will now automatically be set to VeriMy Disabled.
Fixed
- When adding a filter on the View Asset > Asset History tab, the Query field no longer defaults to "Equals".
IT Assets Bundle
Fixed
- The Assets column found on the Service Contracts page is now contained in an export of the data.
- The FedEx Tracking Number hyperlink for a Zebra "Shipped from Repair Depot" event no longer launches the UPS website.
Container Enhancements
New Features
A Managed Columns option has been added on the Containers page. This allows for optional fields to be added or removed from the page. The following field selections are now available:
- Container Number*
- Container Type
- Site*
- Location*
- Comments
- Create Date
* Denotes required fields that cannot be removed via the Manage Columns option.
For Tenants that have the Rotational Assets bundle, three additional fields can now be found under the Manage Columns options. They are:
- Check Out Assignee
- Note: This includes both the Assignee ID and the Assignee Name.
- Check Out Date/Time
- Due Back Date/Time
In addition, the Add Filter function contains four additional options:
- Check Out Assignee
- Check Out Date/Time
- Checked Out
- Due Back Date/Time
- Check Out Assignee
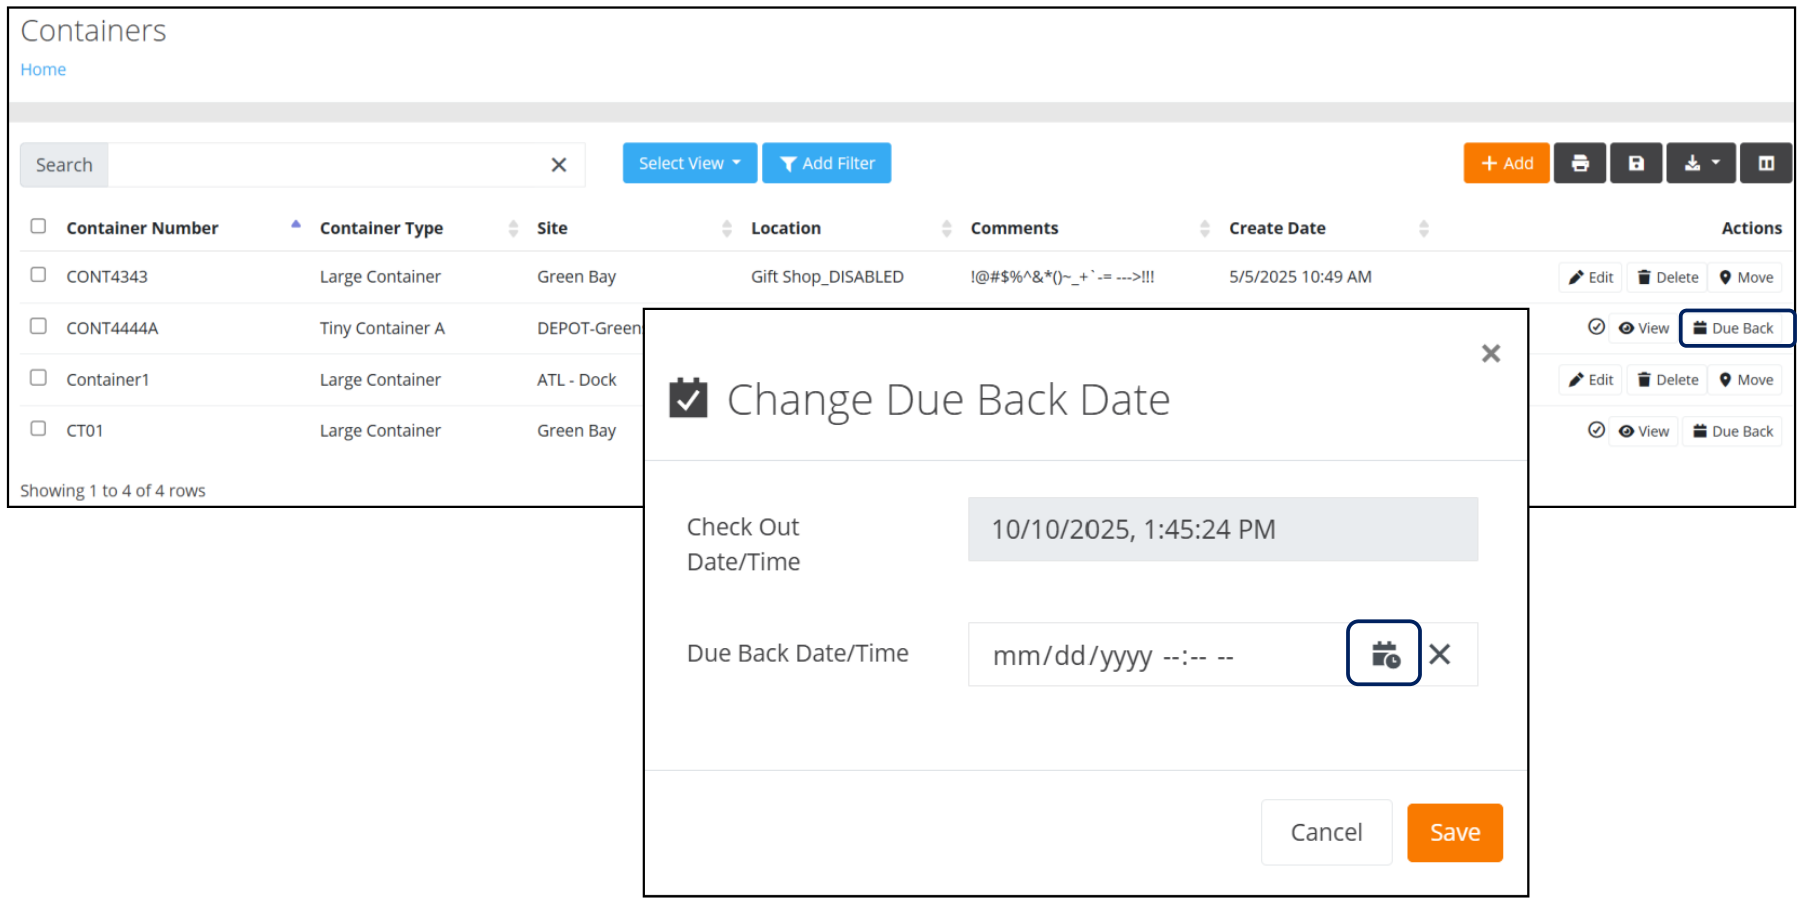
Users can now change the Due Back Date of a Checked Out Container. This functionality can be found on the Containers page under the Actions column, as seen below.
Upon clicking on Due Back, the "Change Due Back Date" popup appears, which will allow the selection of another Date/Time using the Date/Time Picker or by entering a new Date/Time.
Note: The Check Out Date/Time field in the popup is read-only.
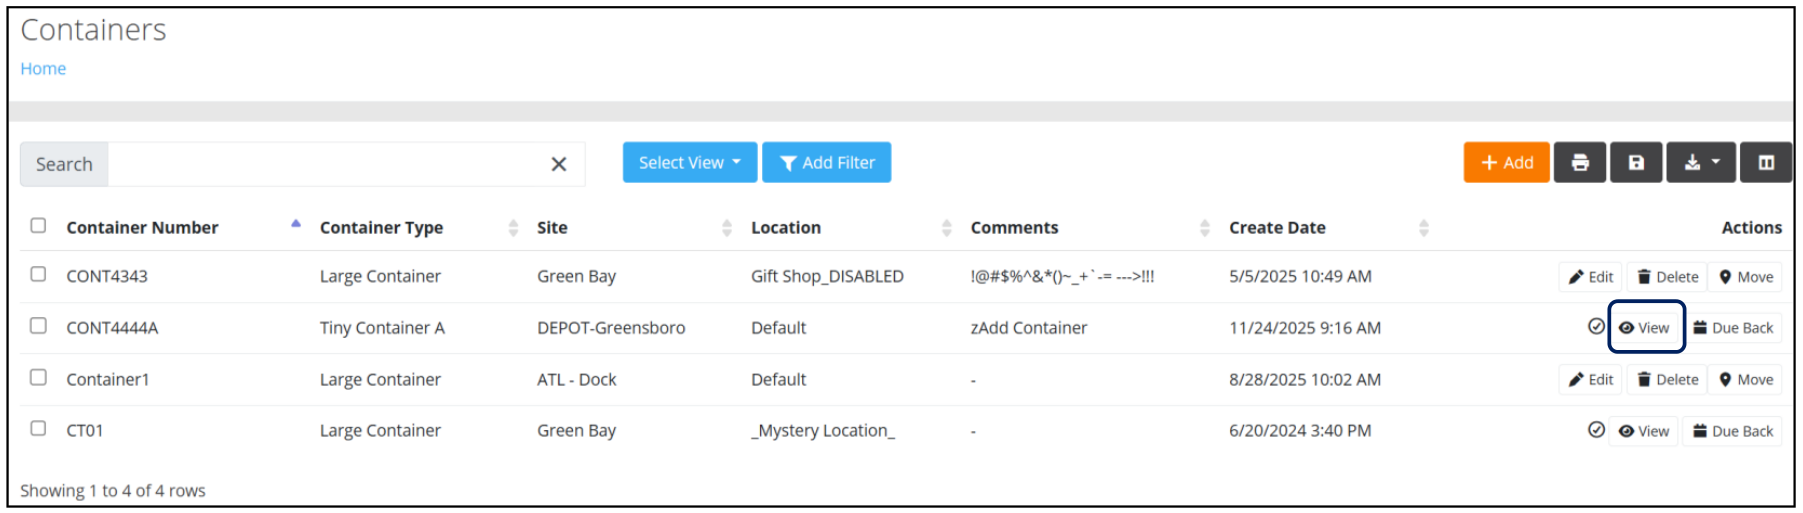
Also under the Actions column on the Containers page is a View option, which will enable Users to view information about a Checked Out Container.
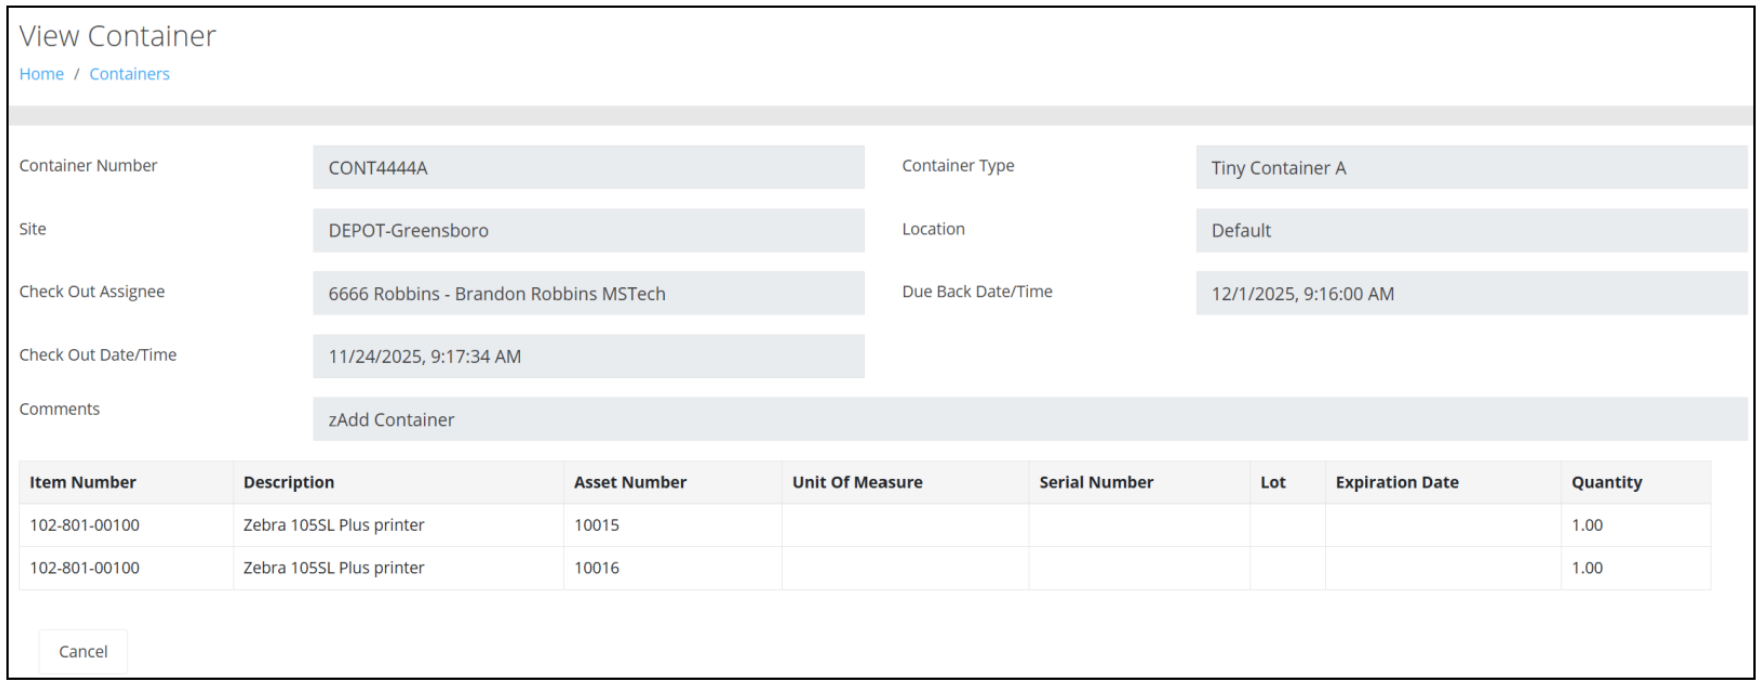
After clicking on the View icon, the View Container page, which is read-only, will be displayed.
Users can perform a Container Check In as well as a Container Check Out using the Web application; however, the following restrictions apply:
- An empty Container cannot be checked out.
- A Container that has already been checked out cannot be checked out again.
An Asset that is found in a Checked Out Container cannot be moved.
A Container that is found in a Disabled Location cannot be checked in. To resolve, the User must assign an Enabled Location before checking in the container.
Fixed
- When performing an Edit of a Container, the proper Validation Message is now displayed upon pressing Save.
CheckMy Mobile
Fixed
- Lengthy Asset numbers no longer push divider lines beyond visibility.
VeriMy Web
New Features
- Users can now monitor the list of all Assets that have VeriMy Enabled via the following two options:
By creating a new Widget from the Insights > VeriMy Enabled Statistics Data Source.
or
By adding the VeriMy Enabled field to the Assets > Assets page via the Manage Columns feature.
Fixed
- An Asset that is VeriMy Enabled in a Tenant cannot be enabled in another Tenant.
- A licensed device that is Retired is now properly updated from Assigned to Available.
Rotational Assets Bundle
New Features
- All Assets and Items being checked in via the Check In page or the Check In By Assignee page must have a valid Location. If the User attempts a Check In and the Location is Disabled, a Validation Message will be generated.
Improvements
- On the Check In page, the "Asset Already Checked In" prompt now contains the value for the Asset Number.
Fixed
- The Condition field dropdown list is no longer empty for an Asset that has been added for Check Out.
- An Asset that has a space can now be successfully added to a Reservation.
- Performance has been improved on the Checked Out Assets report.
Consumable Inventory Bundle
New Features
On the Customers page, an Alert is now displayed when disabling a Customer if Open Picking Orders are found. If the User chooses to proceed, the Open Picking Orders tied to the Customer will be Closed.
On the Vendors page, an Alert is now displayed when disabling a Vendor if Open Receiving Orders are found. If the User chooses to proceed, the Open Receiving Orders tied to the Vendor will be Closed.
Users can no longer reopen a Closed Receiving Order that has a Disabled Vendor or a Closed Picking Order that has a Disabled Customer. The Open button has been removed for these orders.
The option to import Customers and Vendors is now available to Users with the role of Administrator.
The ability to Add Inventory directly from the Inventory page has been implemented.
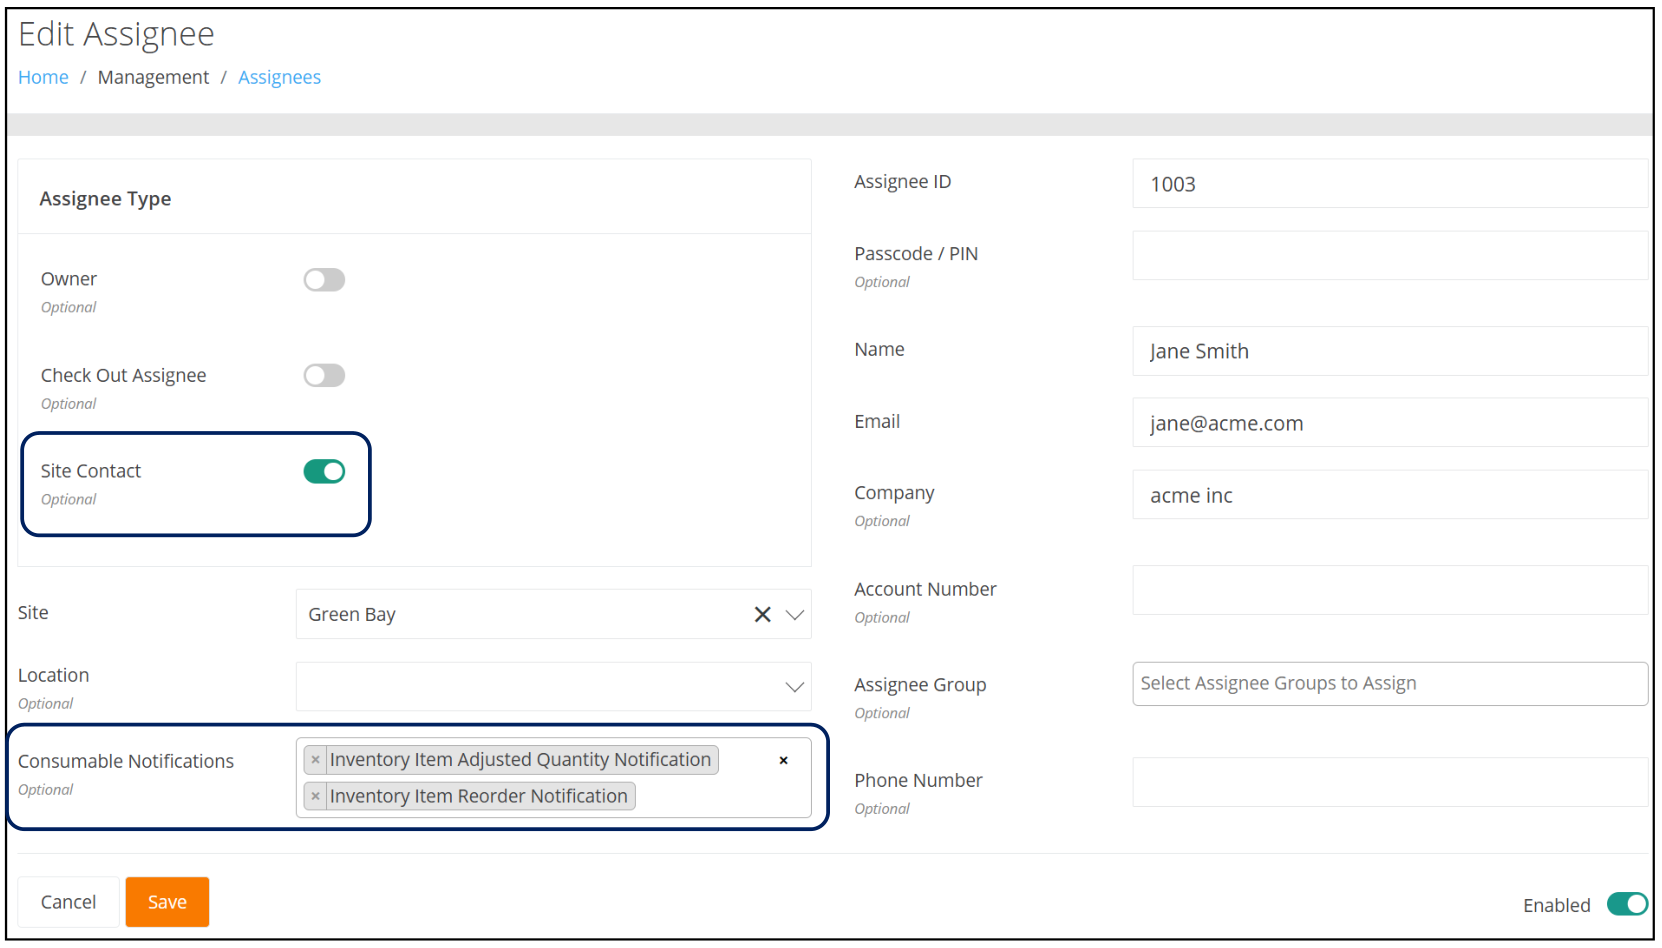
Consumable Notifications are now optional for a Site Contact. On the Add or Edit Assignee page, Administrators can now Add or Remove a Site Notification Email for a Site Contact.
The Consumable Notifications field includes the following options:
- Inventory Item Adjusted Quantity Notification: When added, this Site Contact will receive Inventory Item Adjustment Notification Emails for the Site. Access can be removed at any time via the Edit Assignee page.
- Inventory Item Reorder Notification: When added, this Site Contact will receive the Inventory Item Reorder Notification Emails for the Site. Access can be removed at any time via the Edit Assignee page.
The Packing List is now exclusively available on the Picking page (Picking Orders) and the Issues page (Issue Orders). A Packing List Columns function allows for optional fields to be added to the default Packing List.
- Note: The Packing List is no longer available on the Insights page.
The Packing List now groups all items in the order into a single line. This streamlines the Packing List output by eliminating repeated lines for the same item.
Administrators can now display their Company Logo on the printed Packing List and printed Goods Received Note. This feature is found in Management Menu > Settings > Tenant Settings > System where the logo can be uploaded using the "Company Logo - Print" option. Once the image has been selected and uploaded, the Company Logo will be placed in the upper right area of the printed output.
Fixed
- A quantity that is greater than zero but less than one, such as 0.25, is now considered a valid quantity.
- The Inventory Quantity for an Item that becomes Disabled is now adjusted to zero and removed from the Inventory Table.
- A Negative Inventory Quantity is no longer allowed on the Adjust Inventory form.
- On the Orders > Issues > Add Issue page, selecting an Item Number and/or Site no longer clears the Notes and Quantity fields. Selecting a Location no longer clears the Quantity field.
- On the Edit Receiving page, after selecting an Order, a new Line Number is now successfully created when the User selects the same Item Number for the next Line Item.
- Performing an Inventory Bulk Move (Inventory > Bulk Changes > Change Location) from a Disabled Site/Location is allowed; however, moving Assets to a Site/Location that is Disabled is not allowed.